Curare: A Customizable and Reproducible Analysis Pipeline for RNA-Seq Experiments

Project description


Curare - A Customizable and Reproducible Analysis Pipeline for RNA-Seq Experiments
Contents
Description
Curare is a freely available analysis pipeline for reproducible, high-throughput RNA-Seq experiments. Define standardized pipelines customized for your specific workflow without the necessity of installing all the tools by yourself.
Curare is implemented in Python and uses the power of Snakemake and Conda to build and execute the defined workflows. Its modularized structure and the simplicity of Snakemake enables developers to create new and advanced workflow steps.
Features
Curare was developed to simplify the automized execution of RNA-Seq workflows on large datasets. Each workflow can be divided into four steps: Preprocessing, Premapping, Mapping, and Analysis.
Available modules
- Preprocessing
- Trim-Galore
- Fastp
- Premapping
- FastQC
- MultiQC
- Mapping
- Bowtie
- Bowtie2
- BWA-Backtrack
- BWA-MEM
- BWA-MEM2
- BWA-SW
- Minimap2
- Segemehl
- Star
- Analysis
- Count Table (FeatureCounts)
- DGE Analysis (DESeq2)
- Normalized Coverage
Results Report
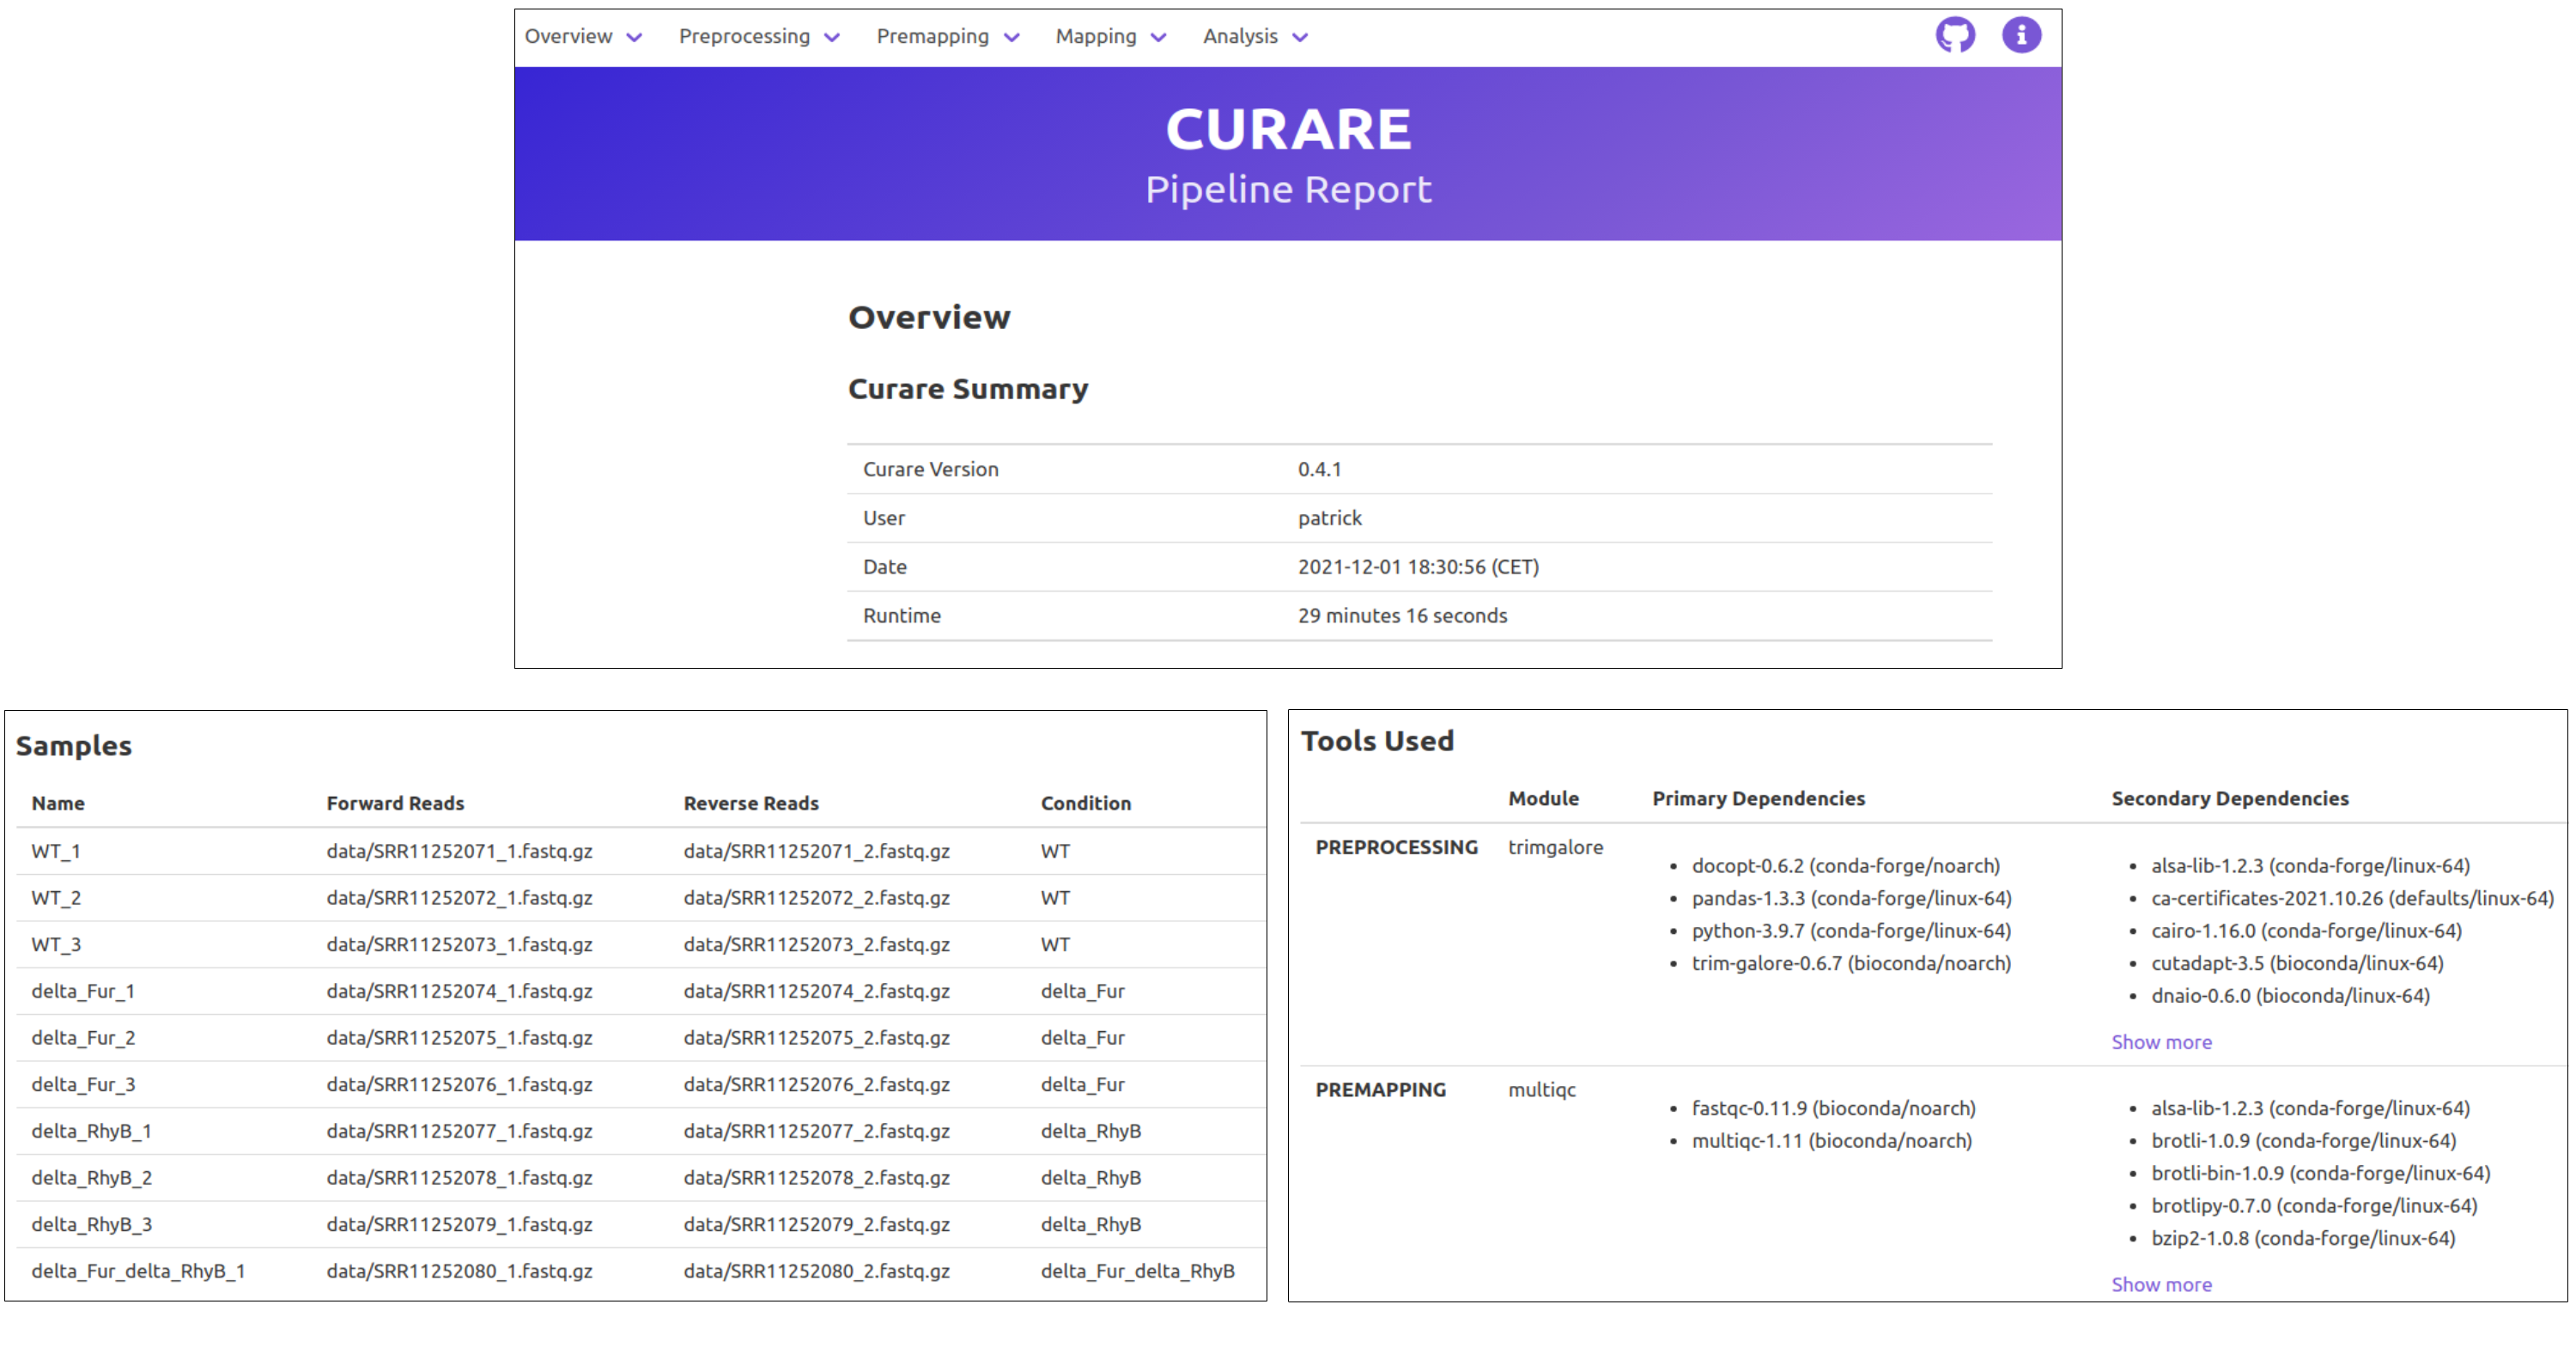
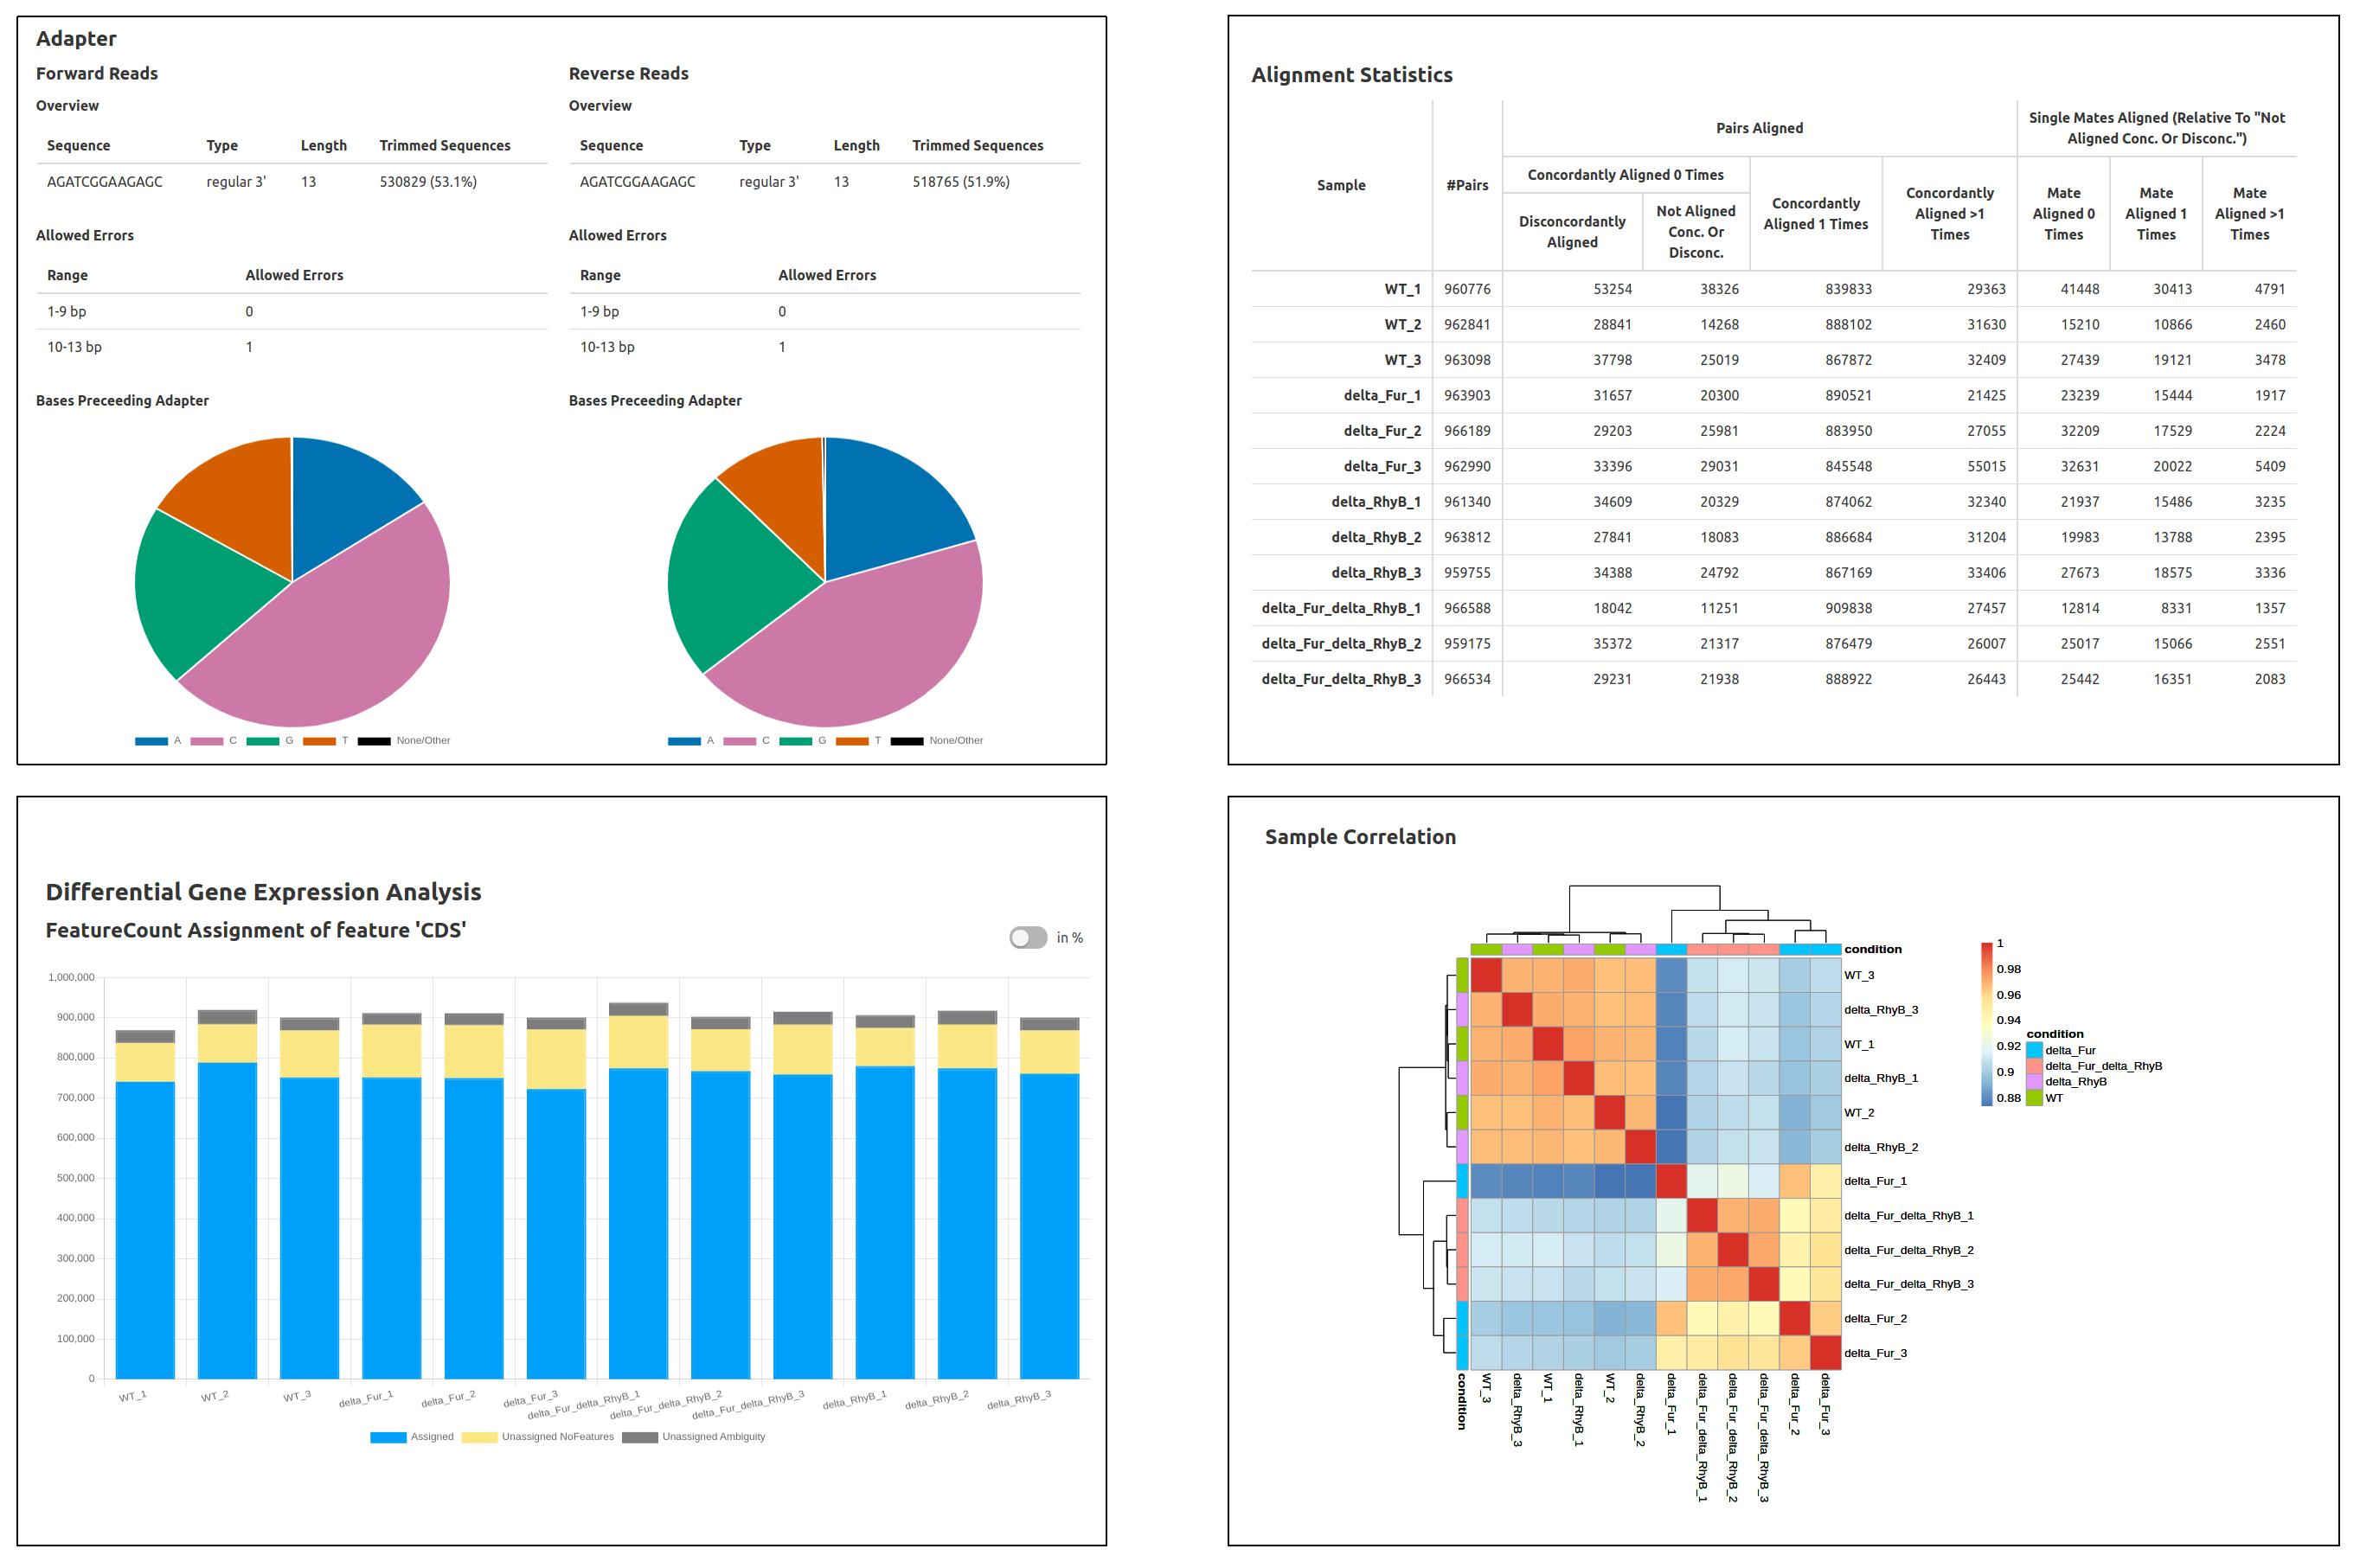
At the end of a Curare run, you will also get an HTML report containing the most important results and an overview of all used settings. The start page will include Curare statistics, the runtime of this analysis, sample descriptions, and all dependencies of the tools used in this pipeline. From the navigation bar at the top, you can then navigate to the specific reports of each module with detailed charts and many statistics. (Images created with Curare using the data from: Banerjee R et al., "Tailoring a Global Iron Regulon to a Uropathogen.", mBio, 2020 Mar 24;11(2))
Usage
Installation
It is recommended to use mamba for installing curare with all dependencies. Please notice that the channels bioconda and conda-forge are required for installing Curare correctly.
mamba create -n curare -c conda-forge -c bioconda curare
conda activate curare
curare --help
Alternatively, you can install Curare via GitHub release and install all dependencies in conda_environment.yaml manually.
mamba env create -n curare -f /path/to/Curare/conda_environment.yaml
conda activate curare
bin/curare --help
If you want to run Curare completely without Conda, you would also need to install the dependencies of all used Curare modules. You can find the dependencies of every module at curare/snakefiles/<module_category>/<module>/lib/conda_env.yaml. To omit the usage of conda/mamba, use the --no-conda option when starting Curare.
If you want to test Curare, you can download our example dataset with a pre-built configuration.
Creating a pipeline
The easiest way to create a new pipeline is by using the Curare wizard. It will guide through all steps, asks what module you wish to use and creates the two necessary files (samples.tsv and pipeline.yml). These files can then be edited with a standard file editor for customizing your data and analysis.
# Current working directory is inside of tool directory
curare_wizard --samples target_directory/samples.tsv --pipeline target_directory/pipeline.yml
Samples File
The samples file (samples.tsv) is a tab-separated file collecting all necessary information about the used biological samples. This includes a unique identifier (name), a file path to the sequencing data (forward_reads/reverse reads on paired-end data, reads on single-end data), and depending on used modules further information like the condition. Every line starting with a # is a comment line and will be ignored by Curare. These lines are just helpful information for correctly writing this file.
Name column: A unique identifier used throughout the whole pipeline for this sample. To prevent any side-effects on the file system or in the used scripts, only alphanumerical characters and '_' are allowed for sample names.
Reads columns: Here, you define the file path to the responding sequencing data. For paired-end datasets, two columns must be set (forward_reads and reverse_reads), for single-end data only one column (reads). The file path can either be a relative path (relative to this file) or an absolute path (starting with '/').
Additional columns: Every selected module can define additional columns. The Curare wizard automatically creates a samples.tsv containing all required columns. So just fill out all open fields in the generated file, and everything will work. You can find a description of all additional columns in the header of the created file.
Example
# name: Unique sample name. Only use alphanumeric characters and '_'. [Value Type: String]
# forward_reads: File path to fastq file containing forward reads. Either as an absolute path or relative to this file. [Value Type: Path]
# reverse_reads: File path to fastq file containing reverse reads. Either as an absolute path or relative to this file. [Value Type: Path]
# condition: Condition name of the sequencing run. May contain [A-Z, a-z, 0-9, _;!@^(),.[]-, Whitespace]. [Value Type: String]

name    forward_reads   reverse_reads   condition
wt_1    data/wt_1_R1.fastq  data/wt_1_R2.fastq  WT
wt_2    data/wt_2_R1.fastq  data/wt_2_R2.fastq  WT
wt_3    data/wt_3_R1.fastq  data/wt_3_R2.fastq  WT
heat_1  data/wt_1_R1.fastq  data/wt_1_R2.fastq  Heat
heat_2  data/wt_2_R1.fastq  data/wt_2_R2.fastq  Heat
heat_3  data/wt_3_R1.fastq  data/wt_3_R2.fastq  Heat
starvation_1    data/wt_1_R1.fastq  data/wt_1_R2.fastq  Starvation
starvation_2    data/wt_2_R1.fastq  data/wt_2_R2.fastq  Starvation
starvation_3    data/wt_3_R1.fastq  data/wt_3_R2.fastq  Starvation
Pipeline File
The pipeline file (pipeline.yml) defines the used modules and their parameters in the newly created workflow. As a typical YAML file, everything is structured in categories. There are categories for each workflow step (preprocessing, premapping, mapping, and analysis) and the main category for the whole pipeline (pipeline). Each of the four workflow categories has a parameter modules defining the used modules in this step. Since many modules need additional information, like a file path to the reference genome or a quality threshold, modules have their own block in their category for specifying these values.
One differentiates between mandatory and optional settings. Mandatory settings follow the structure gff_feature_type: <Insert Config Here>. It is necessary to replace <Insert Config Here> with a real value, e.g. "CDS" (like in the samples.tsv, the file path can either be relative to this file or absolute). Optional settings are commented out with a single #. For using other values than the default value, just remove the # and write your parameter after the colon.
Example
## Curare Pipeline File
## This is an automatically created pipeline file for Curare.
## All required parameters must be set (replace <Insert Config Here> with real value).
## All optional parameters are commented out with a single '#'. For including these parameters, just remove the '#'.

pipeline:
  paired_end: true

preprocessing:
  modules: ["trimgalore"]

  trimgalore:
    ## Choose phred33 (Sanger/Illumina 1.9+ encoding) or phred64 (Illumina 1.5 encoding). [Value Type: Enum]
    #phred_score_type: "--phred33"

    ## Trim low-quality ends from reads in addition to adapter removal. (Default: 20). [Value Type: Number]
    #quality_threshold: "20"

    ## Discard reads that became shorter than length INT because of either quality or adapter trimming. (Default: 20). [Value Type: Number]
    #min_length: "20"

    ## Additional options to use in shell command. [Value Type: String]
    #additional_parameter: ""

    ## Adapter sequence to be trimmed. If not specified explicitly, Trim Galore will try to auto-detect whether the Illumina universal, Nextera transposase, or Illumina small RNA adapter sequence was used. [Value Type: String]
    #adapter_forward: ""

    ## adapter sequence to be trimmed off read 2 of paired-end files. [Value Type: String]
    #adapter_reverse: ""


premapping:
  modules: ["multiqc"]

mapping:
  modules: ["bowtie2"]

  bowtie2:
    ## Path to reference genome fasta file. [Value Type: File_input]
    genome_fasta: <Insert Config Here>

    ## Choose local or end-to-end alignment. [Value Type: Enum]
    ## Enum choices: "local", "end-to-end"
    alignment_type: <Insert Config Here>

    ## Additional options to use in shell command. [Value Type: String]
    #additional_bowtie2_options: ""


analysis:
  modules: ["dge_analysis"]

  dge_analysis:
    ## Used feature type, e.g. gene or exon. [Value Type: String]
    gff_feature_type: <Insert Config Here>

    ## Descriptor for gene name, e.g. ID or gene_id. [Value Type: String]
    gff_feature_name: <Insert Config Here>

    ## File path to gff file. [Value Type: File_input]
    gff_path: <Insert Config Here>

    ## Additional options to use in shell command. [Value Type: String]
    #additional_featcounts_options: ""

    ## Strand specificity of reads. Specifies if reads must lie on the same strand as the feature, the opposite strand, or can be on both. Options: "unstranded, stranded, reversely_stranded"
    #strand_specificity: "unstranded"

    ## GFF attributes to show in the beginning of the xlsx summary (Comma-separated list, e.g. "experiment, product, Dbxref"). [Value Type: String]
    #attribute_columns: ""
Filled pipeline file
## Curare Pipeline File
## This is an automatically created pipeline file for Curare.
## All required parameters must be set (replace <Insert Config Here> with real value).
## All optional parameters are commented out with a single '#'. For including these parameters, just remove the '#'.

pipeline:
  paired_end: true

preprocessing:
  modules: ["trimgalore"]

  trimgalore:
    ## Choose phred33 (Sanger/Illumina 1.9+ encoding) or phred64 (Illumina 1.5 encoding). [Value Type: Enum]
    phred_score_type: "--phred64"

    ## Trim low-quality ends from reads in addition to adapter removal. (Default: 20). [Value Type: Number]
    quality_threshold: "35"

    ## Discard reads that became shorter than length INT because of either quality or adapter trimming. (Default: 20). [Value Type: Number]
    #min_length: "20"

    ## Additional options to use in shell command. [Value Type: String]
    #additional_parameter: ""

    ## Adapter sequence to be trimmed. If not specified explicitly, Trim Galore will try to auto-detect whether the Illumina universal, Nextera transposase, or Illumina small RNA adapter sequence was used. [Value Type: String]
    #adapter_forward: ""

    ## adapter sequence to be trimmed off read 2 of paired-end files. [Value Type: String]
    #adapter_reverse: ""


premapping:
  modules: ["multiqc"]

mapping:
  modules: ["bowtie2"]

  bowtie2:
    ## Path to reference genome fasta file. [Value Type: File_input]
    genome_fasta: "reference/my_genome.fasta"

    ## Choose local or end-to-end alignment. [Value Type: Enum]
    ## Enum choices: "local", "end-to-end"
    alignment_type: "end-to-end"

    ## Additional options to use in shell command. [Value Type: String]
    #additional_bowtie2_options: ""


analysis:
  modules: ["dge_analysis"]

  dge_analysis:
    ## Used feature type, e.g. gene or exon. [Value Type: String]
    gff_feature_type: "CDS"

    ## Descriptor for gene name, e.g. ID or gene_id. [Value Type: String]
    gff_feature_name: "ID"

    ## File path to gff file. [Value Type: File_input]
    gff_path: "reference/my_genome.gff"

    ## Additional options to use in shell command. [Value Type: String]
    #additional_featcounts_options: ""

    ## Strand specificity of reads. Specifies if reads must lie on the same strand as the feature, the opposite strand, or can be on both. Options: "unstranded, stranded, reversely_stranded"
    strand_specificity: "reversely_stranded"

    ## GFF attributes to show in the beginning of the xlsx summary (Comma-separated list, e.g. "experiment, product, Dbxref"). [Value Type: String]
    #attribute_columns: ""
Starting Curare
Curare can be started with this command:
# Current working directory inside of root tool directory
cd curare
conda activate curare
curare --samples <target_directory>/samples.tsv --pipeline <target_directory>/pipeline.yml --output <results_directory>
All results, including the conda environments and a final report, will be written in results_directory.
Results
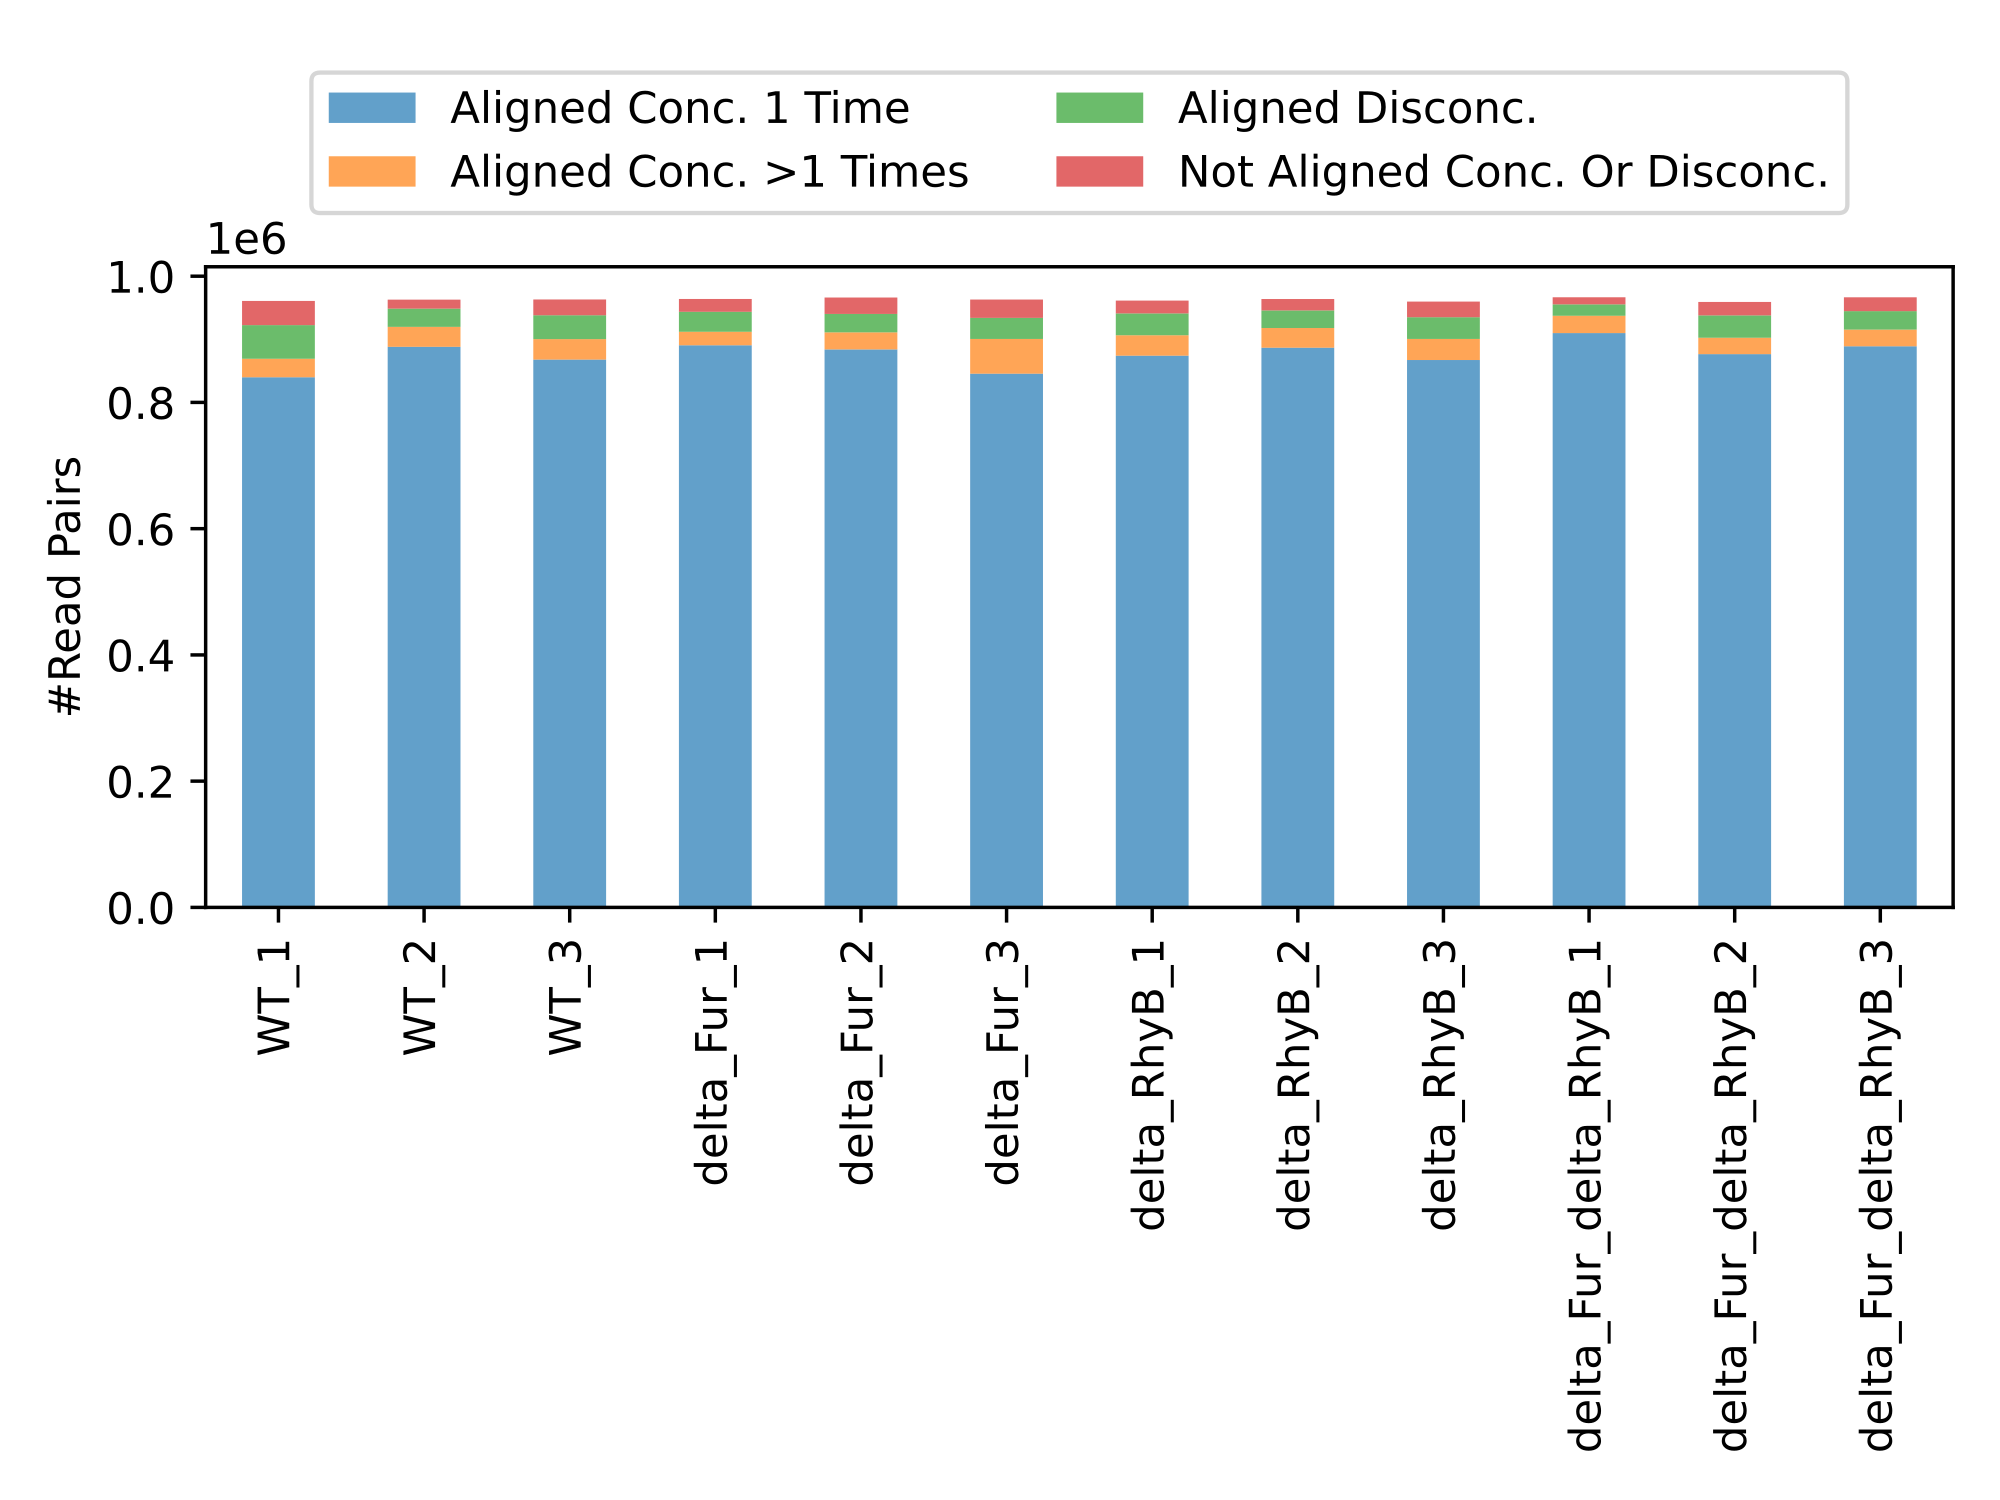
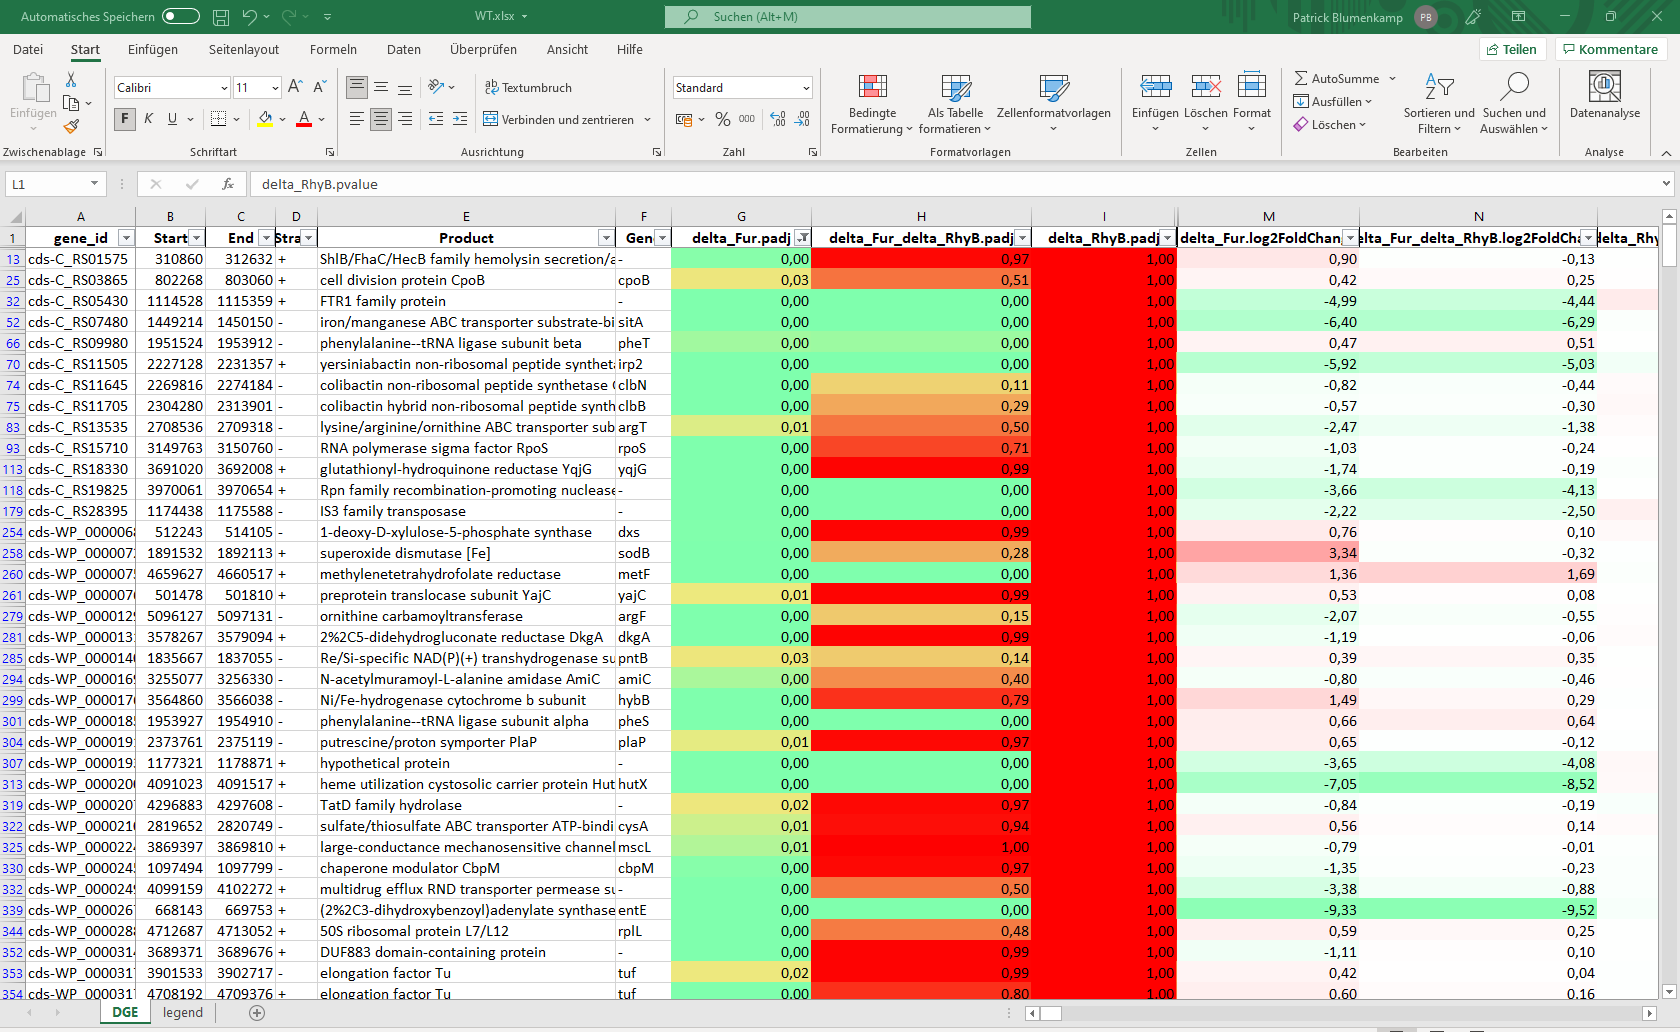
Curare structures all the results by categories and modules. This way each module can create their own structure and is independent from all other modules. For example, the mapping modules generates multiple bam files with various flag filters like unmapped or concordant reads and the differential gene expression module builds large excel files with the most important values and an R object to continue the analysis on your own. (Images: Bowtie2 mapping chart and DESeq2 summary table )
Availability
Available at Bioconda: https://bioconda.github.io/recipes/curare/README.html
Available at PyPI: https://pypi.org/project/Curare/
Example dataset: curare-user-testcase.zip
Citation
In preparation.
FAQ
- How can I use Curare? Usage
- Contact and support: curare@computational.bio.uni-giessen.de
- Issues: Bugs and issues can be filed here


Download files
Download the file for your platform. If you're not sure which to choose, learn more about installing packages.


