Package providing torch-based numerical integration methods.

Project description
torchquad


High-performance numerical integration on the GPU with PyTorch, JAX and Tensorflow
Explore the docs »
Report Bug
·
Request Feature
Table of Contents
About The Project
The torchquad module allows utilizing GPUs for efficient numerical integration with PyTorch and other numerical Python3 modules. The software is free to use and is designed for the machine learning community and research groups focusing on topics requiring high-dimensional integration.
Built With
This project is built with the following packages:
- autoray, which means the implemented quadrature supports NumPy and can be used for machine learning with modules such as PyTorch, JAX and Tensorflow, where it is fully differentiable
- conda, which will take care of all requirements for you
If torchquad proves useful to you, please consider citing the accompanying paper.
Goals
- Supporting science: Multidimensional numerical integration is needed in many fields, such as physics (from particle physics to astrophysics), in applied finance, in medical statistics, and others. torchquad aims to assist research groups in such fields, as well as the general machine learning community.
- Withstanding the curse of dimensionality: The curse of dimensionality makes deterministic methods in particular, but also stochastic ones, computationally expensive when the dimensionality increases. However, many integration methods are embarrassingly parallel, which means they can strongly benefit from GPU parallelization. The curse of dimensionality still applies but the improved scaling alleviates the computational impact.
- Delivering a convenient and functional tool: torchquad is built with autoray, which means it is fully differentiable if the user chooses, for example, PyTorch as the numerical backend. Furthermore, the library of available and upcoming methods in torchquad offers high-effeciency integration for any need.
Getting Started
This is a brief guide for how to set up torchquad.
Prerequisites
We recommend using conda, especially if you want to utilize the GPU. With PyTorch it will automatically set up CUDA and the cudatoolkit for you, for example. Note that torchquad also works on the CPU; however, it is optimized for GPU usage. torchquad's GPU support is tested only on NVIDIA cards with CUDA. We are investigating future support for AMD cards through ROCm.
For a detailed list of required packages and packages for numerical backends, please refer to the conda environment files environment.yml and environment_all_backends.yml. torchquad has been tested with JAX 0.2.25, NumPy 1.19.5, PyTorch 1.10.0 and Tensorflow 2.7.0 on Linux; other versions of the backends should work as well but some may require additional setup on other platforms such as Windows.
Installation
The easiest way to install torchquad is simply to
conda install torchquad -c conda-forge
Alternatively, it is also possible to use
pip install torchquad
The PyTorch backend with CUDA support can be installed with
conda install "cudatoolkit>=11.1" "pytorch>=1.9=*cuda*" -c conda-forge -c pytorch
Note that since PyTorch is not yet on conda-forge for Windows, we have explicitly included it here using -c pytorch.
Note also that installing PyTorch with pip may not set it up with CUDA support. Therefore, we recommend to use conda.
Here are installation instructions for other numerical backends:
conda install "tensorflow>=2.6.0=cuda*" -c conda-forge
pip install "jax[cuda]>=0.2.22" --find-links https://storage.googleapis.com/jax-releases/jax_cuda_releases.html # linux only
conda install "numpy>=1.19.5" -c conda-forge
More installation instructions for numerical backends can be found in environment_all_backends.yml and at the backend documentations, for example https://pytorch.org/get-started/locally/, https://github.com/google/jax/#installation and https://www.tensorflow.org/install/gpu, and often there are multiple ways to install them.
Test
After installing torchquad and PyTorch through conda or pip,
users can test torchquad's correct installation with:
import torchquad
torchquad._deployment_test()
After cloning the repository, developers can check the functionality of torchquad by running the following command in the torchquad/tests directory:
pytest
Usage
This is a brief example how torchquad can be used to compute a simple integral with PyTorch. For a more thorough introduction please refer to the tutorial section in the documentation.
The full documentation can be found on readthedocs.
# To avoid copying things to GPU memory,
# ideally allocate everything in torch on the GPU
# and avoid non-torch function calls
import torch
from torchquad import MonteCarlo, set_up_backend

# Enable GPU support if available and set the floating point precision
set_up_backend("torch", data_type="float32")

# The function we want to integrate, in this example
# f(x0,x1) = sin(x0) + e^x1 for x0=[0,1] and x1=[-1,1]
# Note that the function needs to support multiple evaluations at once (first
# dimension of x here)
# Expected result here is ~3.2698
def some_function(x):
    return torch.sin(x[:, 0]) + torch.exp(x[:, 1])

# Declare an integrator;
# here we use the simple, stochastic Monte Carlo integration method
mc = MonteCarlo()

# Compute the function integral by sampling 10000 points over domain
integral_value = mc.integrate(
    some_function,
    dim=2,
    N=10000,
    integration_domain=[[0, 1], [-1, 1]],
    backend="torch",
)
To change the logger verbosity, set the TORCHQUAD_LOG_LEVEL environment
variable; for example export TORCHQUAD_LOG_LEVEL=DEBUG.
You can find all available integrators here.
Roadmap
See the open issues for a list of proposed features (and known issues).
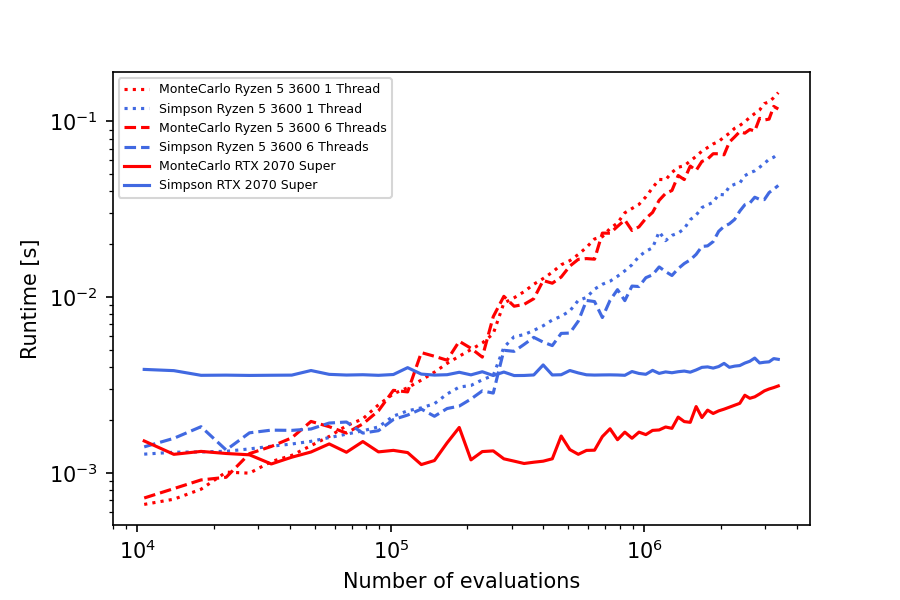
Performance
Using GPUs torchquad scales particularly well with integration methods that offer easy parallelization. For example, below you see error and runtime results for integrating the function f(x,y,z) = sin(x * (y+1)²) * (z+1) on a consumer-grade desktop PC.
Contributing
The project is open to community contributions. Feel free to open an issue or write us an email if you would like to discuss a problem or idea first.
If you want to contribute, please
- Fork the project on GitHub.
- Get the most up-to-date code by following this quick guide for installing torchquad from source:
- Get miniconda or similar
- Clone the repo
git clone https://github.com/esa/torchquad.git
- With the default configuration, all numerical backends with CUDA
support are installed.
If this should not happen, comment out unwanted packages in
environment_all_backends.yml. - Set up the environment. This creates a conda environment called
torchquadand installs the required dependencies.
conda env create -f environment_all_backends.yml
conda activate torchquad
Once the installation is done, you are ready to contribute.
Please note that PRs should be created from and into the develop branch. For each release the develop branch is merged into main.
- Create your Feature Branch (
git checkout -b feature/AmazingFeature) - Commit your Changes (
git commit -m 'Add some AmazingFeature') - Push to the Branch (
git push origin feature/AmazingFeature) - Open a Pull Request on the
developbranch, notmain(NB: We autoformat every PR with black. Our GitHub actions may create additional commits on your PR for that reason.)
and we will have a look at your contribution as soon as we can.
Furthermore, please make sure that your PR passes all automated tests. Review will only happen after that.
Only PRs created on the develop branch with all tests passing will be considered. The only exception to this rule is if you want to update the documentation in relation to the current release on conda / pip. In that case you may ask to merge directly into main.
License
Distributed under the GPL-3.0 License. See LICENSE for more information.
FAQ
- Q:
Error enabling CUDA. cuda.is_available() returned False. CPU will be used.
A: This error indicates that PyTorch could not find a CUDA-compatible GPU. Either you have no compatible GPU or the necessary CUDA requirements are missing. Usingconda, you can install them withconda install cudatoolkit. For more detailed installation instructions, please refer to the PyTorch documentation.
Contact
Created by ESA's Advanced Concepts Team
- Pablo Gómez -
pablo.gomez at esa.int - Gabriele Meoni -
gabriele.meoni at esa.int - Håvard Hem Toftevaag
Project Link: https://github.com/esa/torchquad
Release history Release notifications | RSS feed


Download files
Download the file for your platform. If you're not sure which to choose, learn more about installing packages.
Source Distribution
Built Distribution
Hashes for torchquad-0.4.0-py3-none-any.whl
| Algorithm | Hash digest | |
|---|---|---|
| SHA256 | eb3d271db7d73ad59de498af6df5ee760633016986be3fa5338718a75e4e954b |
|
| MD5 | 5585e20b8be8b3a0a4350737417c5a3b |
|
| BLAKE2b-256 | 35328aca8007a18bcd8b0cd67992c3e84a0b17b19844d70369e8779e6cbff50d |


