Multiple object tracking algorithm via image registration

Project description


ZephIR is a multiple object tracking algorithm based on image registration and built on PyTorch. Check out our preprint and tutorial video!
Latest Updates in v1.0.4
- bug fixes for deprecated dependencies
- see release notes for full list of changes
About
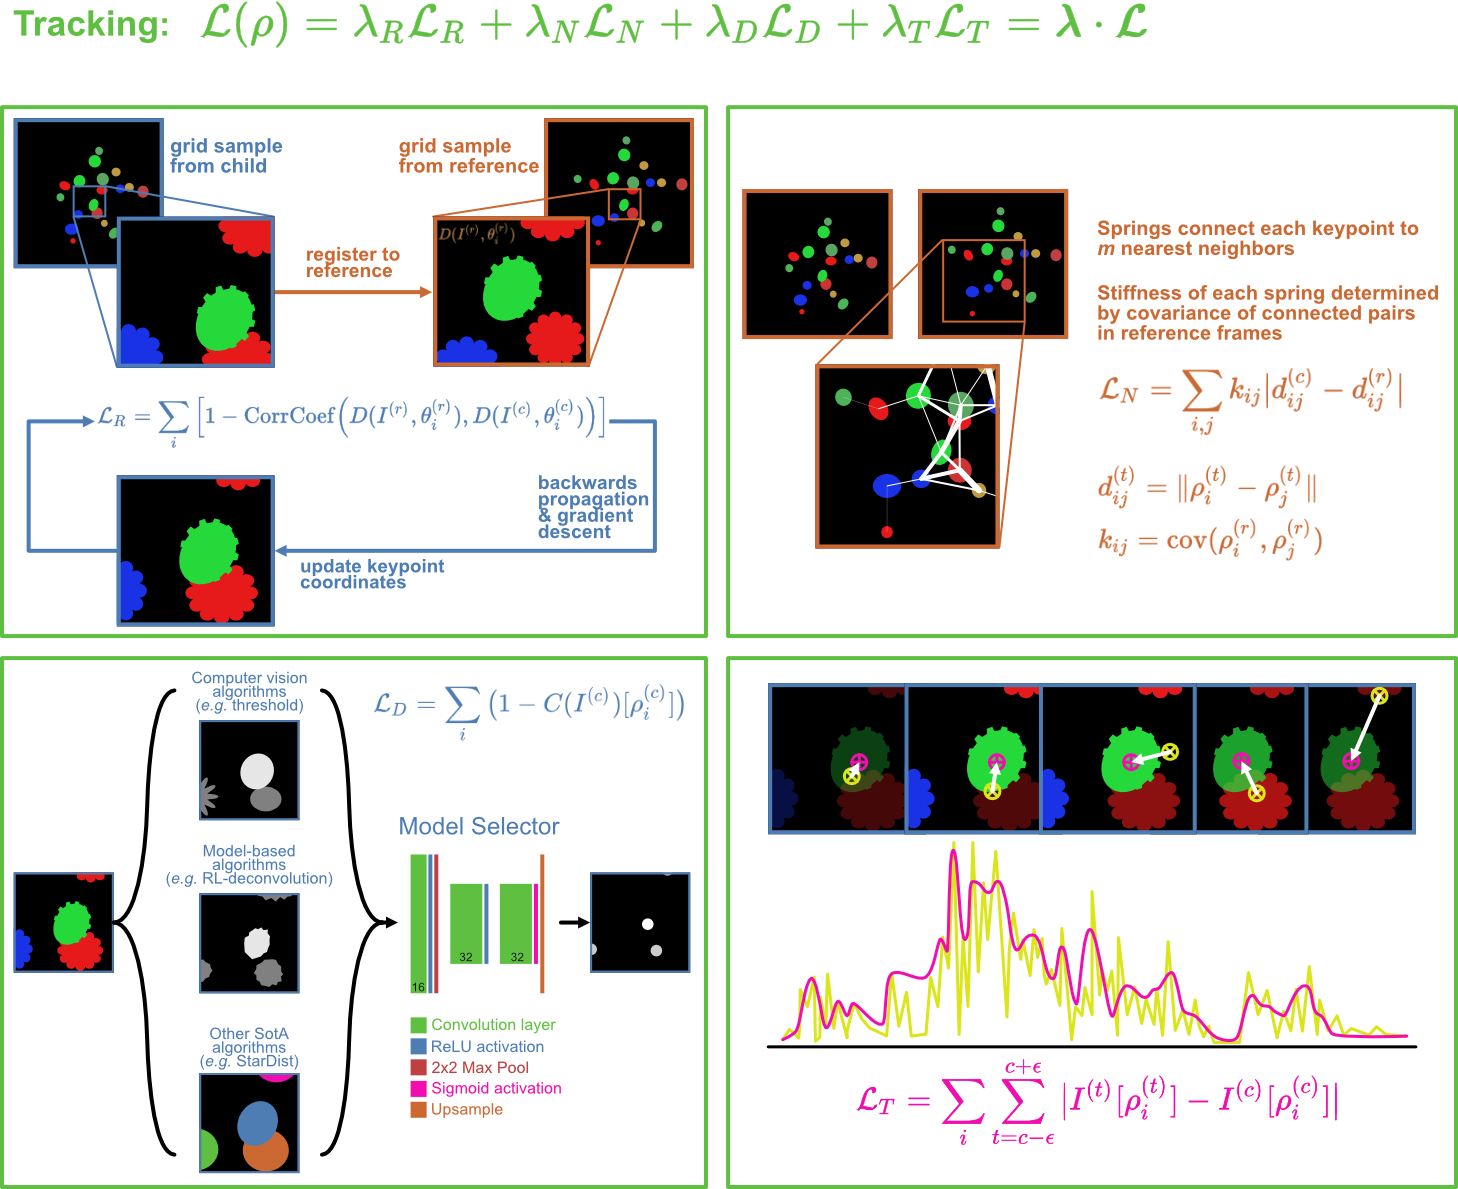
ZephIR tracks keypoints in a 2D or 3D movie by registering image descriptors sampled around each keypoint. Image registration loss is combined with three additional regularization terms:
- spring connections between neighboring objects allow a flexible spatial model of loosely correlated motion
- feature detection optimizes results towards centers of detected features
- temporal smoothing of pixel intensity a small patch of frames limit fluctuations in activity
Overview of tracking loss:
ZephIR is fast, efficient, and designed to run on laptops instead of powerful desktop workstations. It requires no prior training of any model weights, and it is capable of generalizing to a wide diversity of datasets with small tweaks to parameters. This makes ZephIR ideal for analyzing datasets that lack a large corpus of training data, and for tracking fluorescent sources in moving and deforming tissue, both of which create a particularly challenging environment for modern deep learning techniques. ZephIR can also serve as a data augmentation tool in some cases. We provide some support for exporting ZephIR results to DeepLabCut.
Installation
Quick start
pip install docopt flask==2.1.2 pandas==1.4.2 zephir
Dependencies
Make sure that Python (>=3.8.1) and the following packages are installed (prefer conda over pip):
- dataclasses (>=0.6)
- docopt (>=0.6.2)
- Flask (>=2.1.2)
- gevent (>=21.12.0)
- h5py (>=3.6.0)
- matplotlib (>=3.5.2)
- numpy (>=1.22.4)
- opencv-python (>=4.5.5.64)
- pandas (>=1.4.2)
- pathlib (>=1.0.1)
- scikit-learn (>=1.0.2)
- scikit-image (>=0.19.2)
- scipy (>=1.7.3)
- setuptools (>=61.2.0)
- torch (>=1.10.0) (see PyTorch.org for instructions on installing with CUDA)
- tqdm (>=4.64.0)
NOTE: If you run into an issue when launching the annotator, you may need to downgrade
Flask(2.1.2) andPandas(1.4.2).
Build from source
- Clone git repository:
git clone https://github.com/venkatachalamlab/ZephIR.git
-
Navigate to the cloned directory on your local machine.
-
Checkout the current release:
git checkout v1.0.4
Use the following command to see what's new in the most recent release:
git show v1.0.4
- Install:
python setup.py install
or install in development mode:
python setup.py develop
Getting Started
Run from command line:
zephir --dataset=. [options]
We provide a detailed guide for running ZephIR as well as some example workflows for using ZephIR here.
Parameters
For a list of all CLI options and user-tunable parameters, see here.
To help figure out what options may be right for you, check out the list of examples with explanations for the chosen parameters here.
Interfacing with Annotator
ZephIR includes an annotator GUI with custom Python macros for interacting with the data from the GUI.
Run from command line:
annotator --dataset=. [--port=5000]
Learn more about the annotator and its features here.
We also provide a more detailed user guide for using the GUI as a part of a ZephIR workflow here.
Release history Release notifications | RSS feed


Download files
Download the file for your platform. If you're not sure which to choose, learn more about installing packages.


