Command-Line Instance Control for AWS, Azure and GCP

Project description
MCC: Command-Line Instance Control for Enterprise Cloud Providers


Multi-Cloud-Control provides a single solution for controlling cloud VMs/Instances on AWS, Azure and GCP (including multiple accounts per provider). This includes displaying a unified list of VM-instances across cloud providers, and Starting / Stopping / Connecting to VM-instances on any providers platforms. This is extremely useful for companies, projects, and people that use VM-instances on multiple clouds.
There are two commands to run this utility:
mccl - “List Mode” - Displays a unified list of VM-Instances and parameters from all providers
mcc - “Command Mode” - Displays a unified list of VM-Instances across providers and enables command execution
mccl
mccl Displays a unified list of VM-Instances and parameters from all providers
design for quickly displaying a unified list across all providers, when quick access to information is needed
List Mode screenshot

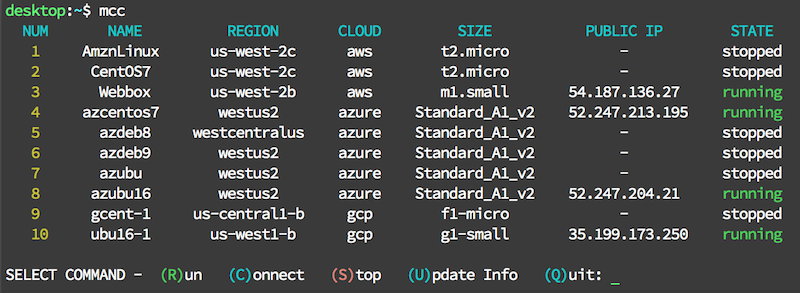
mcc
mcc Displays a unified list of VM-Instances across providers and enables command execution
Designed for use when controlling cross-provider VM-Instance needed
After listing instances and command options, it awaits user command selection
Supports commands for starting, stopping and connecting
Future commands may include: creating/deleting instances, changing configuration (hardware, disks, network), managing imaging/snapshots, managing disk/storage, add/remove to groups/clusters
Command Mode screenshot
Supported Python versions & Platforms
Python 2.7, 3.4, 3.5, 3.6
Platforms:
Linux
macOS (OS X)
Windows 10 ‘Bash on Windows’
Pre-Reqs
The libraries used for secure authentication may require compilation during the installation process on some systems. In order to successfully compile these dependencies, the following packages must be installed before installation:
Installing Pre-Reqs on Debian / Ubuntu Based Systems:
sudo apt-get install gcc python-dev libssl-dev libffi-dev -yInstalling Pre-Reqs on RedHat / CentOS Based Systems:
sudo yum install gcc python-devel openssl-devel libffi-devel -yInstallation
This utility can be installed with pip:
sudo pip install mccConfiguration
The first time the utility is executed it performs the following setup tasks:
Creates its config directory {HOME}/.cloud
Copies a sample config.ini file to the new config dir
Instructs the user to add their credential information to config.ini
The sample config.ini contains sample configuration data, and extensive comments describing how to add your real data.
Notes while editing the config.ini file:
do not change the names of the keys (titles left of the ‘=’ symbol)
lines with comments may be deleted (lines beginning with #)
config.ini - info section and providers list
# 'INFO' SECTION AND 'PROVIDERS' LIST
# - There must be a section named [info] and it must contain the entry providers
#
# - providers is a list of the cloud providers the utility should connect to
#   - ONLY include providers you have credentials for AND want to use
#   - you must use the exact values listed to reference the providers:
#     - "aws", "azure", and "gcp"
#   - multiple account per provider is supported, see section at bottom for details

[info]
# this example - connects to all three providers
providers = aws,azure,gcp

# CREDENTIALS DATA SECTIONS
#  - one section with matching name for each item listed in providers
#  - each section contains the credentials for that provider
#    ex: [aws] - specifies aws credentials
[aws] section - specifies your AWS security credentials and default datacenter region. Information on AWS Credentials
# [aws] SECTION REQUIRED if aws is listed in providers

[aws]
aws_access_key_id = EXCEWDYSWRP7VZOW4VAW
aws_secret_access_key = CHVsdhV+YgBEjJuZsJNstLGgRY43kZggNHQEh/JK
aws_default_region = us-west-1
[azure] section - specifies your Azure Tenant-ID, Subscription-ID, Application-ID and Application-Secret. Creating an Azure Service Principal
# [azure] SECTION REQUIRED if azure is listed in providers

[azure]
az_tenant_id = a3b7de99-6c36-e71f-e7d7-c5a1eefd9c01
az_sub_id = 2ac1b147-fdca-947c-4907-3f302a667100
az_app_id = ee16ad1d-d266-bffa-031c-008ab40d971e
az_app_sec = 22918C9e1cCC7665a+b3e4052f942630aE979CF68/v=
[gcp] section - supports two authentication types. Service Account is likely easier for many users, but both options are available. Specify the type of Authentication: (S)ervice or (A)pplication (defaults to service if not specified), Google Compute project-id, and the remaining variables required for the authentication type as described below. Information on Setting up Service Account Authentication
# [gcp] SECTION REQUIRED if gcp is listed in providers

[gcp]
gcp_auth_type = S
gcp_proj_id = sampleproject-634368
gcp_svc_acct_email = 12345678911-compute@developer.gserviceaccount.com
gcp_pem_file = SampleProject-72fcfdb29717.json

# gcp SUPPORTS TWO AUTHENTICATION TYPES:
#
#   gcp_auth_type - specifies which type to use ( S or A )
#       - if omitted, it defaults to Service Account Auth
#
#   S = Service Account Auth (default)
#       - requires that the service account key (json file) copied or moved to config dir
#    (the example above lists the values needed for Service Account Auth)
#
#   A = Installed Application Auth - when using this auth type:
#       - the first time the program is run with the proper credentials listed
#         - it displays a URL in the terminal session
#         - this URL must be pasted into a web-browser to display a code
#         - copy the code from the web browser and paste it into the terminal
#         - then program will then continue running
#
#  The example below lists the values needed for Installed Application Auth
#
#  [gcp]
#  gcp_auth_type = A
#  gcp_proj_id = sampleproject-634368
#  gcp_client_id = 12345678911-LZXcWZmyzU3v3qNPPJNEimoKgh9Wruo4.apps.googleusercontent.com
#  gcp_client_sec = t4ugvWTocssrVtX448tDEWBW
specifying multiple accounts - for one or more providers
#   Step 1
#    - add an additional entry to the 'providers' list - in this exact format:
#      - the entry begins with the standard values: aws, azure, gcp
#      - it is immediately followed by a numeric suffix
#          ex: aws2 (for a 2nd set of aws credentials)
#      - no additional characters are allowed or it will not be recognized and fail
#
#   Step 2
#    - add a section below of the same name containing the corresponding credentials
#      - ex: [aws2] (containing the 2nd set of aws credentials, for the earlier example)
#    - this new credentials section must include all credentials for the 2nd account,
# even if some are the same as the primary account.Release history Release notifications | RSS feed


Download files
Download the file for your platform. If you're not sure which to choose, learn more about installing packages.


