Cursor-On-Target Transform Proxy

Project description

Cursor on Target Transformation Proxy
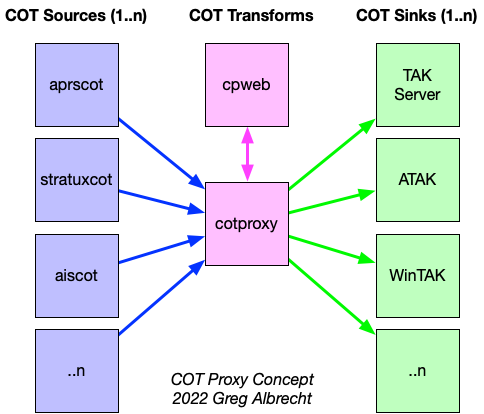
COTProxy is an in-line Cursor-on-Target (CoT) transformation proxy for TAK Products. CoT can be modified as it travels from one TAK Product to another over a network.
How does it work?
Given a matching UID & Transform, CoT Event characteristics can be changed, including Callsign, Type, Icon, Video, et al. COTProxy’s transform configurations are managed via the COTProxyWeb front-end, installed separately.
Concept of Operations CONOPS:
Support This Project
Help: Email takhelp@undef.net or Signal/WhatsApp: +1-310-621-9598
This project has been developed for the Disaster Response, Public Safety and Frontline Healthcare community. All contributions further project development and ensure ongoing support.

Configuration
COTProxy can be configured using an INI-style config file, or using Environment Variables. Configuration Parameters are as follows:
CPAPI_URL: URL of COTProxyWeb API. Default = http://localhost:10415/
LISTEN_URL: Protocol, Local IP & Port to listen for CoT Events. Default = udp://0.0.0.0:8087.
PASS_ALL: If True, will pass everything, Transformed or not. Default = False.
AUTO_ADD: If True, will automatically create Transforms and Objects for all COT Events. Default = False.
Optional special parameters for importing legacy known_craft.csv files:
KNOWN_CRAFT_FILE: [optional] Path to existing Known Craft file to use when seeding COTProxyWeb database. Default = known_craft.csv.
SEED_FAA_REG: [optional] If True, will set Tail/N-Number on seeded ICAO Hexs from FAA database. Default = True.
TLS & other configuration options, see: PyTAK.
Example Config
To use any of these example configurations, save the indented code block to the file /etc/config.ini and start COTProxy with cotproxy -c /etc/config.ini.
Example - Send modified CoT to a TAK Server using TLS:
[cotproxy]
; ^-- [cotproxy] must always the the first line of config file.

; Listen for CoT at TCP Port 8087 on all network interfaces:
LISTEN_URL=tcp://0.0.0.0:8087

; Send modified CoT to our TAK Server using TLS:
COT_URL=tls://takserver.example.com:8089

; TLS Cert & Key
PYTAK_TLS_CLIENT_CERT=/etc/cotproxy.cert.pem
PYTAK_TLS_CLIENT_KEY=/etc/cotproxy.key.pem
Example - Send modified CoT to ATAK Mesh Multicast:
[cotproxy]
; ^-- [cotproxy] must always the the first line of config file.

; Listen for CoT at TCP Port 8087 on all network interfaces:
LISTEN_URL=tcp://0.0.0.0:8087

; ATAK Multicast Group & Port:
COT_URL=udp://239.2.3.1:6969
Running
COTProxy should be started as a background sevice (‘run forever’, daemon, etc). Most modern Linux-based operating systems use the systemd System and Service Manager.
CentOS, Debian, Ubuntu, RaspberryOS, Raspbian
These instructions will create, enable and start a service on Linux.
Download the example cotproxy systemd service definition:
$ sudo wget --output-document=/etc/systemd/system/cotproxy.service https://raw.githubusercontent.com/ampledata/cotproxy/main/cotproxy.service
2. Create the /etc/config.ini file and add an appropriate configuration, see Configuration section of the README for config examples:
$ sudo nano /etc/config.ini
Enable cotproxy systemd service:
$ sudo systemctl daemon-reload
$ sudo systemctl enable cotproxy
$ sudo systemctl start cotproxy
You can view cotproxy logs with: $ sudo journalctl -xef
Installation
Debian, Ubuntu, RaspberryOS, Raspbian
COTProxy is available as a .deb package:
$ sudo apt update
$ wget https://github.com/ampledata/pytak/releases/latest/download/python3-pytak_latest_all.deb
$ sudo apt install -f ./python3-pytak_latest_all.deb
$ wget https://github.com/ampledata/cotproxy/releases/latest/download/python3-cotproxy_latest_all.deb
$ sudo apt install -f ./python3-cotproxy_latest_all.deb
CentOS, RedHat
Install from the Python Package Index (PyPI):
$ python3 -m pip install cotproxy
Developers
Install from GitHub source:
$ git clone https://github.com/ampledata/cotproxy.git
$ cd cotproxy/
$ python3 setup.py install
Install with PyEnv
PyEnv is an alternative installation method that bypasses the system built-in Python environment on Linux & MacOS. PyEnv works by installing its own Python binary & libraries, and keeping installed modules isolated from system modules. This is the authors preferred method of installation.
PyEnv - Debian
Install required packages:
$ sudo apt-get install make build-essential libssl-dev zlib1g-dev \
    libbz2-dev libreadline-dev libsqlite3-dev wget curl llvm \
    libncursesw5-dev xz-utils tk-dev libxml2-dev libxmlsec1-dev \
    libffi-dev liblzma-dev git
$ curl https://pyenv.run | bash
Add the following to your ~/.bashrc and restart your shell:
export PYENV_ROOT="$HOME/.pyenv"
command -v pyenv >/dev/null || export PATH="$PYENV_ROOT/bin:$PATH"
eval "$(pyenv init -)"
eval "$(pyenv virtualenv-init -)"
Once back in:
$ pyenv install 3.9.13
...Catch up on your expense reports, have a snack, stay hydrated...
$ pyenv shell 3.9.13
$ pyenv virtualenv pytakenv
$ pyenv activate pytakenv
$ python3 -m pip install --upgrade pip
$ mkdir ~/src
$ cd ~/src
$ git clone https://github.com/ampledata/cotproxy.git
$ cd cotproxy
$ python3 setup.py install
$ cd ~/src
$ git clone https://github.com/ampledata/cotproxyweb.git
$ cd cotproxyweb
$ python3 -m pip install -r requirements.txt
$ bash setup.sh
... When prompted, select an admin password. ...
You should now be able to connect to port :8000/admin from a web browser.
Seed COTProxy Transforms frome existing Known Craft file, given a Known Craft file named known_ps.csv:
$ CPAPI_URL="http://localhost:8000/" KNOWN_CRAFT=known_ps.csv cotproxy-seed
PyEnv - CentOS 7
Update packages:
sudo yum update
sudo yum check-update
Install required packages:
sudo yum groupinstall -y "Development Tools"
sudo yum install -y zlib zlib-devel bzip2-devel openssl-devel sqlite-devel \
    readline-devel libffi-devel lzma-sdk-devel ncurses-devel gdbm-devel \
    db4-devel expat-devel libpcap-devel xz-devel pcre-devel wget
Install updated SQLite:
mkdir -p ~/src
cd ~/src
wget https://www.sqlite.org/2019/sqlite-autoconf-3290000.tar.gz
tar zxvf sqlite-autoconf-3290000.tar.gz
cd sqlite-autoconf-3290000
./configure
make
sudo make install
Install PyEnv:
curl https://pyenv.run | bash
Update ~/.bash_profile:
The following chunk of code should be appended to the end of your ~/.bash_profile, either using a text editor like vi, vim, nano or pico. Once added, reload your environment by running: source ~/.bash_profile:
export PYENV_ROOT="$HOME/.pyenv"
command -v pyenv >/dev/null || export PATH="$PYENV_ROOT/bin:$PATH"
eval "$(pyenv init -)"
eval "$(pyenv virtualenv-init -)"
export PATH=/opt/sqlite/bin:$PATH
export LD_LIBRARY_PATH=/opt/sqlite/lib
export LD_RUN_PATH=/opt/sqlite/lib
export C_INCLUDE_PATH=/opt/sqlite/include
export CPLUS_INCLUDE_PATH=/opt/sqlite/include
Install Python 3.9 environment:
pyenv install 3.9.13
pyenv shell 3.9.13
pyenv virtualenv cpenv
Install cotproxy:
mkdir -p ~/src
cd ~/src
wget https://github.com/ampledata/cotproxy/archive/refs/tags/v1.0.0b2.tar.gz
tar -zvxf v1.0.0b2.tar.gz
cd cotproxy-1.0.0b2/
python3 setup.py install
Install & Initialize cotproxyweb:
mkdir -p ~/src
cd ~/src
git clone https://github.com/ampledata/cotproxyweb.git
cd cotproxyweb/
python3 -m pip install -r requirements.txt
python3 manage.py migrate
python3 manage.py createsuperuser \
--username admin --email admin@undef.net
python3 manage.py runserver 0:8000
From here follow the Running section of the README.
Source
Copyright
COTProxy is Copyright 2022 Greg Albrecht
License
COTProxy is licensed under the Apache License, Version 2.0. See LICENSE for details.
Release history Release notifications | RSS feed

Download files
Download the file for your platform. If you're not sure which to choose, learn more about installing packages.


