Handprint: HANDwritten Page RecognitIoN Test

Project description
Handprint
A Python program to apply different handwritten text recognition services to images of handwritten text pages, and produce an annotated image (and optionally more) showing the text recognized.


🏁 Log of recent changes
Version 1.0.1: This version adds instructions for installing from PyPI and fixes a bug writing files downloaded from URLs.
Version 1.0.0: This is a sufficiently complete version of Handprint that can finally be called a version 1.0. Changes compared to version 0.10.0 include: new way to provide credential files, new default output (in which results from different services are placed side-by-side in a single large image), new command-line arguments, parallel execution, and more.
The file CHANGES contains a more complete change log that includes information about previous releases.
Table of Contents
- Introduction
- Installation
- Usage
- Known issues and limitations
- Getting help
- Contributing
- License
- Authors and history
- Acknowledgments
☀ Introduction
Handprint (Handwritten Page Recognition Test) is a small project to examine the performance of alternative services for handwritten text recognition (HTR). It was developed for use with documents from the Caltech Archives, but it is completely independent and can be applied to any images of text documents. Services supported include Google's Google Cloud Vision API, Microsoft's Azure Computer Vision API, Amazon's Textract and Rekognition, and more. Among other features, Handprint can generate versions of the input images with recognized text overlaid over them, to visualize the results. The image at right shows an example.
Handprint can work with individual images, directories of images, and URLs pointing to images on remote servers. In addition to producing annotated images as output, it can output the raw results from an HTR service as JSON and text files. Handprint can use multiple processor threads for parallel execution.
✺ Installation and configuration
The instructions below assume you have a Python interpreter installed on your computer; if that's not the case, please first install Python and familiarize yourself with running Python programs on your system.
Handprint includes several adapters for working with cloud-based HTR services from Amazon, Google, and Microsoft. Installing Handprint requires a both installing a copy of Handprint on your computer and supplying your copy with credentials for accessing the cloud services you want to use.
⓵ Install Handprint on your computer
The following is probably the simplest and most direct way to install the latest release of Handprint on your computer:
sudo python3 -m pip install handprint --upgrade
Alternatively, you can install the latest version directly from the GitHub repository using the following command:
sudo python3 -m pip install git+https://github.com/caltechlibrary/handprint.git --upgrade
⓶ Add cloud service credentials
A one-time configuration step is needed for each cloud-based HTR service after you install Handprint on a computer. This step supplies Handprint with credentials to access the services. In each case, the same command format is used:
handprint -a SERVICENAME CREDENTIALSFILE.json
SERVICENAME must be one of the service names printed by running handprint -l, and CREDENTIALSFILE.json must have one of the formats discussed below. When you run this command, Handprint will copy CREDENTIALSFILE.json to a private location, and thereafter uses the credentials to access SERVICENAME. (The private location is different on different systems; for example, on macOS it is ~/Library/Application Support/Handprint/.) Examples are given below.
Microsoft
Microsoft's approach to credentials in Azure involves the use of subscription keys. The format of the credentials file for Handprint just needs to contain a single field:
{
 "subscription_key": "YOURKEYHERE"
}
The value of "YOURKEYHERE" will be a string such as "18de248475134eb49ae4a4e94b93461c". To obtain a key, visit https://portal.azure.com and sign in using your account login. (Note: you will need to turn off browser security plugins such as Ad Block and uMatrix if you have them, or else the site will not work.) Once you are authenticated to the Azure portal, you can create credentials for using Azure's machine-learning services. Some notes about this can be found in the Handprint project Wiki pages on GitHub. Once you have obtained a key, use a text editor to create a JSON file in the simple format shown above, save that file somewhere on your computer (for the sake of this example, assume it is myazurecredentials.json), and use the command discussed above to make Handprint copy the credentials file:
handprint -a microsoft myazurecredentials.json
Credentials for using a Google service account need to be stored in a JSON file that contains many fields. The overall format looks like this:
{
  "type": "service_account",
  "project_id": "theid",
  "private_key_id": "thekey",
  "private_key": "-----BEGIN PRIVATE KEY-----anotherkey-----END PRIVATE KEY-----\n",
  "client_email": "emailaddress",
  "client_id": "id",
  "auth_uri": "https://accounts.google.com/o/oauth2/auth",
  "token_uri": "https://oauth2.googleapis.com/token",
  "auth_provider_x509_cert_url": "https://www.googleapis.com/oauth2/v1/certs",
  "client_x509_cert_url": "someurl"
}
Getting one of these is summarized in the Google Cloud docs for Creating a service account, but more explicit instructions can be found in the Handprint project Wiki pages on GitHub. Once you have downloaded a Google credentials file from Google, save the file somewhere on your computer (for the sake of this example, assume it is mygooglecredentials.json), and use the command discussed above to make Handprint copy the credentials file:
handprint -a google mygooglecredentials.json
Amazon
Amazon credentials for AWS take the form of two alphanumeric strings: a key id string and a secret access key string. In addition, the service needs to be invoked with a region identifier. For the purposes of Handprint, these should be stored in a JSON file with the following format:
{
    "aws_access_key_id": "YOUR_KEY_ID_HERE",
    "aws_secret_access_key": "YOUR_ACCESS_KEY_HERE",
    "region_name": "YOUR_REGION_NAME_HERE"
}
Getting this information is, thankfully, a relatively simple process for Amazon's services. Instructions can be found in the Handprint project Wiki pages on GitHub. Once you have obtained the two alphanumeric keys and a region identifier string, use a text editor to create a JSON file in the simple format shown above, save that file somewhere on your computer (for the sake of this example, assume it is myamazoncredentials.json), and use two commands to make Handprint copy the credentials file for the two different Amazon services currently supported by Handprint:
handprint -a amazon-textract myamazoncredentials.json
handprint -a amazon-rekognition myamazoncredentials.json
▶︎ Usage
Handprint comes with a single command-line interface program called handprint. Here is a screen cast to give a sense for what it's like to run Handprint. Click on the following image:

The handprint command-line program should end up installed in a location where software is normally installed on your computer, if the installation steps described in the previous section proceed successfully. Running Handprint from a terminal shell then should be as simple as running any other shell command on your system:
handprint -h
If that fails for some reason, you should be able to run Handprint from anywhere using the normal approach for running Python modules:
python3 -m handprint -h
The -h option (/h on Windows) will make handprint display some help information and exit immediately. To make Handprint do more, you can supply other arguments that instruct Handprint to process image files (or alternatively, URLs pointing to image files at a network location) and run text recognition algorithms on them, as explained below.
Supported HTR/OCR services
Handprint can contact more than one cloud service for HTR. You can use the -l option (/l on Windows) to make it display a list of the services currently implemented:
# handprint -l
Known services: amazon-rekognition, amazon-textract, google, microsoft
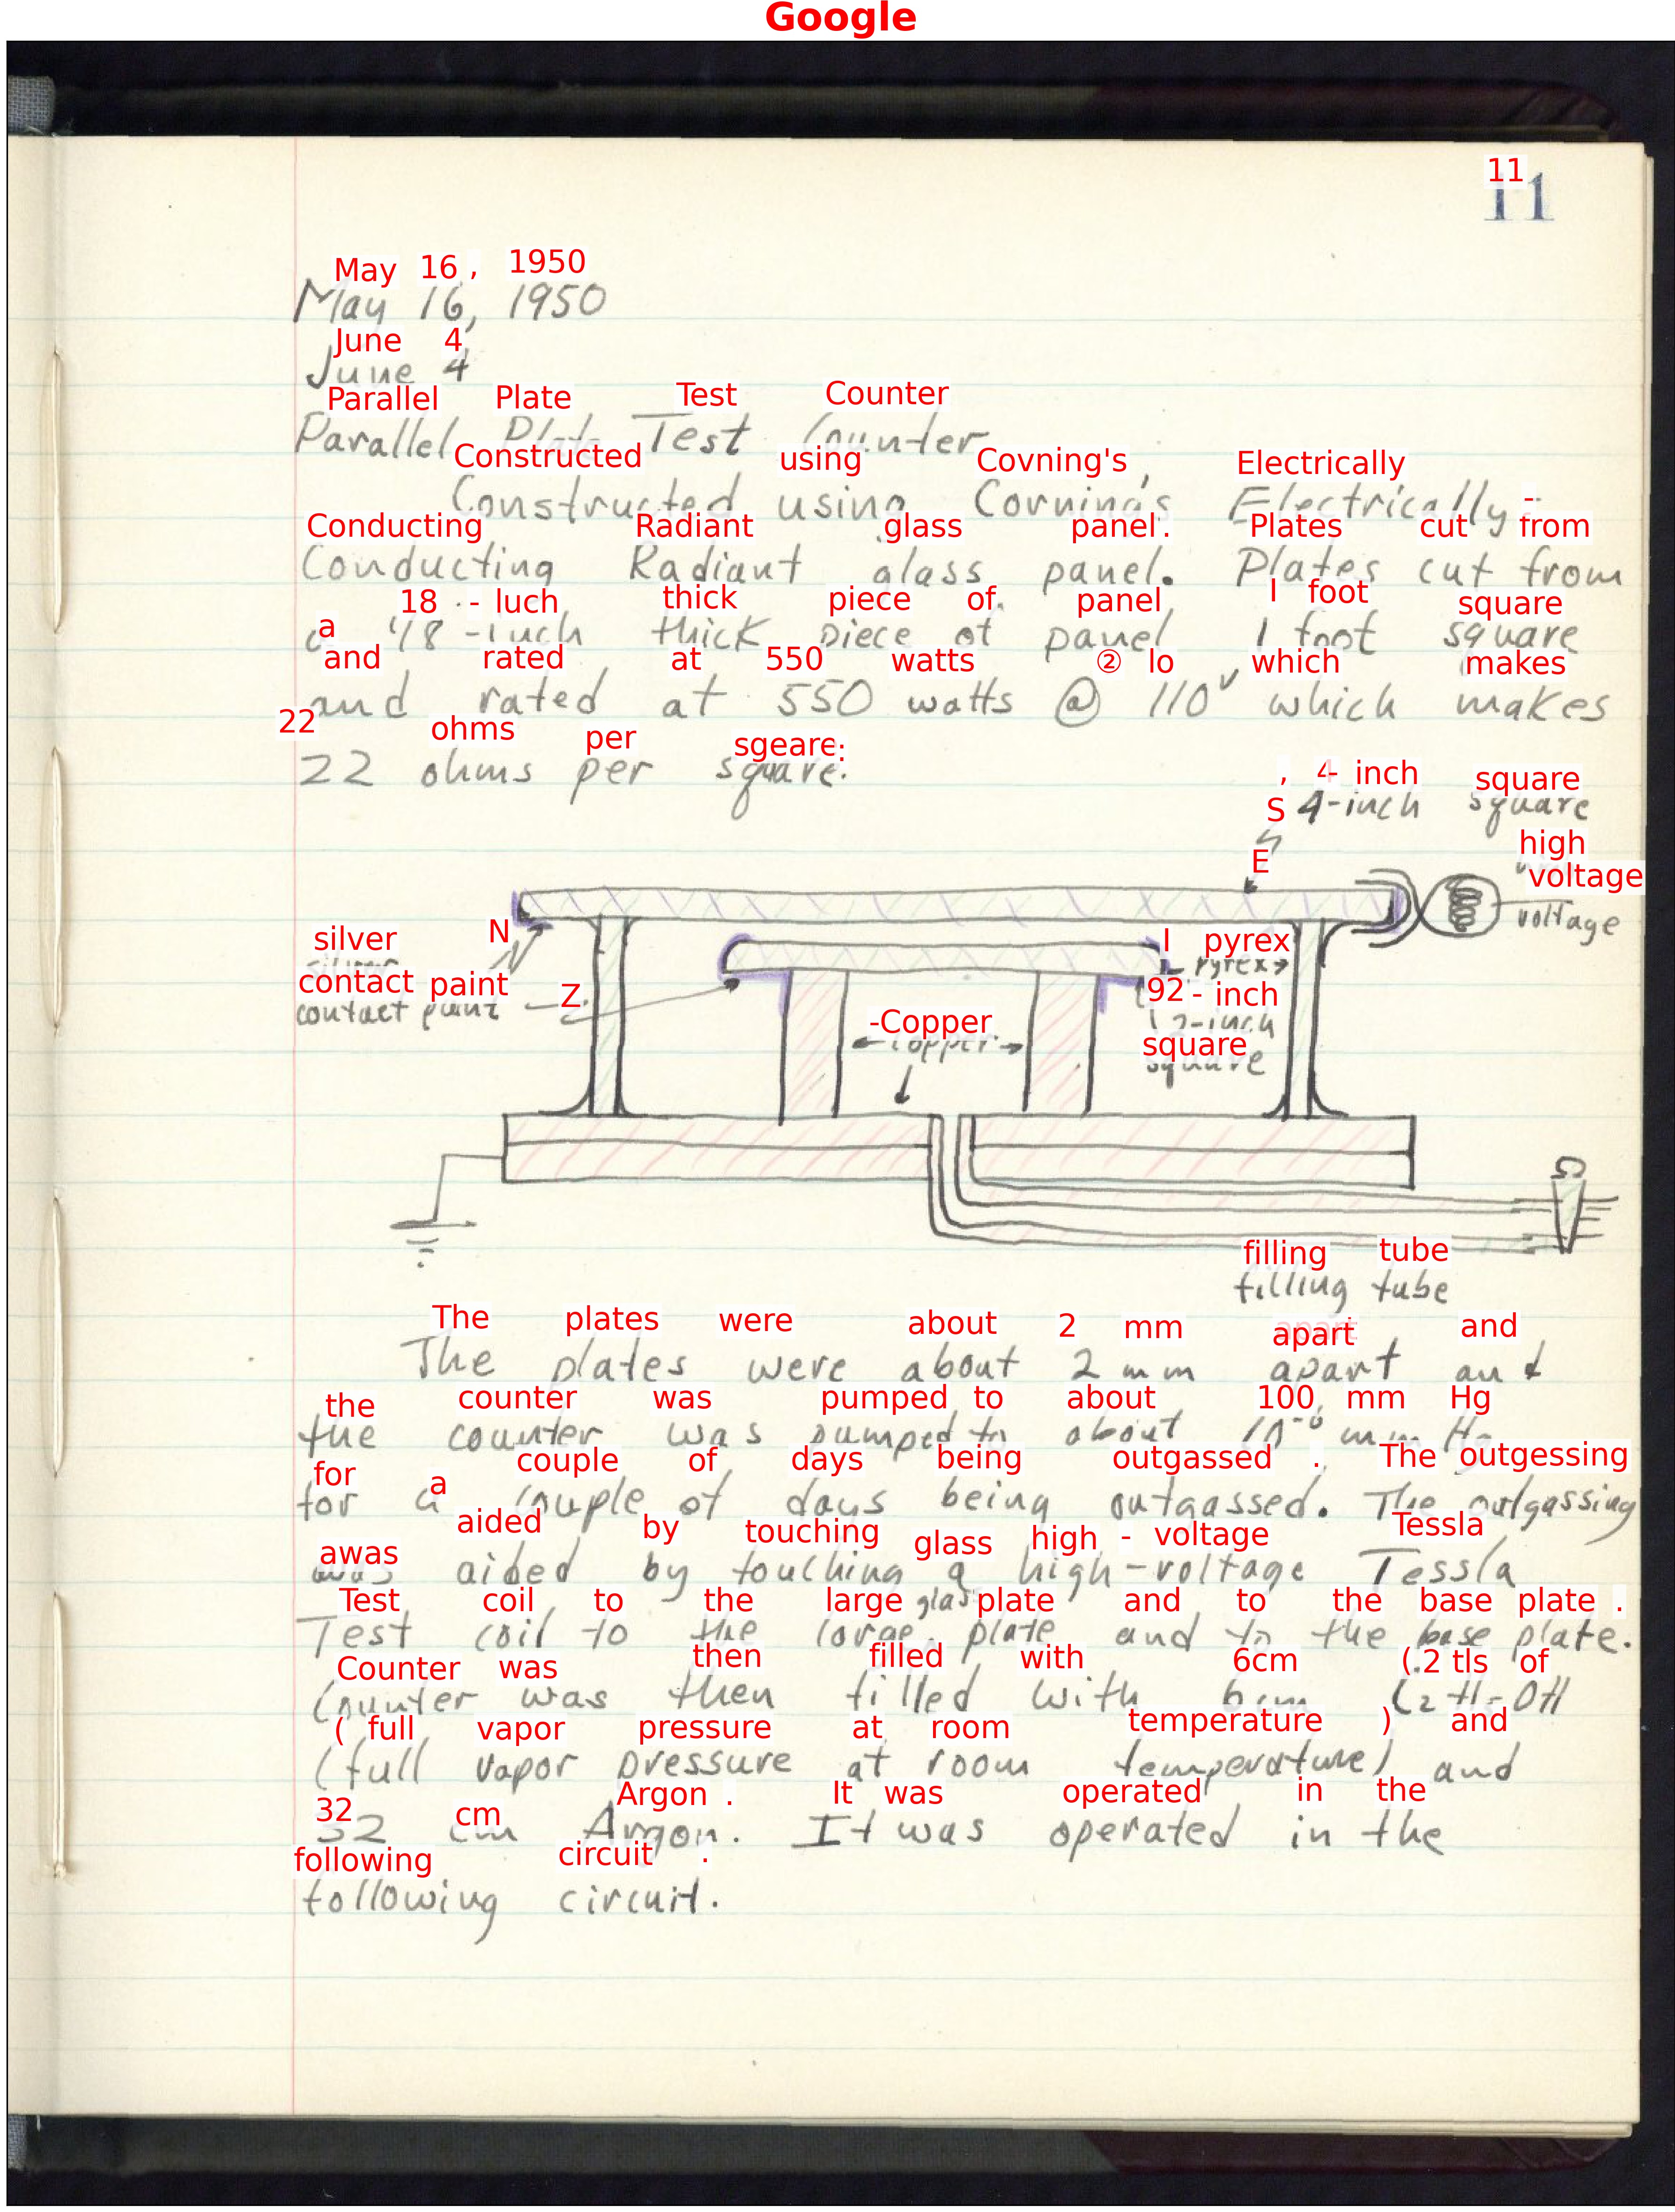
By default, Handprint will run every known service in turn, creating annotated images to represent the results of each individual service. To invoke only specific services, use the -s option (/s on Windows) followed by a service name or a list of names separated by commas (e.g., google,microsoft). For example, the following command will save the results of invoking only Microsoft's text recognition service on a page from Clara Barton's unpublished draft book "The Life of My Childhood", available in Handprint's source directory:
handprint -s microsoft tests/images/public-domain/clara-barton-life-of-my-childhood-p90.jpg
Here is what that result looks like:
Input files and URLs
After credentials are installed, running Handprint without the -a option will invoke one or more services on files, directories of files, or URLs pointing to files. More specifically, inputs can be supplied in any of the following ways:
- One or more directory paths or one or more image file paths on the local disk, which will be interpreted as images (either individually or in directories) to be processed
- One or more URLs, which will be interpreted as network locations of image files to be processed
- If given the
-foption (/fon Windows), a file containing either image paths or image URLs to be processed
Handprint considers each input path individually, and determines when an input is a URL based on whether the given path begins with letters followed by the characters :/ followed by the rest of the path (e.g., http://some/other/characters). If any of the input images are URLs, Handprint will first download the images found at the URLs to a directory indicated by the option -o (/o on Windows). If a destination directory is not provided via -o, the current working directory where Handprint is running is used instead.
No matter whether files or URLs, each input should be a single image of a document page in which text should be recognized. Handprint reads a number of common formats: JP2, JPEG, PNG, GIF, BMP, and TIFF. However, for simplicity and maximum compatibility with all cloud services, Handprint always converts all input files to PNG if they are not already in that format, before sending them to a service. Handprint also resizes images if necessary, to the smallest size accepted by any of the services invoked if an image exceeds that size. (For example, if service A accepts files up to 10 MB in size and service B accepts files up to 5 MB, all input images will be resized to 5 MB before sending them to A and B, even if A could accept a higher-resolution image.)
Note that providing URLs on the command line can be problematic due to how terminal shells interpret certain characters, and so when supplying URLs, it's usually better to store the URLs in a file in combination with the -f option (/f on Windows).
Annotated output images
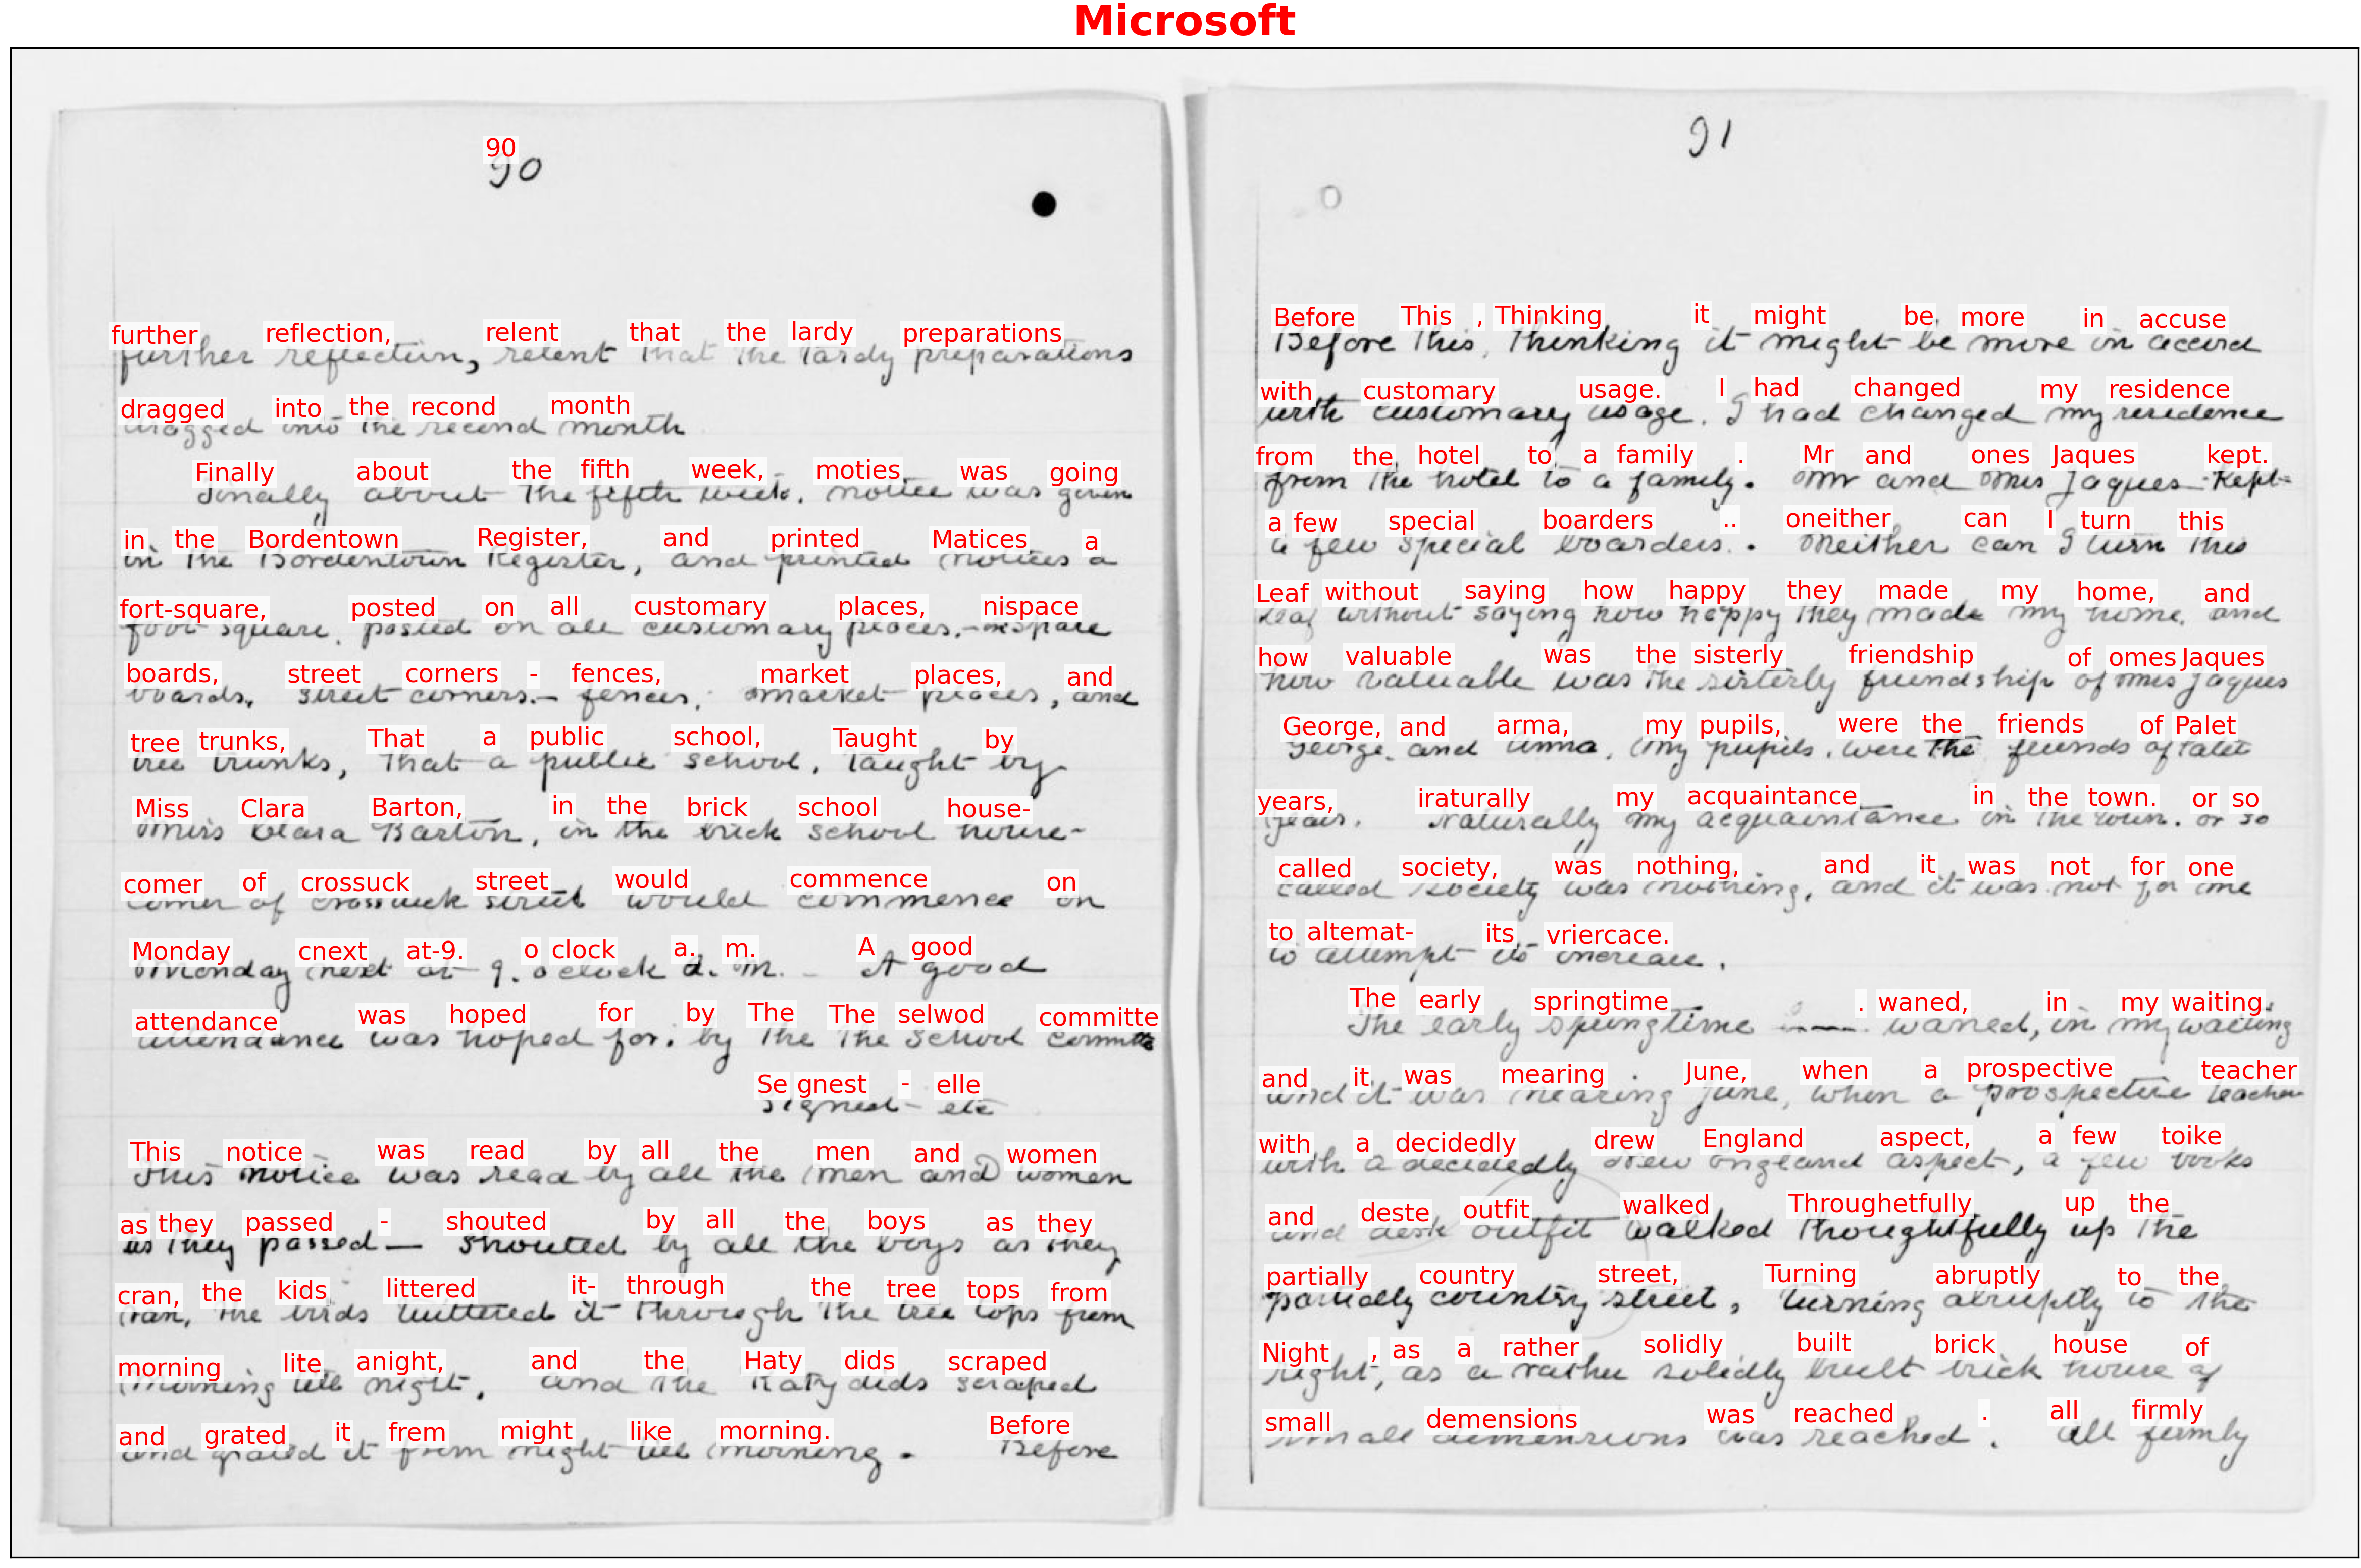
By default, Handprint will create a single output file for each input file. This file will be have the suffix .all-results.png and contain an annotated version of the results for each service invoked, tiled in a N×N grid fashion to produce one (big) output image. Here is a sample output image to illustrate:

The 2×2 image above was produced by running the following command from the Handprint source directory:
handprint tests/images/public-domain/H96566k.jpg
The individual results, as well as individual annotated images corresponding to the results from each service, will not be retained unless the -e extended results option (/e on Windows) is invoked. The production of the overview grid image can be skipped by using the -G option (/G on Windows).
Extended results
If the -e option -e (/e on Windows) is used, Handprint saves not only the overview image containing all the results, but also, individual annotated images for each service's results, the raw data (converted to a JSON file by Handprint), and the text extracted by the service. These additional outputs will be written in files named after the original files with the addition of a string that indicates the service used. For example, a file named somefile.jpg will produce
somefile.png
somefile.amazon-textract.png
somefile.amazon-textract.json
somefile.amazon-textract.txt
somefile.google.png
somefile.google.json
somefile.google.txt
...
A complication arises with using URLs in combination with the -e option: how should Handprint name the files that it writes? Some CMS systems store content using opaque schemes that provide no clear names in the URLs, making it impossible for a software tool such as Handprint to guess what file name would make sense to use for local storage. Worse, some systems create extremely long URLs, making it impractical to use the URL itself as the file name. For example, the following is a real URL pointing to an image in Caltech Archives:
https://hale.archives.caltech.edu/adore-djatoka//resolver?rft_id=https%3A%2F%2Fhale.archives.caltech.edu%2Fislandora%2Fobject%2Fhale%253A85240%2Fdatastream%2FJP2%2Fview%3Ftoken%3D7997253eb6195d89b2615e8fa60708a97204a4cdefe527a5ab593395ac7d4327&url_ver=Z39.88-2004&svc_id=info%3Alanl-repo%2Fsvc%2FgetRegion&svc_val_fmt=info%3Aofi%2Ffmt%3Akev%3Amtx%3Ajpeg2000&svc.format=image%2Fjpeg&svc.level=4&svc.rotate=0
To deal with this situation, Handprint manufactures its own file names when a URL is encountered. The scheme is simple: by default, Handprint will use a base name of document-N, where N is an integer. The integers start from 1 for every run of Handprint, and the integers count the URLs found either on the command line or in the file indicated by the -f option. The image found at a given URL is stored in a file named document-N.E where E is the format extension (e.g., document-1.jpg, document-1.png, etc.). The URL itself is stored in another file named document-1.url. Thus, the files produced by Handprint will look like this when the -e option is used (assuming, for this example, that the files at the source URLs are in JPEG format):
document-1.jpg
document-1.url
document-1.google.png
document-1.google.json
document-1.google.txt
document-1.microsoft.png
document-1.microsoft.json
document-1.microsoft.txt
...
document-2.jpg
document-2.url
document-2.google.png
document-2.google.json
document-2.google.txt
document-2.microsoft.png
document-2.microsoft.json
document-2.microsoft.txt
...
document-3.jpg
document-3.url
document-3.google.png
document-3.google.json
document-3.google.txt
document-3.microsoft.png
document-3.microsoft.json
document-3.microsoft.txt
...
The base name document can be changed using the -b option (/b on Windows). For example, running Handprint with the option -b einstein will cause the outputs to be named einstein-1.jpg, einstein-1.url, etc.
Finally, if an image is too large for any of the services invoked, then Handprint will resize it prior to sending the image to any of the services (as noted above). It will write the reduced image to a file named FILENAME-reduced.EXT, where FILENAME is the original file name and EXT is the file extension. This means that if an image needs to be resized, the results of applying the text recognition services will be, e.g.,
document-1-reduced.png
document-1-reduced.google.png
document-1-reduced.google.json
document-1-reduced.google.txt
document-1-reduced.microsoft.png
document-1-reduced.microsoft.json
document-1-reduced.microsoft.txt
...
Other options
Handprint produces color-coded diagnostic output as it runs, by default. However, some terminals or terminal configurations may make it hard to read the text with colors, so Handprint offers the -C option (/C on Windows) to turn off colored output.
Handprint will send files to the different services in parallel, using a number of process threads equal to 1/2 of the number of cores on the computer it is running on. (E.g., if your computer has 4 cores, it will by default use at most 2 threads.) The -t option (/t on Windows) can be used to change this number.
If given the -@ option (/@ on Windows), this program will print additional diagnostic output as it runs; in addition, it will start the Python debugger (pdb) when an exception occurs, instead of simply exiting. Important: some Python version/platform combinations seem to crash outright if pdb is invoked in a process thread – something that is likely to happen if you are debugging the execution of Handprint. Consequently, Handprint's debug mode (via the -@ option) almost always has to be combined with -t 1 to make Handprint use only one thread.
If given the -V option (/V on Windows), this program will print the version and other information, and exit without doing anything else.
Command line options summary
The following table summarizes all the command line options available. (Note: on Windows computers, / must be used as the prefix character instead of the - dash character):
| Short | Long form opt | Meaning | Default | |
|---|---|---|---|---|
-aA |
--add-credsA |
Add credentials for service A and exit | ||
-bB |
--base-nameB |
Write outputs to files named B-n | Use the base names of the image files | ⚑ |
-C |
--no-color |
Don't color-code the output | Use colors in the terminal output | |
-e |
--extended |
Produce extended results | Produce only results overview image | |
-fF |
--from-fileF |
Read file names or URLs from file F | Use names or URLs on command line | |
-G |
--no-grid |
Do not produce results overview image | Produce an N×N grid image | |
-h |
--help |
Display help text and exit | ||
-l |
--list |
Display list of known services and exit | ||
-oO |
--outputO |
Write outputs to directory O | Directories where images are found | |
-q |
--quiet |
Don't print messages while working | Be chatty while working | |
-sS |
--serviceS |
Use recognition service S | "all" | |
-tT |
--threadsT |
Use T number of threads | Use #cores/2 threads | |
-V |
--version |
Display program version info and exit | ||
-@ |
--debug |
Debugging mode | Normal mode |
⚑ If URLs are given, then the outputs will be written by default to names of the form document-n, where n is an integer. Examples: document-1.jpg, document-1.google.txt, etc. This is because images located in network content management systems may not have any clear names in their URLs.
⚑ Known issues and limitations
Here are some known limitations in the current version of Handprint:
- The Amazon Rekognition API will return at most 50 words in an image.
- Some services have different file size restrictions depending on the format of the file, but Handprint always uses the same limit for all files for a given service. This is a code simplification.
⁇ Getting help
If you find an issue, please submit it in the GitHub issue tracker for this repository.
♬ Contributing
I would be happy to receive your help and participation with enhancing Handprint! Please visit the guidelines for contributing for some tips on getting started.
☮︎ License
Copyright (C) 2018–2019, Caltech. This software is freely distributed under a BSD/MIT type license. Please see the LICENSE file for more information.
❡ Authors and history
Mike Hucka designed and implemented Handprint beginning in mid-2018.
☺︎ Acknowledgments
The vector artwork of a hand used as a logo for Handprint was created by Kevin from the Noun Project. It is licensed under the Creative Commons CC-BY 3.0 license.
Handprint benefitted from feedback from several people, notably from Tommy Keswick, Mariella Soprano, Peter Collopy and Stephen Davison.
Handprint makes use of numerous open-source packages, without which it would have been effectively impossible to develop Turf with the resources we had. I want to acknowledge this debt. In alphabetical order, the packages are:
- appdirs – module for determining appropriate platform-specific directories
- boto3 – Amazon AWS SDK for Python
- colorama – makes ANSI escape character sequences work under MS Windows terminals
- colored – library for color and formatting in terminal
- google-api-core, google-api-python-client, google-auth, google-auth-httplib2, google-cloud, google-cloud-vision, googleapis-common-protos, google_api_python_client – Google API libraries
- halo – busy-spinners for Python command-line programs
- humanize – make numbers more easily readable by humans
- httplib2 – a comprehensive HTTP client library
- imagesize – determine the dimensions of an image
- ipdb – the IPython debugger
- matplotlib – a Python 2-D plotting library
- oauth2client – Google OAuth 2.0 library
- Pillow – a fork of the Python Imaging Library
- plac – a command line argument parser
- psutil – cross-platform package for process and system monitoring in Python
- requests – an HTTP library for Python
- setuptools – library for
setup.py - termcolor – ANSI color formatting for output in terminal
Finally, I am grateful for computing & institutional resources made available by the California Institute of Technology.

Release history Release notifications | RSS feed


Download files
Download the file for your platform. If you're not sure which to choose, learn more about installing packages.
Source Distribution
Built Distribution
Hashes for handprint-1.0.1-py3-none-any.whl
| Algorithm | Hash digest | |
|---|---|---|
| SHA256 | 3dc3bb9291080b041a98a15234debbba5fd08f3e41b3bdb92539254b46bff203 |
|
| MD5 | 65c1658dff6cb0ef06450d2f8d6ca760 |
|
| BLAKE2b-256 | 160eb5725d6455906835d09e370deda55908035d16dd82ce08ff95d167271669 |


