Making decision trees competitive with state-of-the-art neural networks on CIFAR10, CIFAR100, TinyImagenet200, Imagenet. Transform any image classification neural network into an interpretable neural-backed decision tree.

Project description
Neural-Backed Decision Trees
Project Page // Paper // No-code Web Demo // Colab Notebook
By Alvin Wan, *Lisa Dunlap, *Daniel Ho, Jihan Yin, Scott Lee, Henry Jin, Suzanne Petryk, Sarah Adel Bargal, Joseph E. Gonzalez *denotes equal contribution
Run decision trees that achieve state-of-the-art accuracy for explainable models on CIFAR10, CIFAR100, TinyImagenet200, and ImageNet. NBDTs achieve accuracies within 1% of the original neural network on CIFAR10, CIFAR100, and TinyImagenet200 with the recently state-of-the-art WideResNet; and within 2% of the original neural network on ImageNet, using recently state-of-the-art EfficientNet. We attain an ImageNet top-1 accuracy of 75.13%.
Table of Contents
- Quickstart: Running and loading NBDTs
- Convert your own neural network into a decision tree
- Training and evaluation
- Results
- Setup for Development
- Citation
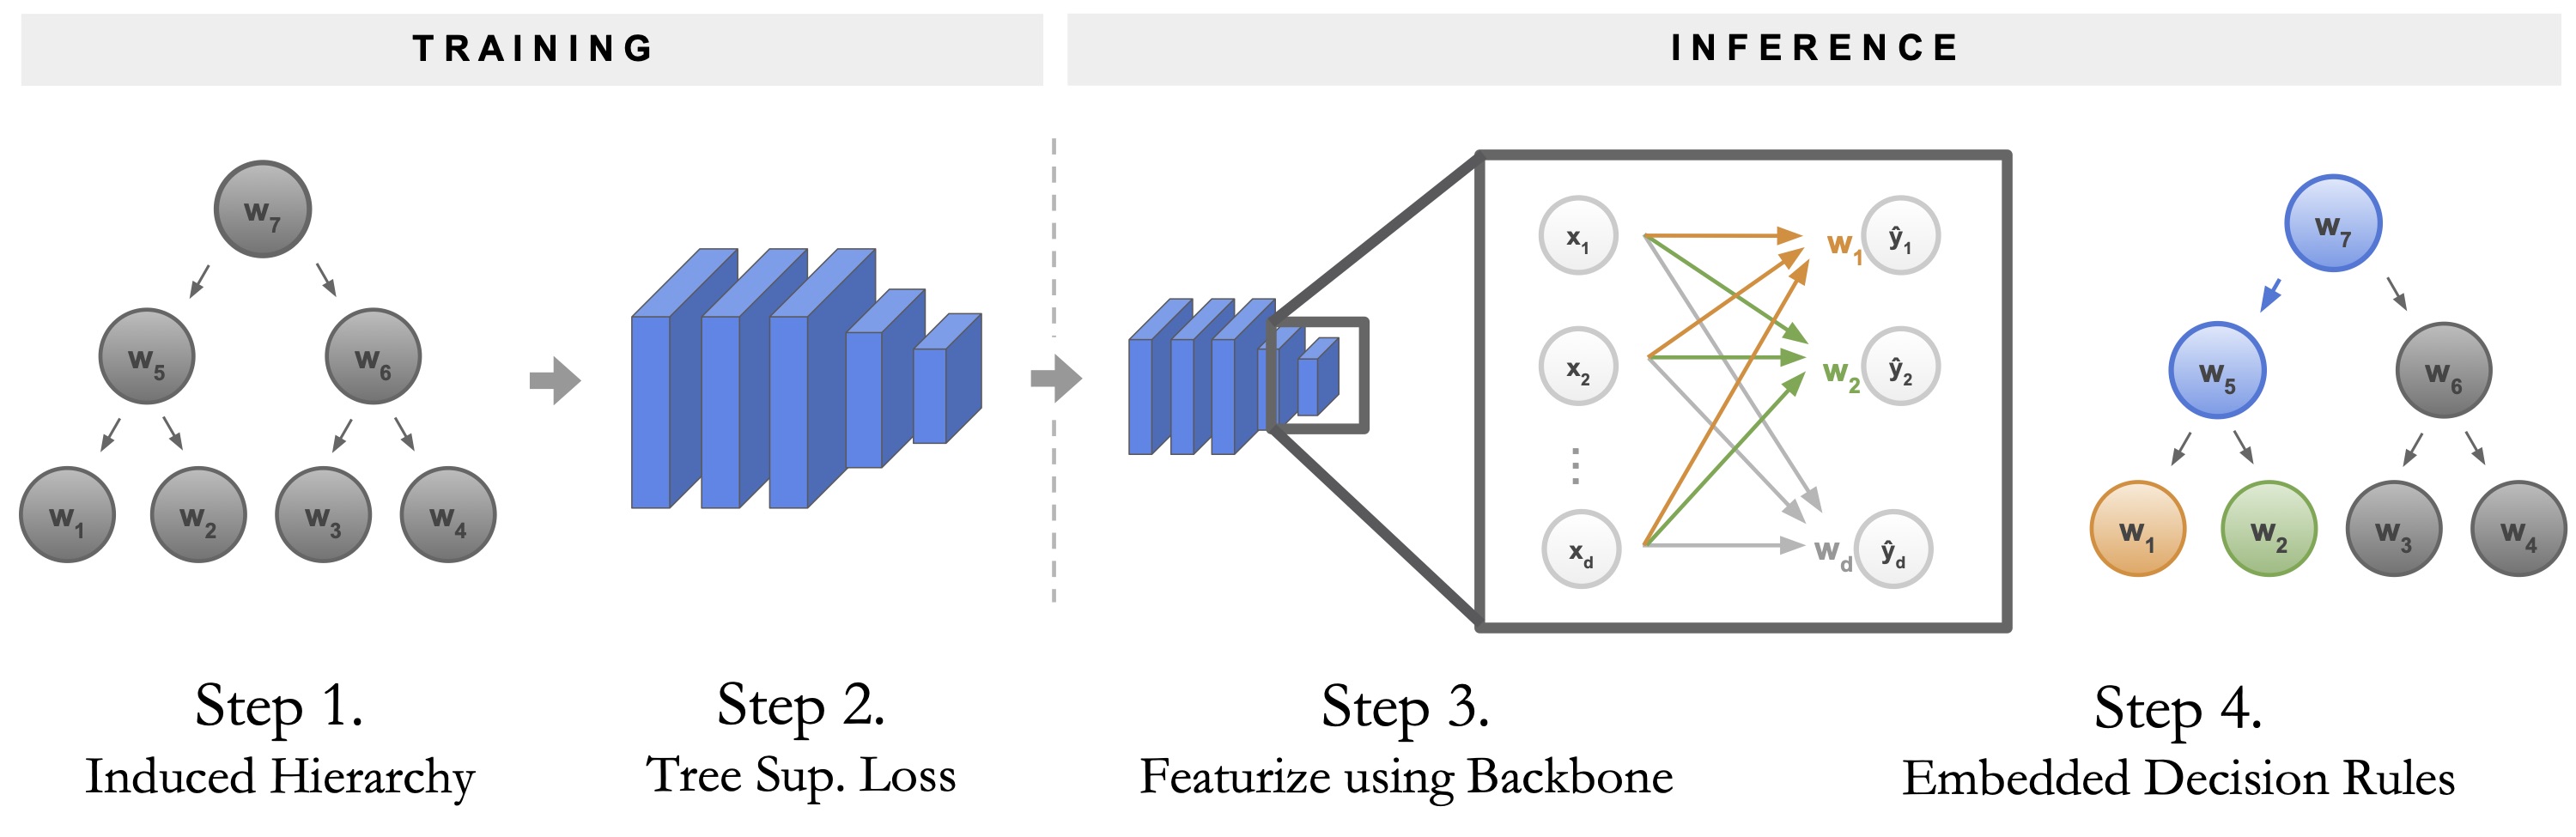
Per the pipeline illustration above, we (1) generate the hierarchy and (2) train the neural network with a tree supervision loss. Then, we (3) run inference by featurizing images using the network backbone and running embedded decision rules.
Quickstart
Running Pretrained NBDT on Examples
Don't want to download? Try your own images on the web demo.
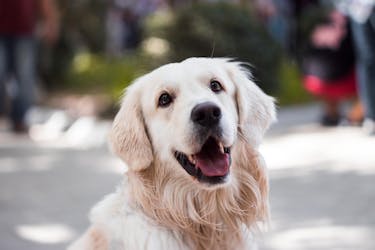
Pip install the nbdt utility and run it on an image of your choosing. This can be a local image path or an image URL. Below, we evaluate on an image of a cat, from the web. This cat is pictured below.
pip install nbdt
nbdt https://images.pexels.com/photos/126407/pexels-photo-126407.jpeg?auto=compress&cs=tinysrgb&dpr=2&w=32
This outputs both the class prediction and all the intermediate decisions, like below:
Prediction: cat // Decisions: animal (99.47%), chordate (99.20%), carnivore (99.42%), cat (99.86%)
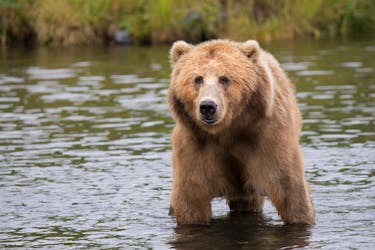
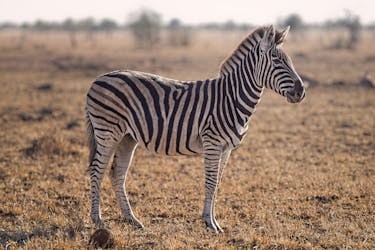
By default, this evaluation utility uses WideResNet pretrained on CIFAR10. You can also pass classes not seen in CIFAR10. Below, we pass a picture of a bear and a zebra. This zebra is also pictured below.
nbdt https://images.pexels.com/photos/750539/pexels-photo-750539.jpeg?auto=compress&cs=tinysrgb&dpr=2&h=32
nbdt https://images.pexels.com/photos/158109/kodiak-brown-bear-adult-portrait-wildlife-158109.jpeg?auto=compress&cs=tinysrgb&dpr=2&w=32
Like before, this outputs the class prediction and intermediate decisions. Although the Bear and Zebra classes were not seen at train time, the model still correctly picks Animal over Vehicle for both. Note that for Zebra, the obvious closest class is Horse, matching the model's prediction below.
Prediction: horse // Decisions: animal (99.31%), ungulate (99.25%), horse (99.62%)
Prediction: dog // Decisions: animal (99.51%), chordate (99.35%), carnivore (99.69%), dog (99.22%)

Pictures are taken from pexels.com, which are free to use per the Pexels license.
Loading Pretrained NBDTs in Code
Don't want to download? Try inference on a pre-filled Google Colab Notebook.
If you haven't already, pip install the nbdt utility.
pip install nbdt
Then, pick an NBDT inference mode (hard or soft), dataset, and backbone. By default, we support ResNet18 and WideResNet28x10 for CIFAR10, CIFAR100, and TinyImagenet200. See nbdt-pytorch-image-models for EfficientNet-EdgeTPUSmall on ImageNet.
Try below script on Google Colab
from nbdt.model import SoftNBDT
from nbdt.models import ResNet18, wrn28_10_cifar10, wrn28_10_cifar100, wrn28_10  # use wrn28_10 for TinyImagenet200

model = wrn28_10_cifar10()
model = SoftNBDT(
  pretrained=True,
  dataset='CIFAR10',
  arch='wrn28_10_cifar10',
  model=model)
Note torchvision.models.resnet18 only supports 224x224 input. However, nbdt.models.resnet.ResNet18 supports variable size inputs. See Models for instructions on using your favorite image classification neural network.
Example in ~30 lines: See nbdt/bin/nbdt, which loads the pretrained model, loads an image, and runs inference on the image in ~30 lines. This file is the executable nbdt in the previous section. Try this in a Google Colab Notebook.
Convert Neural Networks to Decision Trees
To convert your neural network into a neural-backed decision tree, perform the following 3 steps:
- First, if you haven't already, pip install the
nbdtutility:pip install nbdt - Second, during training, wrap your loss
criterionwith a custom NBDT loss. Below, we demonstrate the soft tree supervision loss on the CIFAR10 dataset. By default, we supportCIFAR10,CIFAR100,TinyImagenet200, andImagenet1000.
from nbdt.loss import SoftTreeSupLoss
criterion = SoftTreeSupLoss(dataset='CIFAR10', criterion=criterion)  # `criterion` is your original loss function e.g., nn.CrossEntropyLoss
- Third, during inference or validation, wrap your
modelwith a custom NBDT wrapper as shown below. This is only to run prediction as an NBDT during validation or inference time. Do not wrap your model like below, during training.
from nbdt.model import SoftNBDT
model = SoftNBDT(dataset='CIFAR10', model=model)  # `model` is your original model
Example integration with repository: See nbdt-pytorch-image-models, which applies this 3-step integration to a popular image classification repository pytorch-image-models.
Example integration with a random neural network in 16 lines [click to expand]
You can also include arbitrary image classification neural networks not explicitly supported in this repository. For example, after installing pretrained-models.pytorch using pip, you can instantiate and pass any pretrained model into our NBDT utility functions.
from nbdt.model import SoftNBDT
from nbdt.loss import SoftTreeSupLoss
from nbdt.hierarchy import generate_hierarchy
import pretrainedmodels

model = pretrainedmodels.__dict__['fbresnet152'](num_classes=1000, pretrained='imagenet')

# 1. generate hierarchy from pretrained model
generate_hierarchy(dataset='Imagenet1000', arch='fbresnet152', model=model)

# 2. Fine-tune model with tree supervision loss
criterion = ...
criterion = SoftTreeSupLoss(dataset='Imagenet1000', hierarchy='induced-fbresnet152', criterion=criterion)

# 3. Run inference using embedded decision rules
model = SoftNBDT(model=model, dataset='Imagenet1000', hierarchy='induced-fbresnet152')
For more information on generating different hierarchies, see Induced Hierarchy.
Want to build and use your own induced hierarchy? [click to expand]
Use the nbdt-hierarchy utility to generate a new induced hierarchy from a pretrained model.
nbdt-hierarchy --arch=efficientnet_b0 --dataset=Imagenet1000
Then, pass the hierarchy name to the loss and models. You may alternatively pass the fully-qualified path_graph path.
from nbdt.loss import SoftTreeSupLoss
from nbdt.model import SoftNBDT

criterion = SoftTreeSupLoss(dataset='Imagenet1000', criterion=criterion, hierarchy='induced-efficientnet_b0')
model = SoftNBDT(dataset='Imagenet1000', model=model, hierarchy='induced-efficientnet_b0')
For more information on generating different hierarchies, see Induced Hierarchy.
Training and Evaluation
To reproduce experimental results, start by cloning the repository and installing all requirements.
git clone git@github.com:alvinwan/neural-backed-decision-trees.git  # or http addr if you don't have private-public github key setup
cd neural-backed-decision-trees
python setup.py develop
To reproduce the core experimental results in our paper -- ignoring ablation studies -- simply run the following bash script:
bash scripts/gen_train_eval_wideresnet.sh
Want more transparent step-by-step instructions? The bash scripts above are explained in more detail in the following sections: Induced Hierarchy, Soft Tree Supervision Loss, and Soft Inference. These scripts reproduce our CIFAR10, CIFAR100, and TinyImagenet200 results. To reproduce our ImageNet results, see nbdt-pytorch-image-models.
For all scripts, you can use any torchvision model or any pytorchcv model, as we directly support both model zoos. Customization for each step is explained below.
1. Hierarchies
Induced Hierarchy
Run the following to generate and test induced hierarchies for CIFAR10 based off of the WideResNet model.
nbdt-hierarchy --arch=wrn28_10_cifar10 --dataset=CIFAR10
See how it works and how to configure. [click to expand]
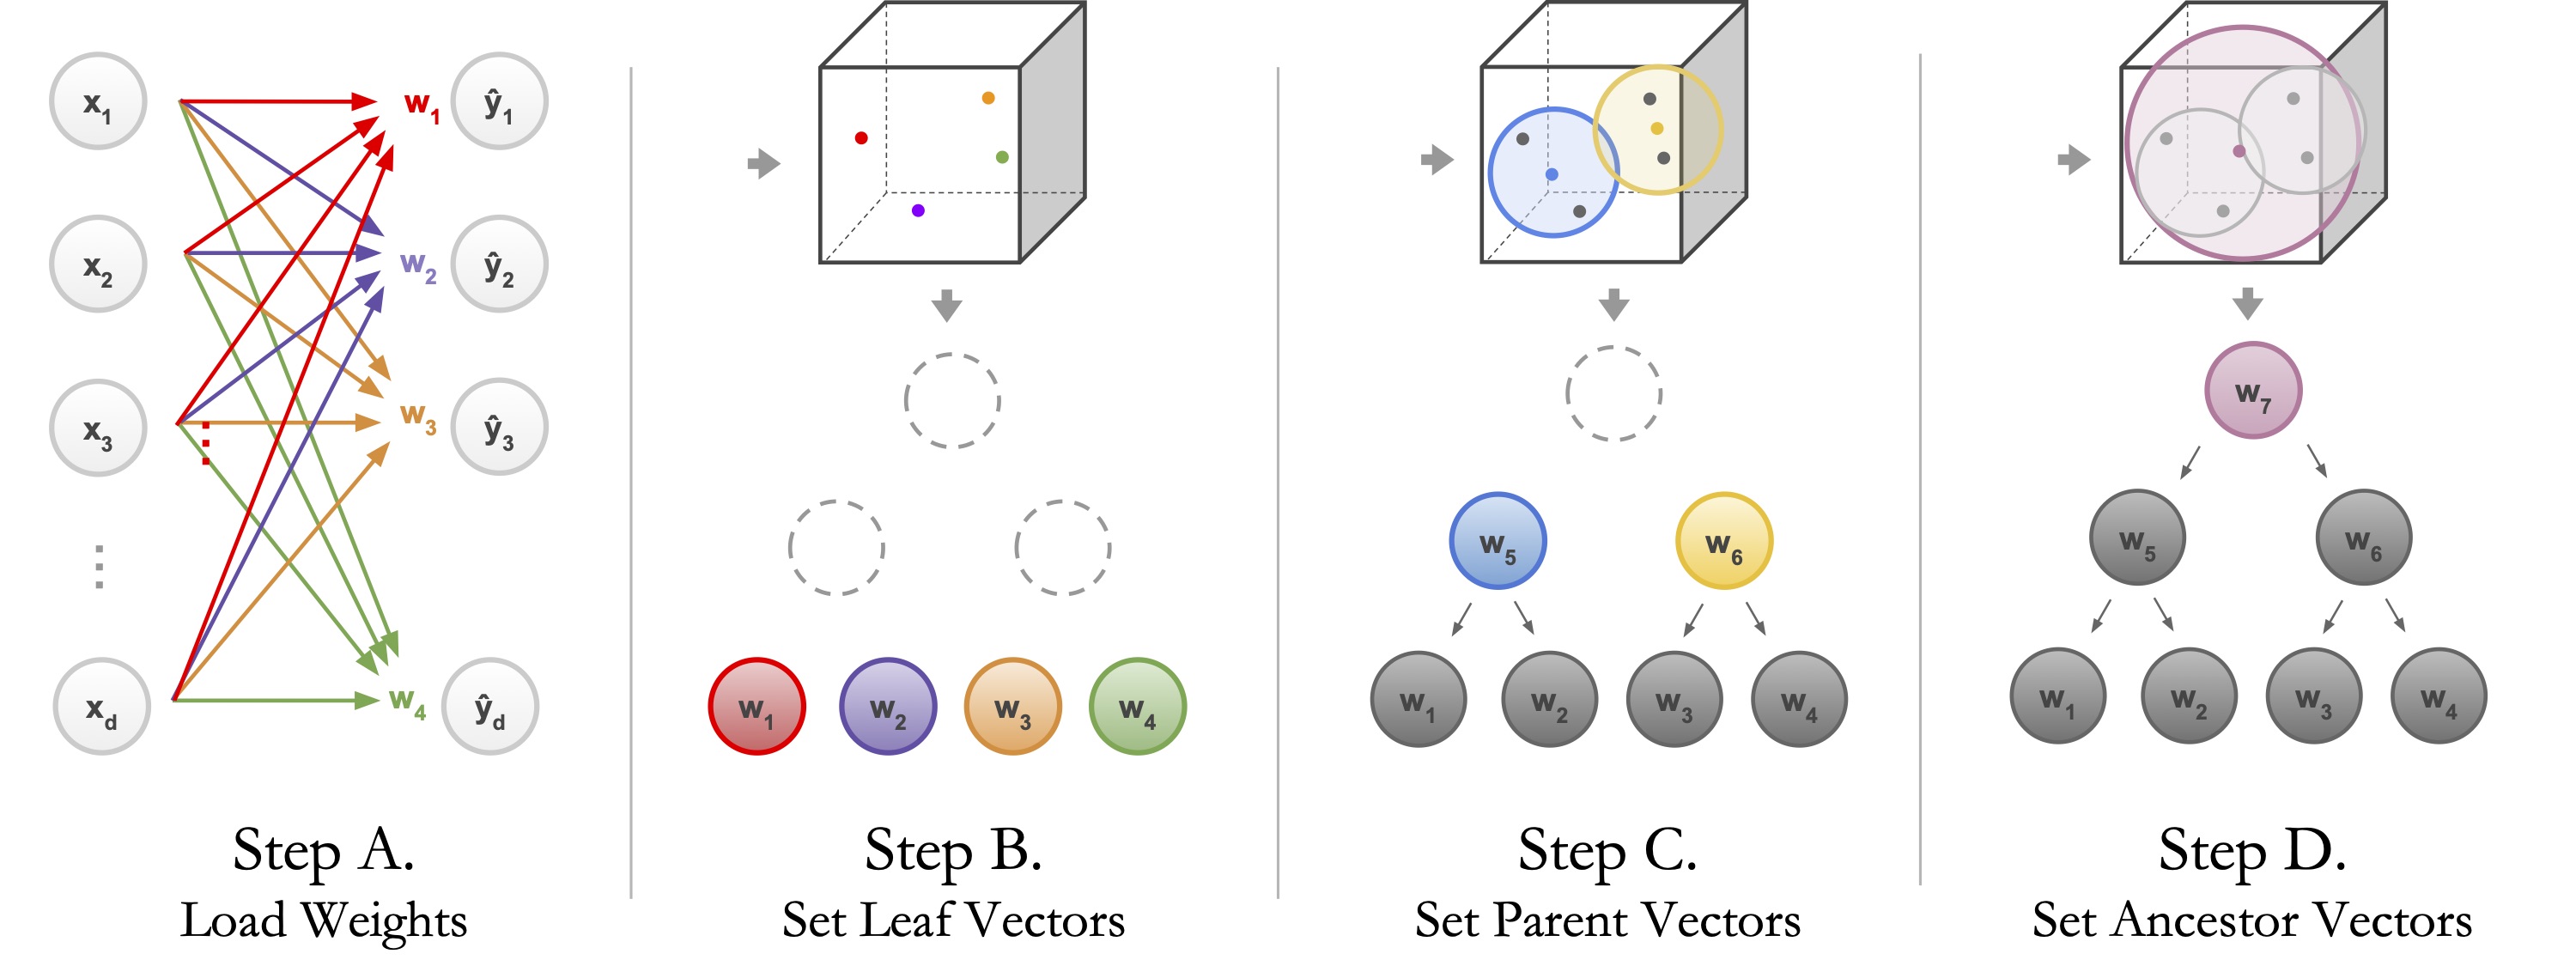
The script loads the pretrained model (Step A), populates the leaves of the tree with fully-connected layer weights (Step B) and performs hierarchical agglomerative clustering (Step C). Note that the above command can be rerun with different architectures, different datasets, or random neural network checkpoints to produce different hierarchies.
# different architecture: ResNet18
nbdt-hierarchy --arch=ResNet18 --dataset=CIFAR10

# different dataset: ImageNet
nbdt-hierarchy --arch=efficientnet_b7 --dataset=Imagenet1000

# arbitrary checkpoint
wget https://download.pytorch.org/models/resnet18-5c106cde.pth -O resnet18.pth
nbdt-hierarchy --checkpoint=resnet18.pth --dataset=Imagenet1000
You can also run the hierarchy generation from source directly, without using the command-line tool, by passing in a pretrained model.
from nbdt.hierarchy import generate_hierarchy
from nbdt.models import wrn28_10_cifar10

model = wrn28_10_cifar10(pretrained=True)
generate_hierarchy(dataset='Imagenet1000', arch='wrn28_10_cifar10', model=model)
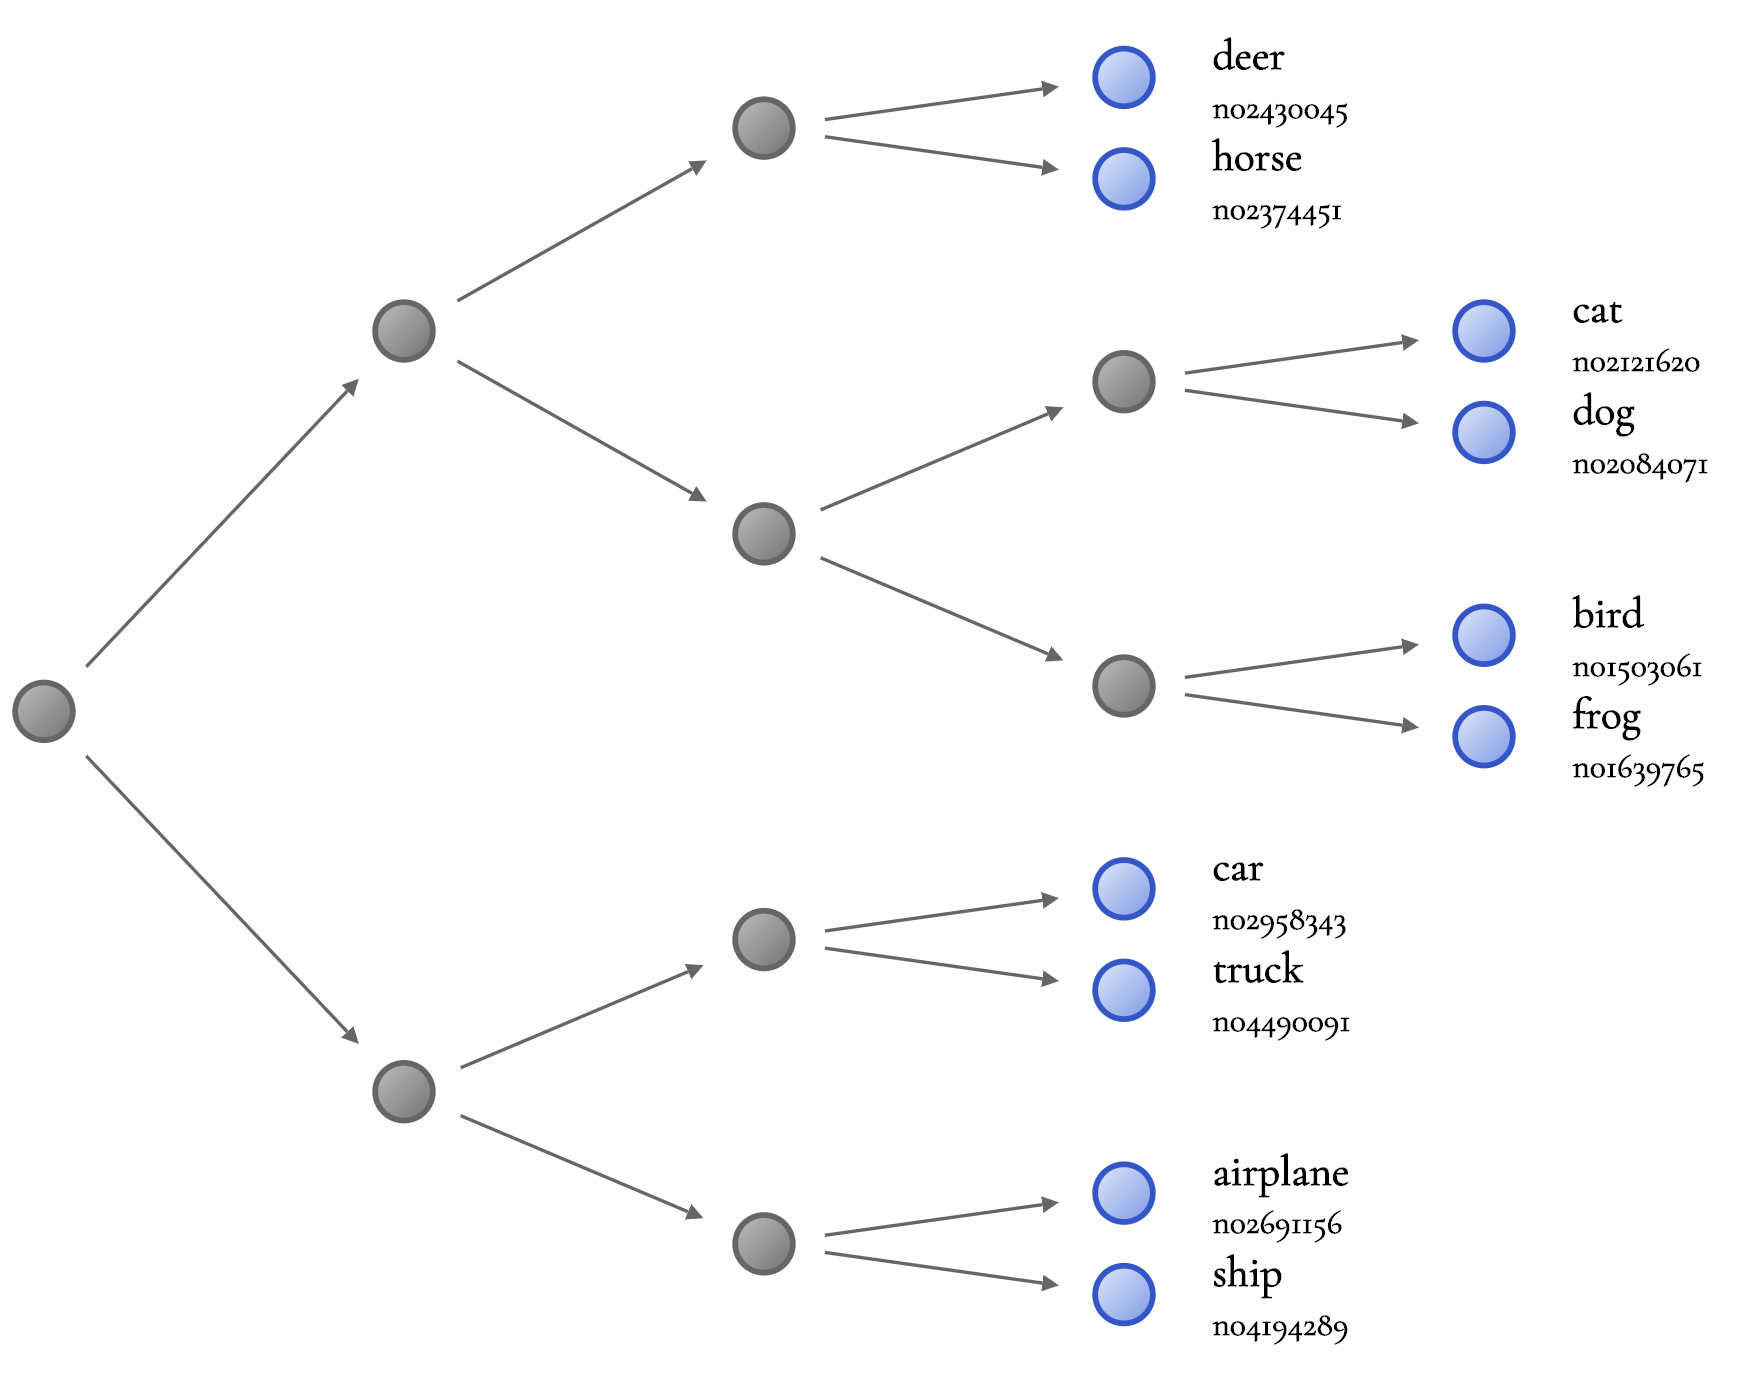
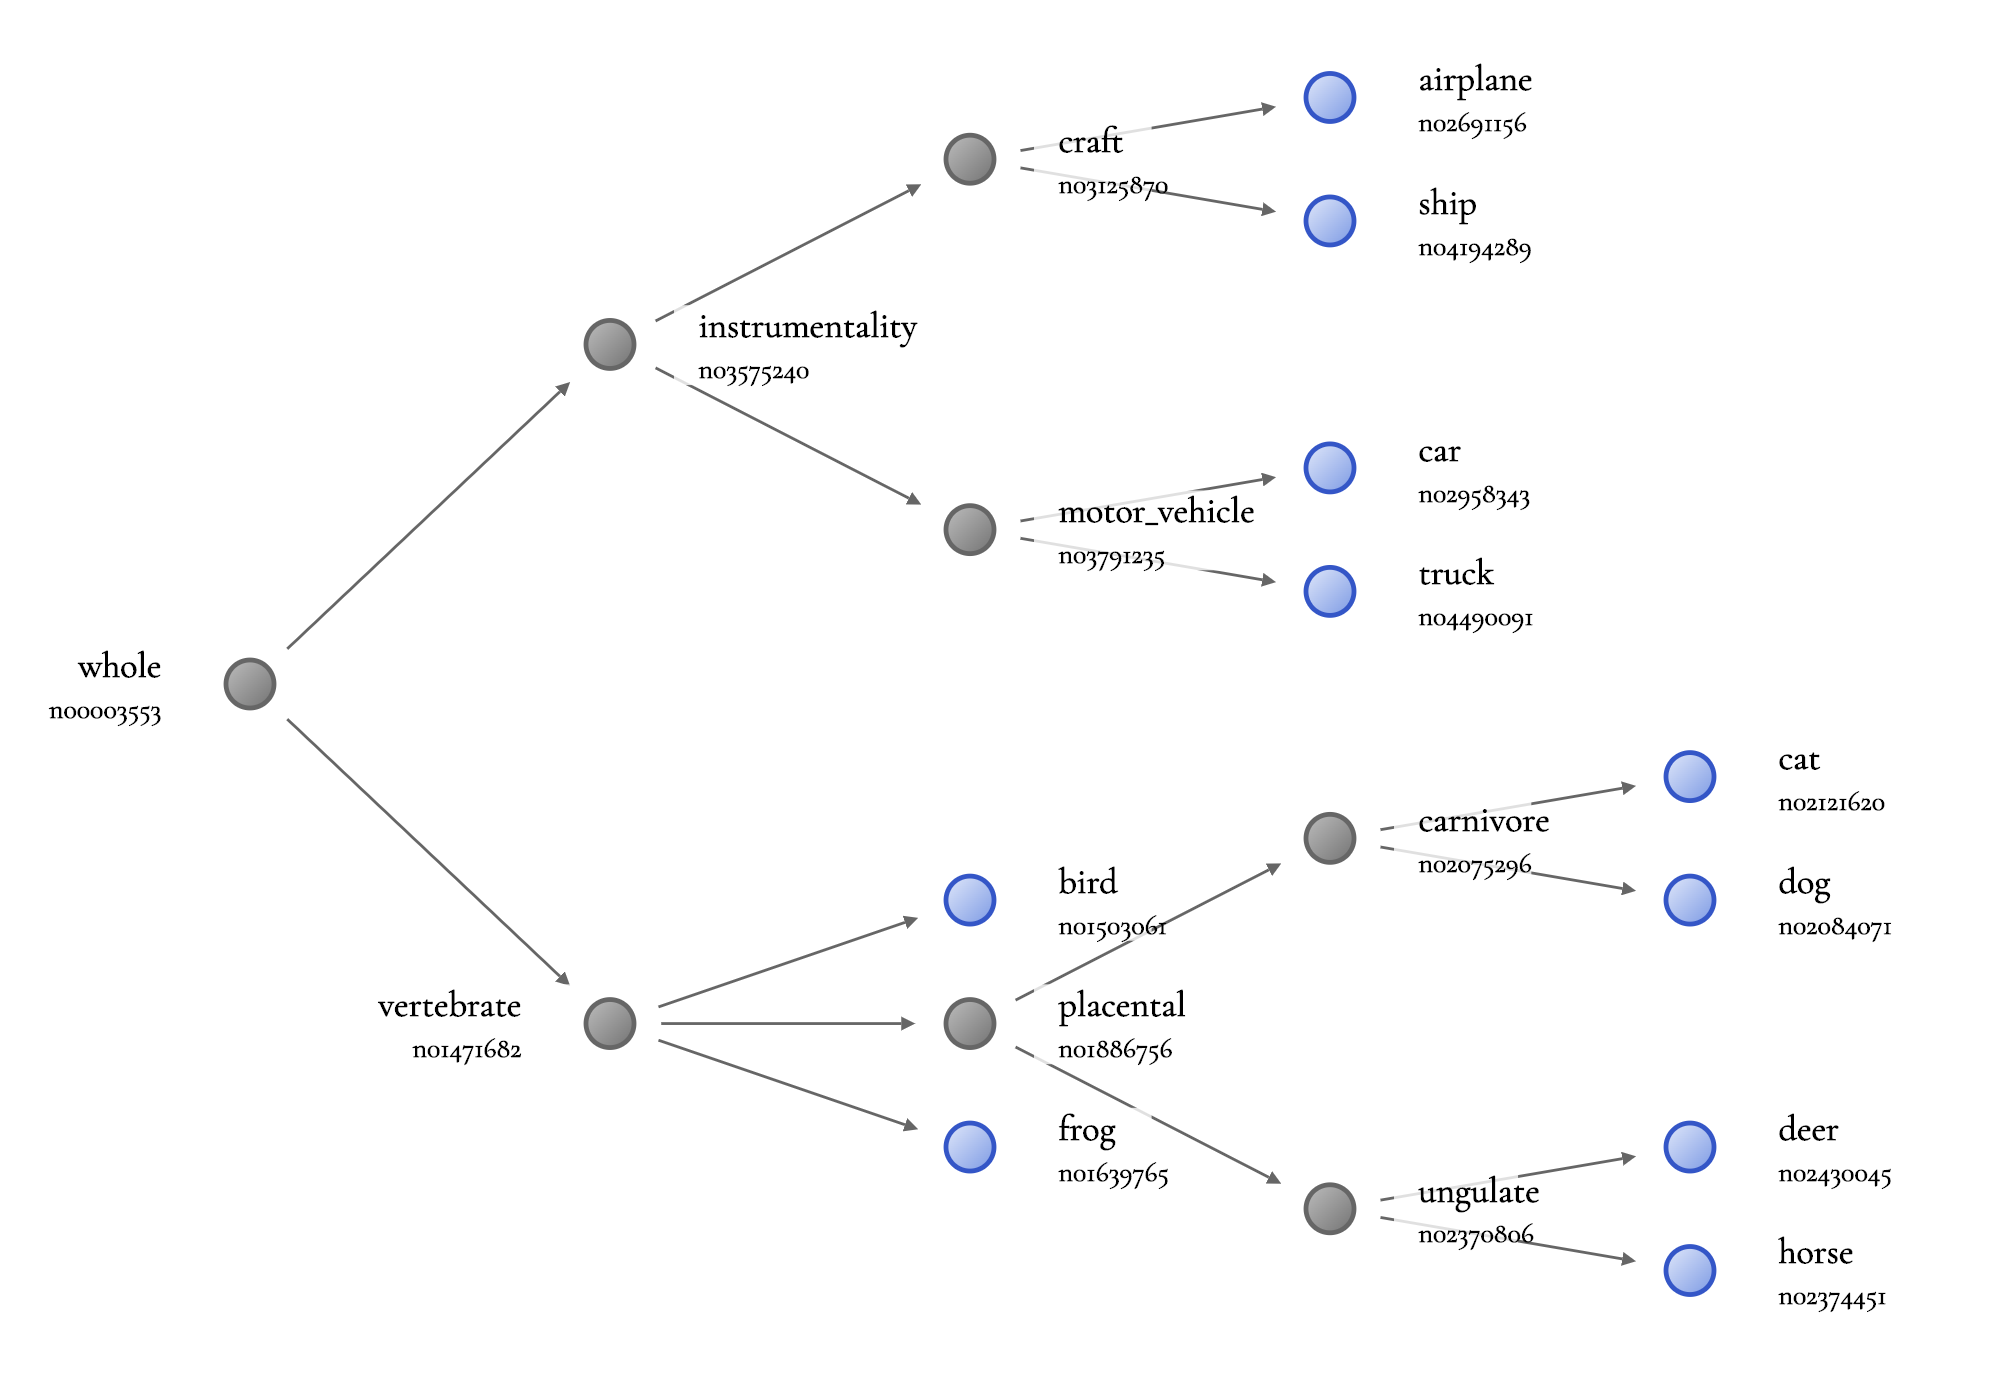
See example visualization. [click to expand]
By default, the generation script outputs the HTML file containing a d3
visualization. All visualizations are stored in out/. We will generate another visualization with larger font size and includes wordnet IDs where available.
nbdt-hierarchy --vis-sublabels --vis-zoom=1.25 --dataset=CIFAR10 --arch=wrn28_10_cifar10
The above script's output will end with the following.
==> Reading from ./nbdt/hierarchies/CIFAR10/graph-induced-wrn28_10_cifar10.json
Found just 1 root.
==> Wrote HTML to out/induced-wrn28_10_cifar10-tree.html
Open up out/induced-wrn28_10_cifar10-tree.html in your browser to view the d3 tree visualization.
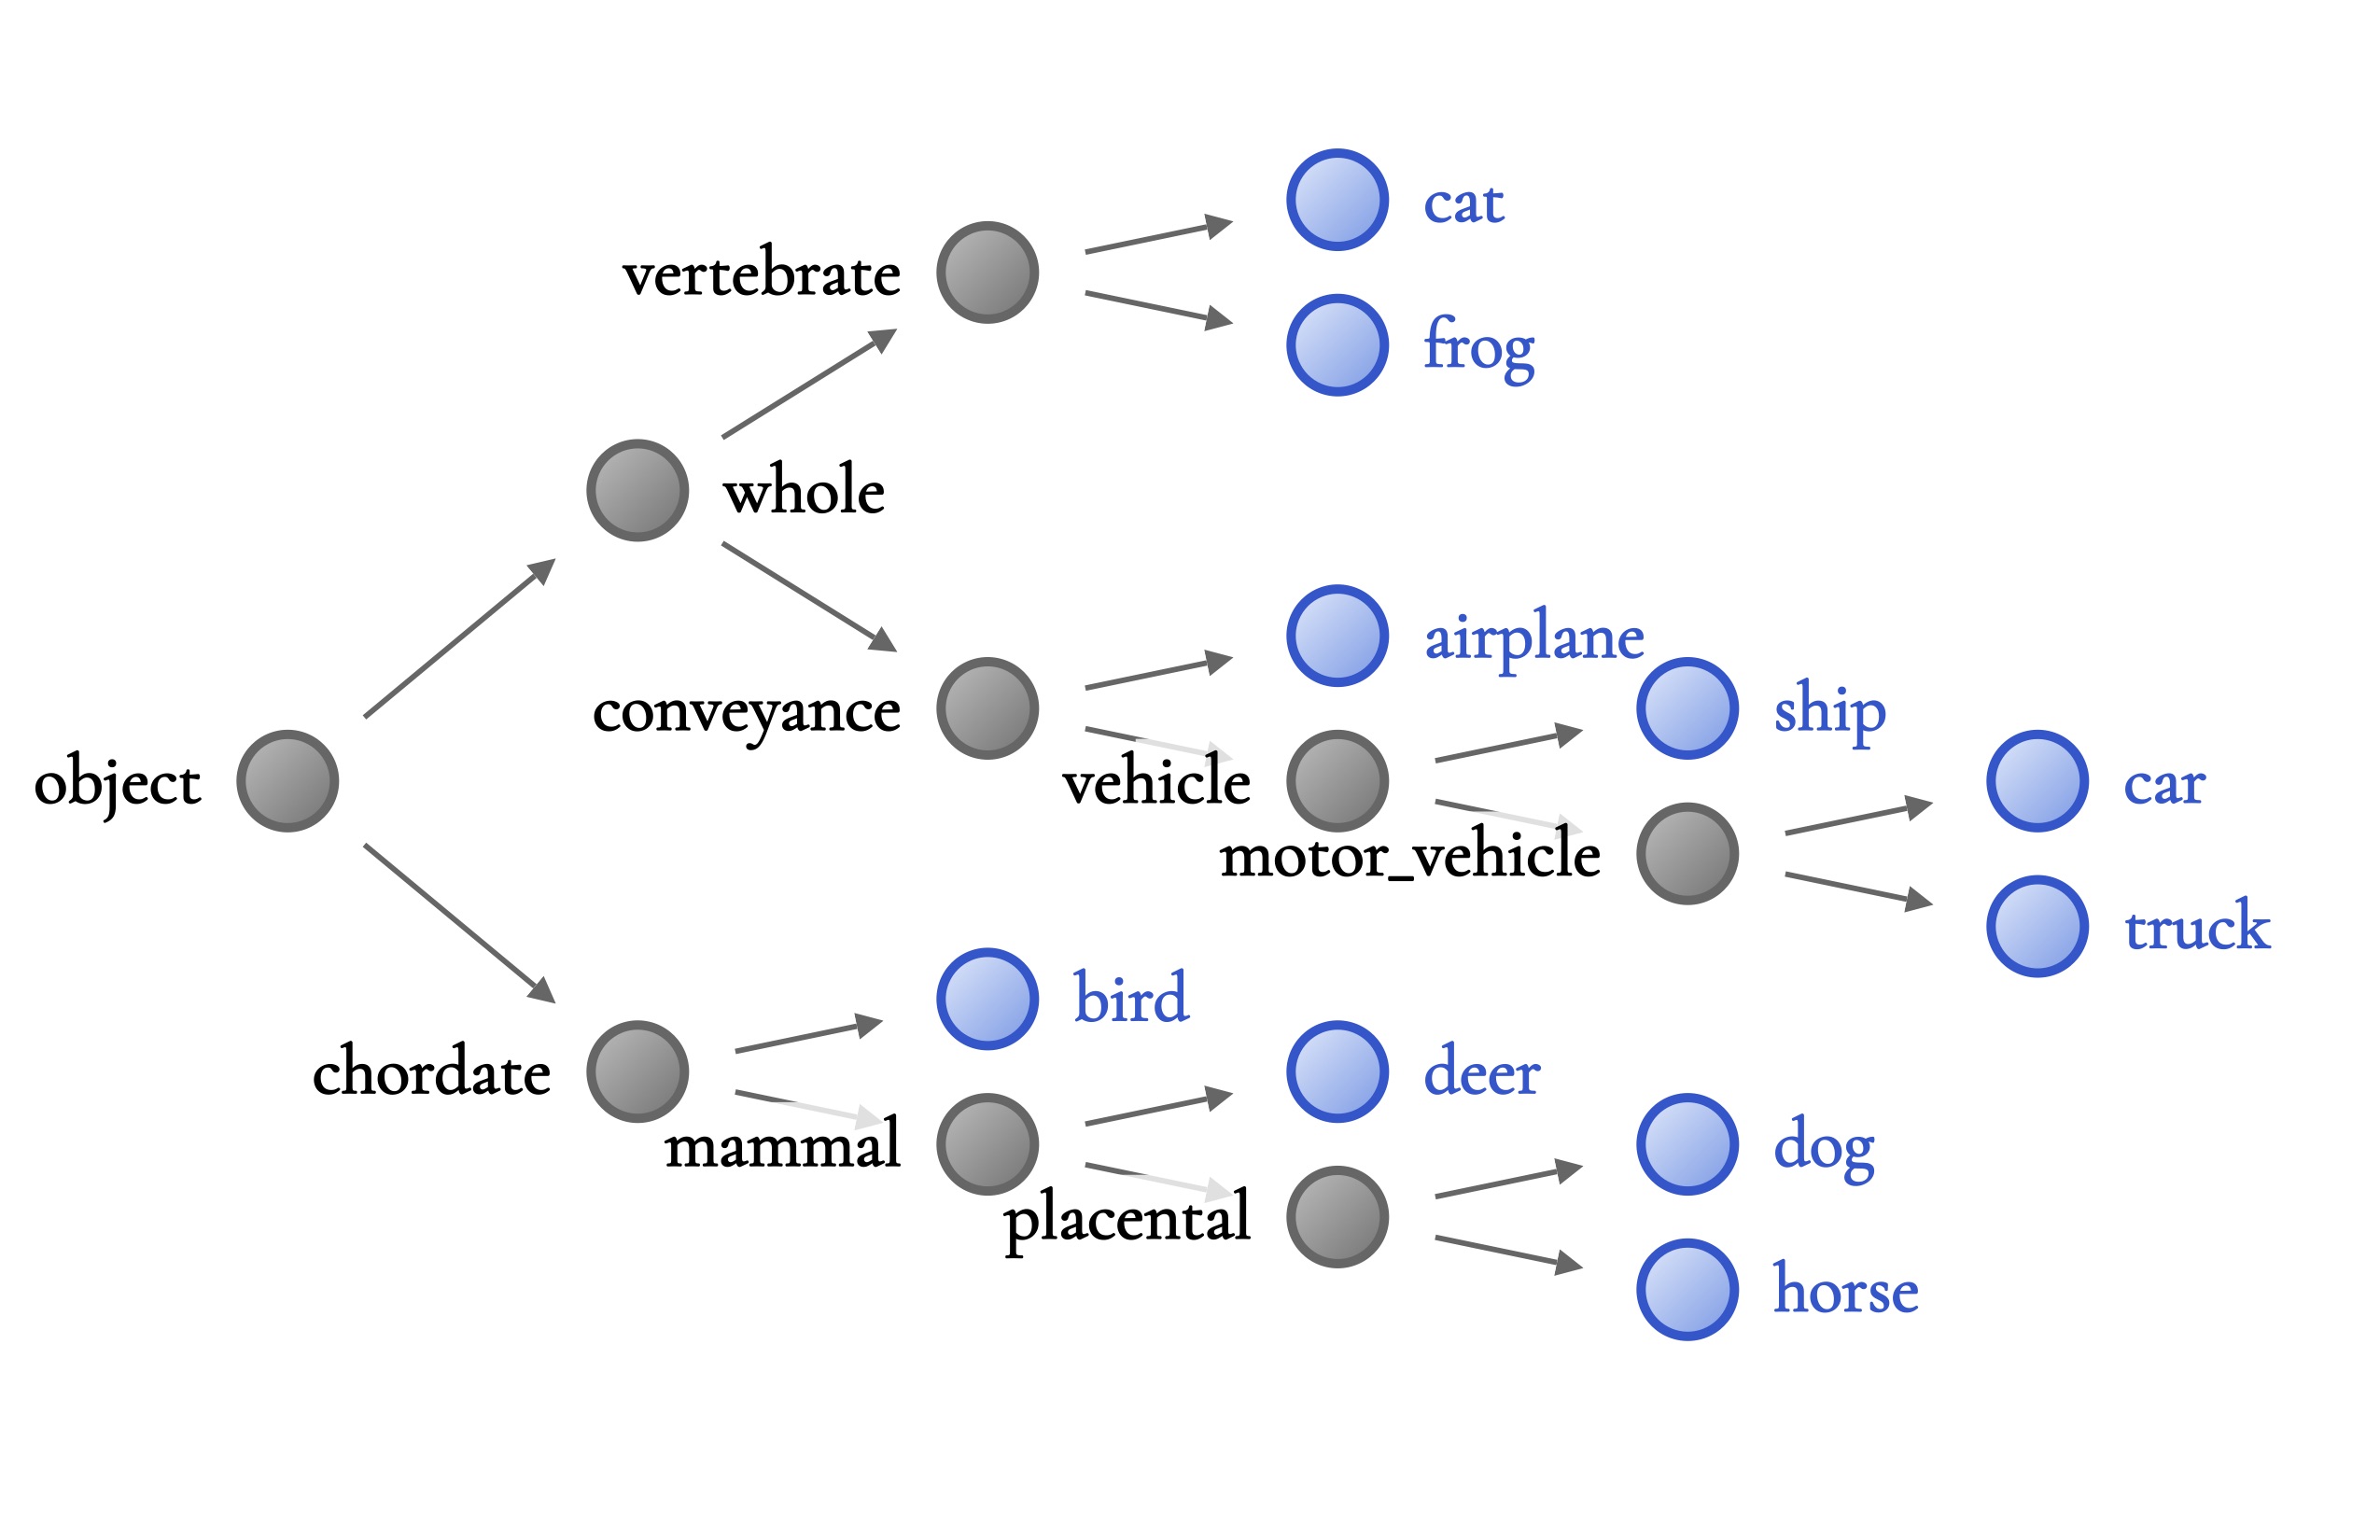
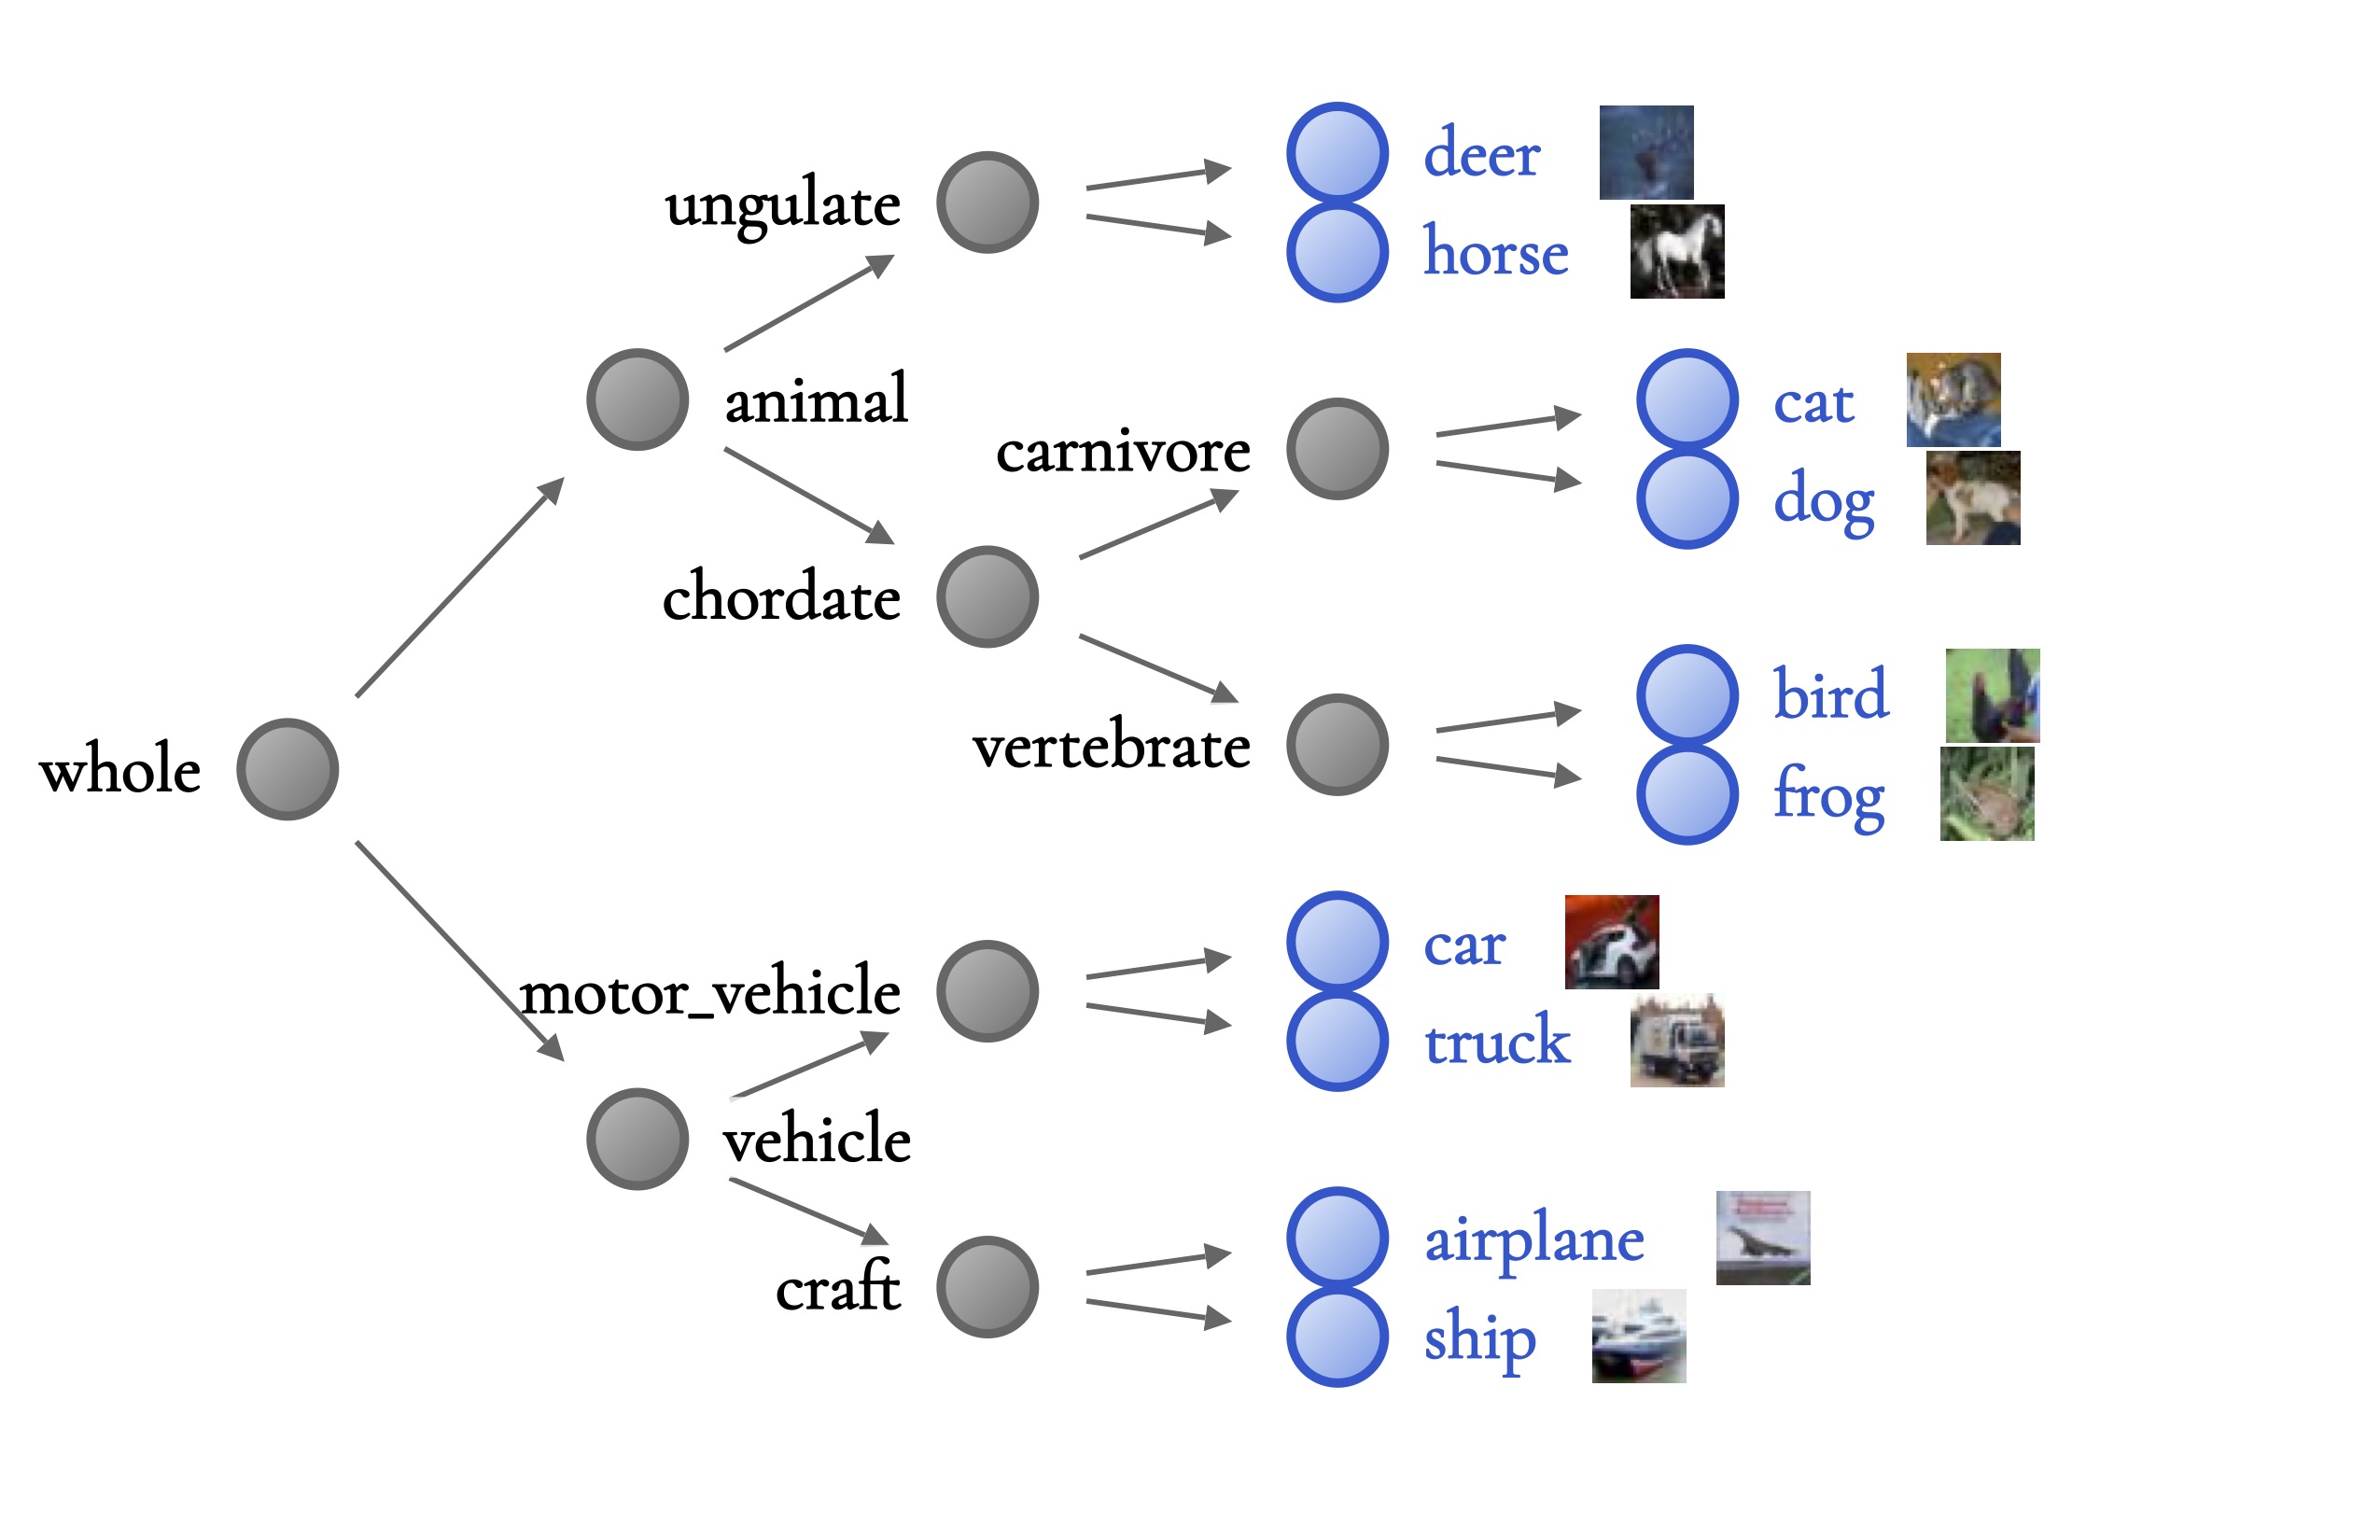
Want to reproduce hierarchy visualizations from the paper? [click to expand]
To generate figures from the paper, use a larger zoom and do not include sublabels. The checkpoints used to generate the induced hierarchy visualizations are included in this repository's hub of models.
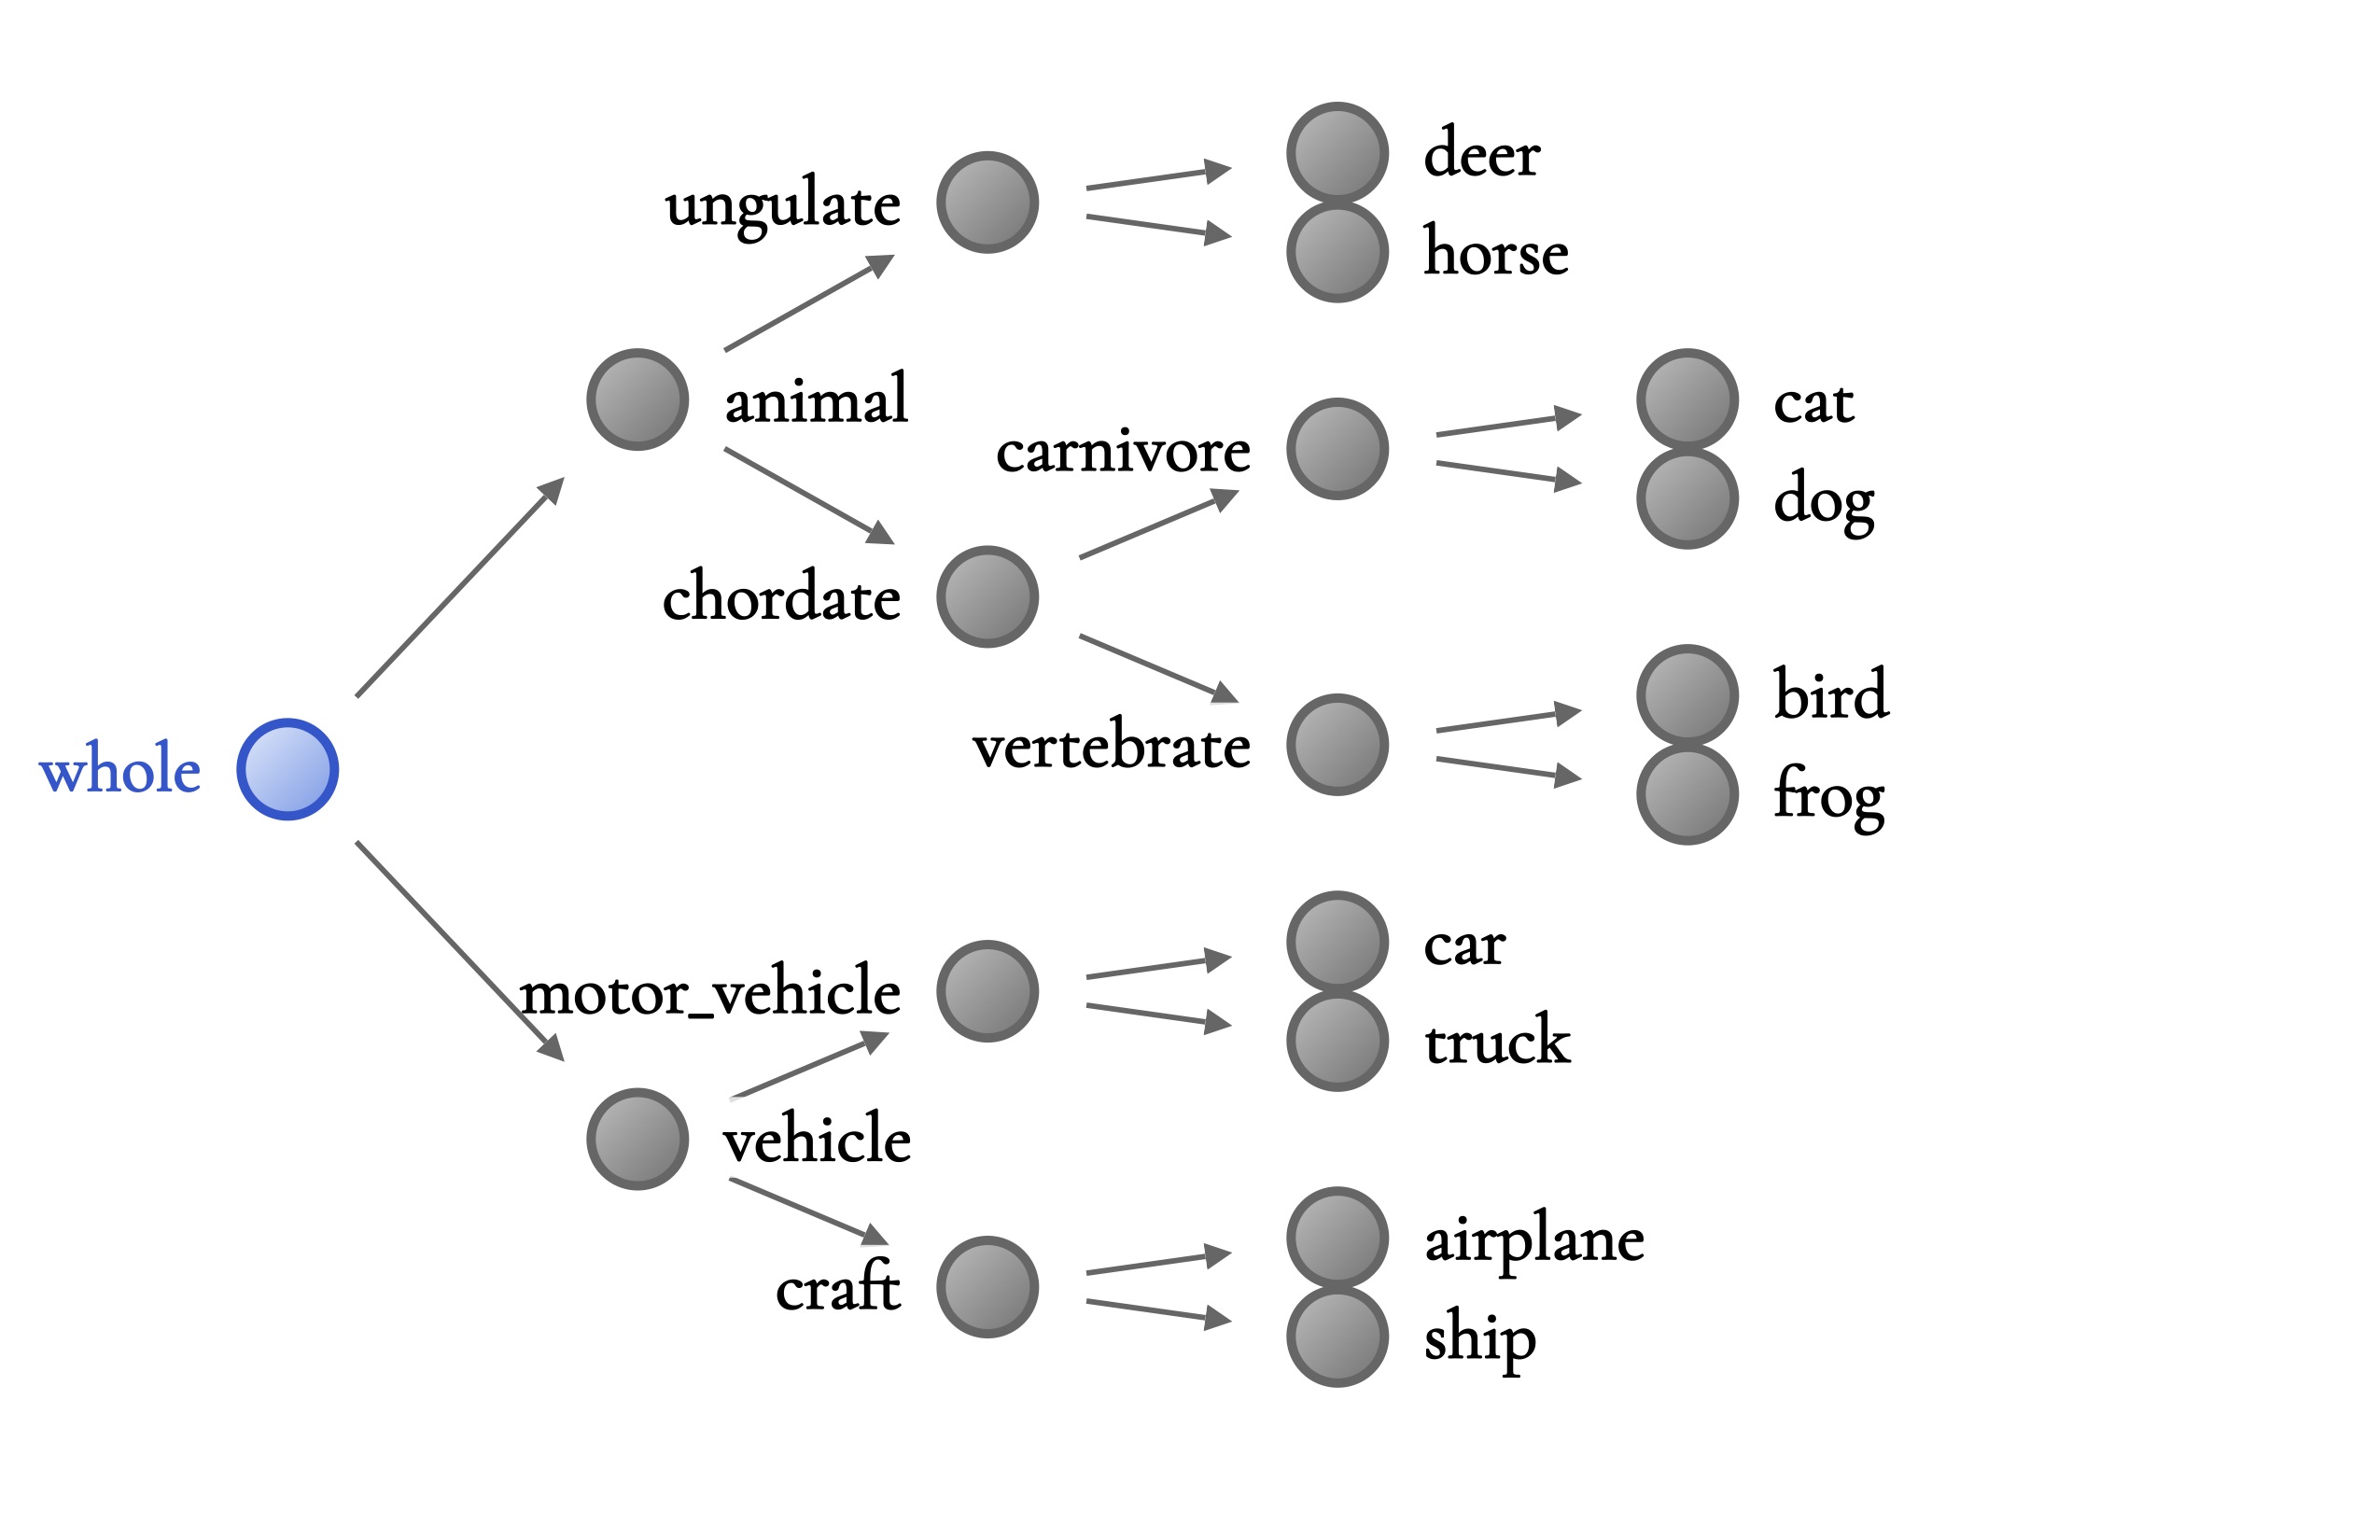
nbdt-hierarchy --vis-zoom=2.5 --dataset=CIFAR10 --arch=ResNet10 --vis-force-labels-left conveyance vertebrate chordate vehicle motor_vehicle mammal placental
nbdt-hierarchy --vis-zoom=2.5 --dataset=CIFAR10 --arch=wrn28_10_cifar10 --vis-leaf-images --vis-image-resize-factor=1.5 --vis-force-labels-left motor_vehicle craft chordate vertebrate carnivore ungulate craft
nbdt-hierarchy --vis-zoom=2.5 --dataset=CIFAR10 --arch=wrn28_10_cifar10 --vis-color-nodes whole --vis-no-color-leaves --vis-force-labels-left motor_vehicle craft chordate vertebrate carnivore ungulate craft
WordNet Hierarchy
Run the following to generate and test WordNet hierarchies for CIFAR10, CIFAR100, and TinyImagenet200. The script also downloads the NLTK WordNet corpus.
bash scripts/generate_hierarchies_wordnet.sh
See how it works. [click to expand]
The below just explains the above generate_hierarchies_wordnet.sh, using CIFAR10. You do not need to run the following after running the above bash script.
# Generate mapping from classes to WNID. This is required for CIFAR10 and CIFAR100.
nbdt-wnids --dataset=CIFAR10

# Generate hierarchy, using the WNIDs. This is required for all datasets: CIFAR10, CIFAR100, TinyImagenet200
nbdt-hierarchy --method=wordnet --dataset=CIFAR10
See example visualization. [click to expand]
We can generate a visualization with a slightly improved zoom and with wordnet IDs. By default, the script builds the Wordnet hierarchy for CIFAR10.
nbdt-hierarchy --method=wordnet --vis-zoom=1.25 --vis-sublabels
Random Hierarchy
Use --method=random to randomly generate a binary-ish hierarchy. Optionally, use the --seed (--seed=-1 to not shuffle leaves) and --branching-factor flags. When debugging, we set branching factor to the number of classes. For example, the sanity check hierarchy for CIFAR10 is
nbdt-hierarchy --seed=-1 --branching-factor=10 --dataset=CIFAR10
2. Tree Supervision Loss
In the below training commands, we uniformly use --path-resume=<path/to/checkpoint> --lr=0.01 to fine-tune instead of training from scratch. Our results using a recently state-of-the-art pretrained checkpoint (WideResNet) were fine-tuned. Run the following to fine-tune WideResNet with soft tree supervision loss on CIFAR10.
python main.py --lr=0.01 --dataset=CIFAR10 --arch=wrn28_10_cifar10 --hierarchy=induced-wrn28_10_cifar10 --pretrained --loss=SoftTreeSupLoss
See how it works and how to configure. [click to expand]
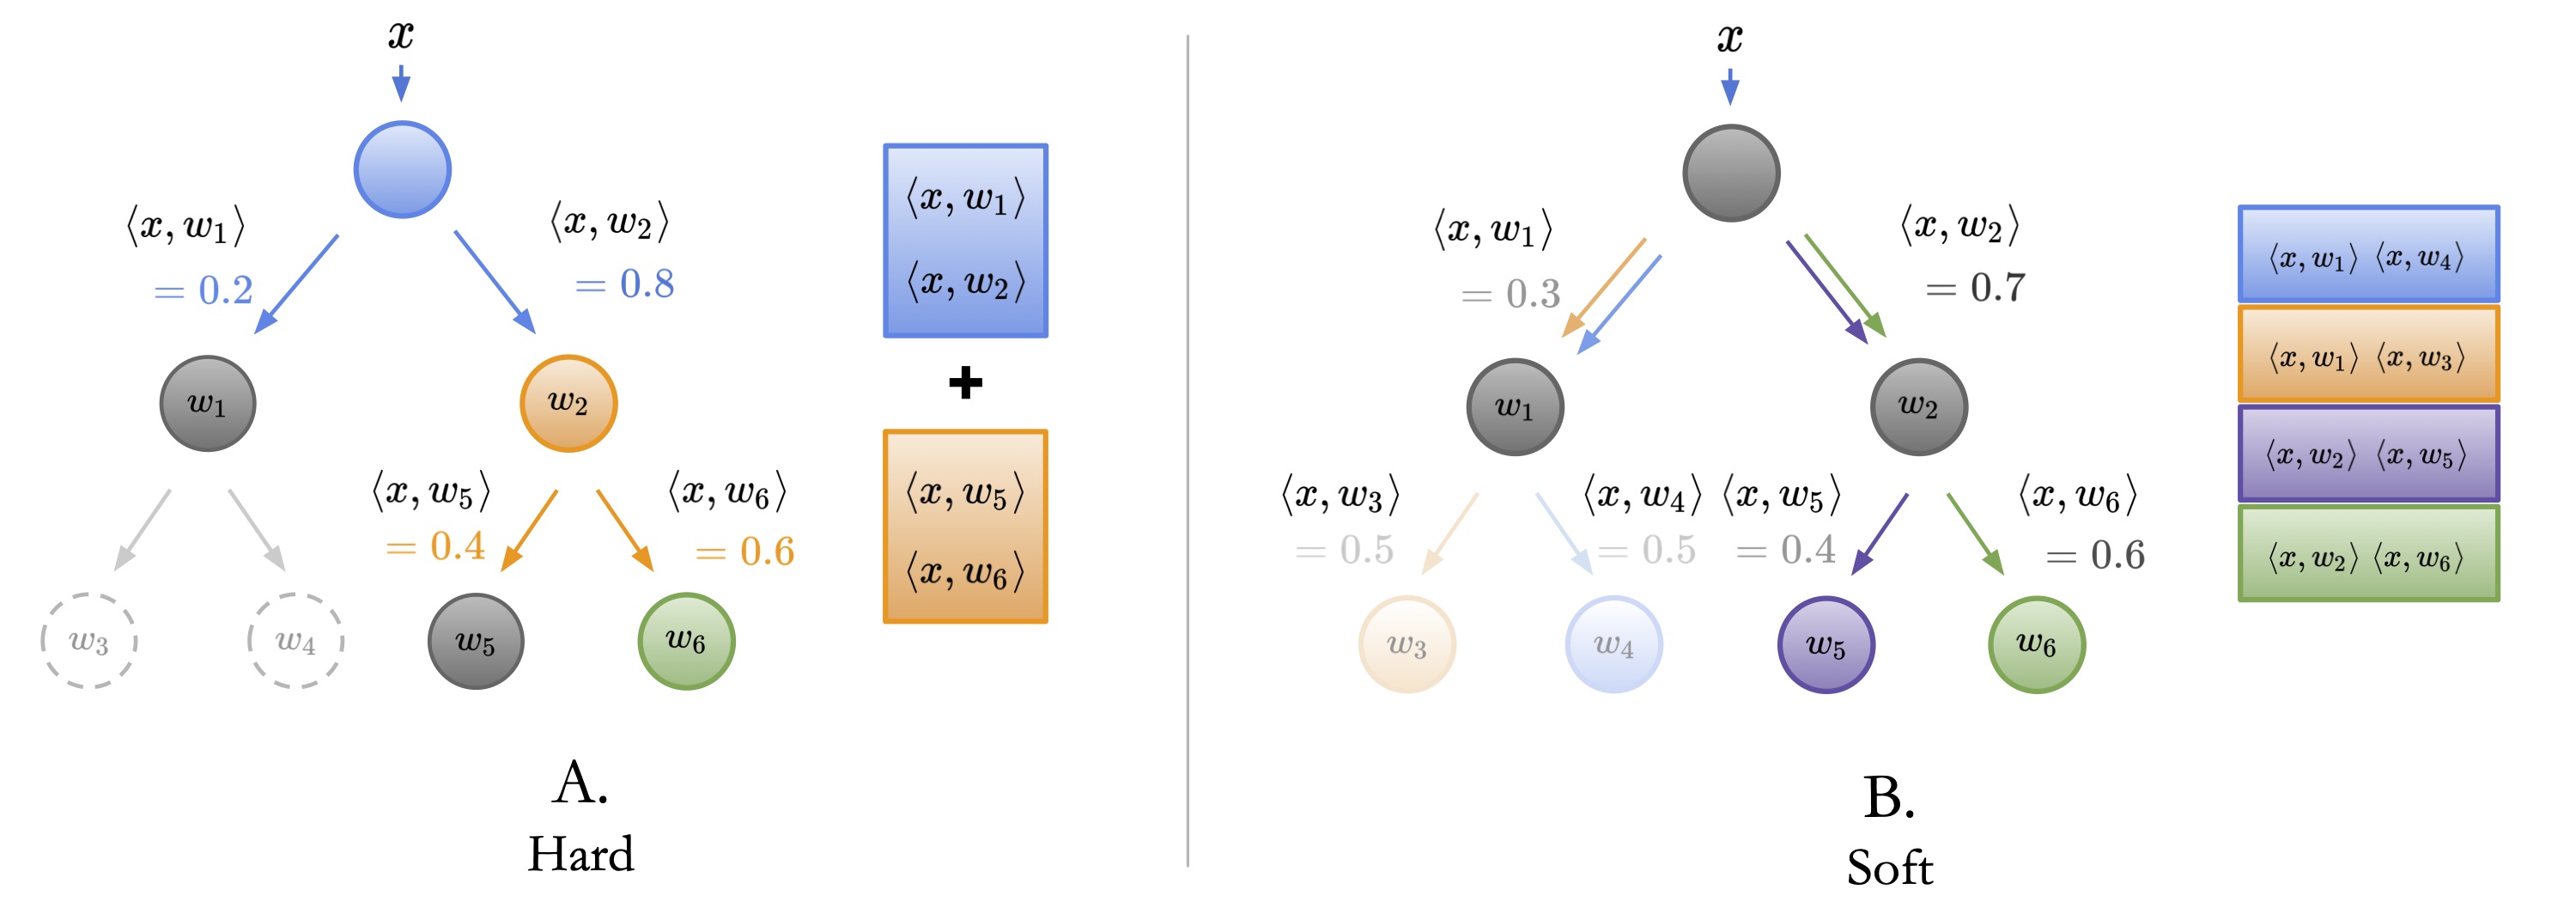
The tree supervision loss features two variants: a hard version and a soft version. Simply change the loss to HardTreeSupLoss or SoftTreeSupLoss, depending on the one you want.
# fine-tune the wrn pretrained checkpoint on CIFAR10 with hard tree supervision loss
python main.py --lr=0.01 --dataset=CIFAR10 --arch=wrn28_10_cifar10 --hierarchy=induced-wrn28_10_cifar10 --pretrained --loss=HardTreeSupLoss

# fine-tune the wrn pretrained checkpoint on CIFAR10 with soft tree supervision loss
python main.py --lr=0.01 --dataset=CIFAR10 --arch=wrn28_10_cifar10 --hierarchy=induced-wrn28_10_cifar10 --pretrained --loss=SoftTreeSupLoss
To train from scratch, use --lr=0.1 and do not pass the --path-resume or --pretrained flags. We fine-tune WideResnet on CIFAR10, CIFAR100, but where the baseline neural network accuracy is reproducible, we train from scratch.
3. Inference
Like with the tree supervision loss variants, there are two inference variants: one is hard and one is soft. Below, we run soft inference on the model we just trained with the soft loss.
Run the following bash script to obtain these numbers.
python main.py --dataset=CIFAR10 --arch=wrn28_10_cifar10 --hierarchy=induced-wrn28_10_cifar10 --loss=SoftTreeSupLoss --eval --resume --analysis=SoftEmbeddedDecisionRules
See how it works and how to configure. [click to expand]

Note the following commands are nearly identical to the corresponding train commands -- we drop the lr, pretrained flags and add resume, eval, and the analysis type (hard or soft inference). The best results in our paper, oddly enough, were obtained by running hard and soft inference both on the neural network supervised by a soft tree supervision loss. This is reflected in the commands below.
# running soft inference on soft-supervised model
python main.py --dataset=CIFAR10 --arch=wrn28_10_cifar10 --hierarchy=induced-wrn28_10_cifar10 --loss=SoftTreeSupLoss --eval --resume --analysis=SoftEmbeddedDecisionRules

# running hard inference on soft-supervised model
python main.py --dataset=CIFAR10 --arch=wrn28_10_cifar10 --hierarchy=induced-wrn28_10_cifar10 --loss=SoftTreeSupLoss --eval --resume --analysis=HardEmbeddedDecisionRules
Results
We compare against all previous decision-tree-based methods that report on CIFAR10, CIFAR100, and/or ImageNet, including methods that hinder interpretability by using impure leaves or a random forest. We report the baseline with the highest accuracy, of all these methods: Deep Neural Decision Forest (DNDF updated with ResNet18), Explainable Observer-Classifier (XOC), Deep ConvolutionalDecision Jungle (DCDJ), Network of Experts (NofE), Deep Decision Network(DDN), and Adaptive Neural Trees (ANT).
| CIFAR10 | CIFAR100 | TinyImagenet200 | ImageNet | |
|---|---|---|---|---|
| NBDT-S (Ours) | 97.57% | 82.87% | 66.66% | 75.13% |
| NBDT-H (Ours) | 97.55% | 82.21% | 64.39% | 74.79% |
| Best Pre-NBDT Acc | 94.32% | 76.24% | 44.56% | 61.29% |
| Best Pre-NBDT Method | DNDF | NofE | DNDF | NofE |
| Our improvement | 3.25% | 6.63% | 22.1% | 13.84% |
As the last row denotes, we outperform all previous decision-tree-based methods by anywhere from 3% (CIFAR10) to 13%+ (ImageNet). Note that accuracies in our pretrained checkpoints for small to medium datasets (CIFAR10, CIFAR100, and TinyImagenet200) may fluctuate by 0.1-0.2%, as we retrained all models with the current public version of this repository.
Setup for Development
As discussed above, you can use the nbdt python library to integrate NBDT training into any existing training pipeline. However, if you wish to use the barebones training utilities here, refer to the following sections for adding custom models and datasets.
If you have not already, start by cloning the repository and installing all requirements.
git clone git@github.com:alvinwan/neural-backed-decision-trees.git  # or http addr if you don't have private-public github key setup
cd neural-backed-decision-trees
python setup.py develop
As a sample, we've included copies of the WideResNet bash script but for ResNet18.
bash scripts/gen_train_eval_resnet.sh
For any models that have pretrained checkpoints for the datasets of interest (e.g., CIFAR10, CIFAR100, and ImageNet models from pytorchcv or ImageNet models from torchvision), modify scripts/gen_train_eval_pretrained.sh; it suffices to change the model name. For all models that do not have pretrained checkpoint for the dataset of interest, modify scripts/gen_train_eval_nopretrained.sh.
Models
Without any modifications to main.py, you can replace ResNet18 with your favorite network: Pass any torchvision.models model or any pytorchcv model to --arch, as we directly support both model zoos. Note that the former only supports models pretrained on ImageNet. The latter supports models pretrained on CIFAR10, CIFAR100, andd ImageNet; for each dataset, the corresponding model name includes the dataset e.g., wrn28_10_cifar10. However, neither supports models pretrained on TinyImagenet.
To add a new model from scratch:
- Create a new file containing your network, such as
./nbdt/models/yournet.py. This file should contain an__all__only exposing functions that return a model. These functions should acceptpretrained: boolandprogress: bool, then forward all other keyword arguments to the model constructor. - Expose your new file via
./nbdt/models/__init__.py:from .yournet import *. - Train the original neural network on the target dataset. e.g.,
python main.py --arch=yournet18.
Dataset
Without any modifications to main.py, you can use any image classification dataset found at torchvision.datasets by passing it to --dataset. To add a new dataset from scratch:
- Create a new file containing your dataset, such as
./nbdt/data/yourdata.py. Say the data class isYourData10. Like before, only expose the dataset class via__all__. This dataset class should support a.classesattribute which returns a list of human-readable class names. - Expose your new file via
'./nbdt/data/__init__.py':from .yourdata import *. - Create a text file with wordnet IDs in
./nbdt/wnids/{dataset}.txt. This list should be in the same order that your dataset's.classesis. You may optionally use the utilitynbdt-wnidsto generate wnids (see note below) - Train the original neural network on the target dataset. e.g.,
python main.py --dataset=YourData10
*Note: You may optionally use the utility
nbdt-wnidsto generate wnids:nbdt-wnids --dataset=YourData10, where
YourDatais your dataset name. If a provided class name fromYourData.classesdoes not exist in the WordNet corpus, the script will generate a fake wnid. This does not affect training but subsequent analysis scripts will be unable to provide WordNet-imputed node meanings.
Citation
If you find this work useful for your research, please cite our paper:
@article{wan2020nbdt,
   title={NBDT: Neural-Backed Decision Trees},
   author={Alvin Wan and Lisa Dunlap and Daniel Ho and Jihan Yin and Scott Lee and Henry Jin and Suzanne Petryk and Sarah Adel Bargal and Joseph E. Gonzalez},
   year={2020},
   eprint={},
   archivePrefix={arXiv},
   primaryClass={cs.CV}
}
Release history Release notifications | RSS feed


Download files
Download the file for your platform. If you're not sure which to choose, learn more about installing packages.


