NodeORC: Automated edge and cloud image-based discharge estimation with OpenRiverCam

Project description


What is NodeOpenRiverCam
NodeOpenRiverCam enables velocimetry analysis and discharge estimation of videos in the cloud or directly on a site, using the underlying pyOpenRiverCam library. It is meant to operate together with a LiveOpenRiverCam server which collects data from multiple nodeOpenRiverCam instances, orchestrates and distributes new tasks to them. You can connect as many NodeOpenRiverCam devices to a LiveOpenRiverCam server as you want.
NodeOpenRiverCam is being developed in the TEMBO Africa project. The TEMBO Africa project has received funding from the European Union’s Horizon Europe research and innovation programme under greant agreement No. 101086209.
Both NodeOpenRiverCam and LiveOpenRiverCam are currently under development for their first release. The first release of both OpenRiverCam components is planned in May 2024. Until that time please stay up to date on this page. The documentation will change significantly during this period. We do not provide any feedback on questions until the first release is out.
.
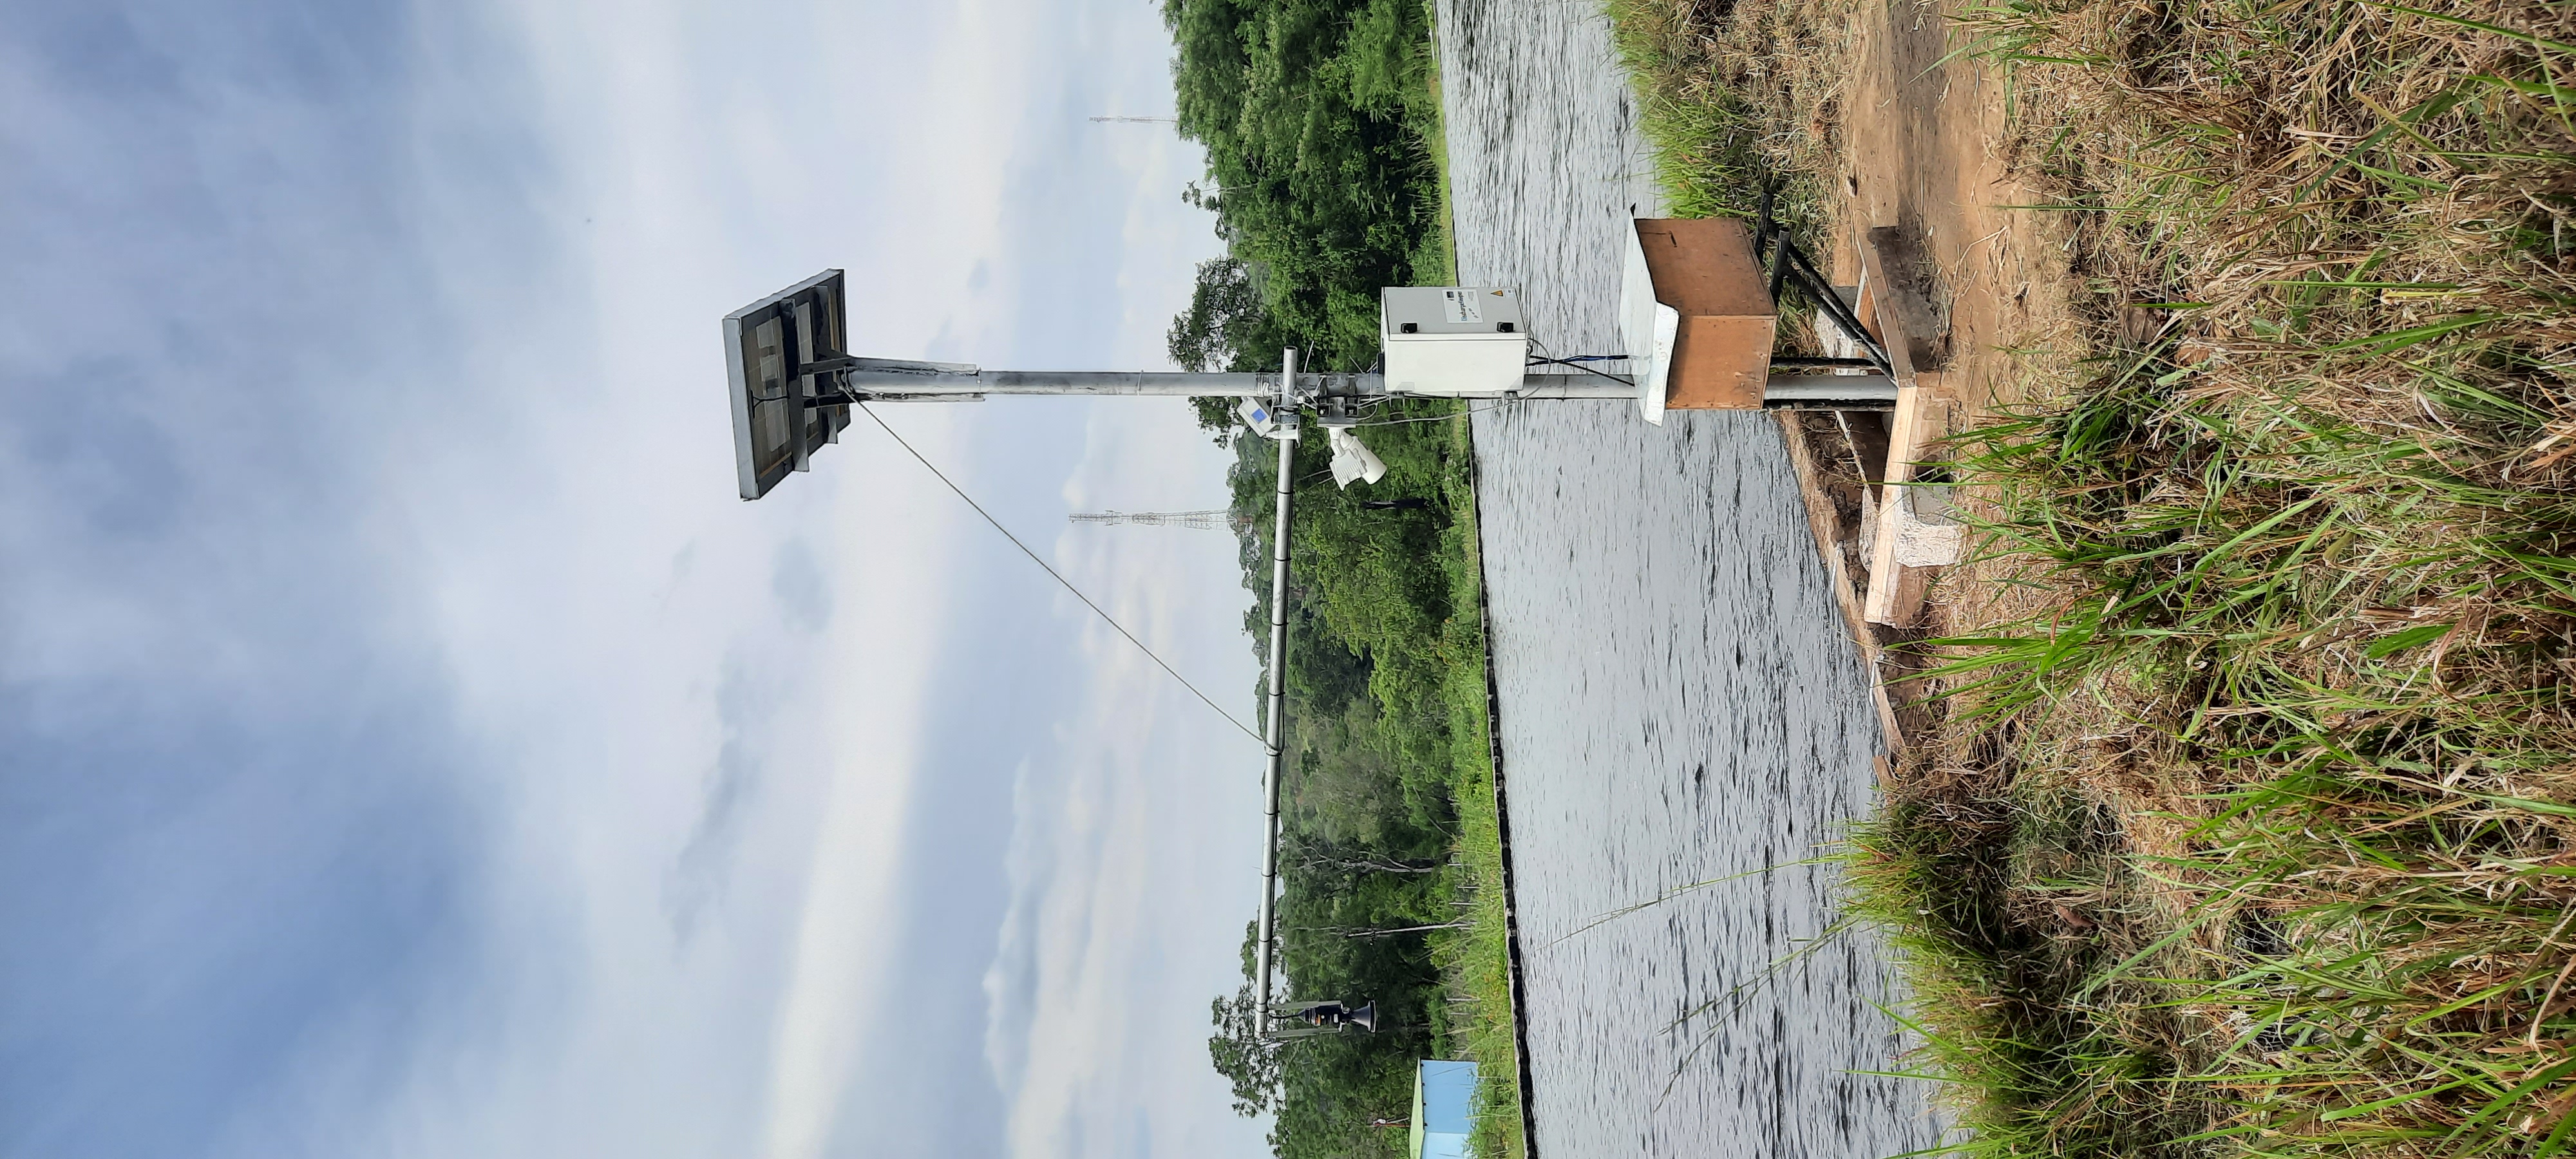
NodeOpenRiverCam site with processing occurring on the fly, and data sent to the LiveOpenRiverCam platform. Credits SEBA and Photrack for site setup and the hardware.
Issues
If you have a question or problem, then please DO NOT send emails to us. Instead, please submit an issue on the Github respository, following the guidelines.
Getting started
To get started with NodeOpenRivercam, you will need the following:
A device on which to setup NodeORC. This can be a local device running on the site where videos are collected or a cloud device. The device should be connected to internet. For local processing, the device should also have sufficient storage available.
For edge-processing (i.e. on the site itself), a camera is needed that can take videos regularly and store this on a designated location on the device. If you use a raspberry pi, we recommend using on the same device a raspberry pi camera.
Also for edge processing, water levels must be automatically collected and stored in a predefined file format. Water levels will then automatically be read and matched against incoming videos.
A LiveOpenRiverCam server from which to configure the device. If you want to collect videos on a laptop, and connect that laptop in the field to the device, then you can also setup LiveOpenRiverCam with Docker on your laptop. Please visit LiveORC for more information how to set this up. You have to make sure that the local LiveOpenRiverCam instance and the device are on the same network. If you plan to configure the device in the field, we recommend to ensure the device can connect to a WiFi hotspot, which is available in the field. Note that no internet connection is needed, only a local network.
A username and password for the LiveOpenRiverCam server. Please set this up following the documentation of LiveORC.
And that’s it! With these in place you are ready to go.
Installation
To install the latest release of NodeOpenRiverCam on your device, there are two options, native installation (only on linux devices, tested for debian-based systems) or a docker installation (also on Windows or Mac):
Native installation
NodeOpenRiverCam is entirely rasperry pi compliant. You do need an ARM64 bit device (Raspberry Pi 4 or higher) and about 1.5GB storage for the software, excluding the operating system. We recommend a SD card of 16GB, but at the very least you will require 8 GB. For storage of videos and results we strongly recommend NOT to use the SD card as many I/O operations on SD cards are known to corrupt the SD card in due time. We recommend to use a USB-drive. This drive can be hot swapped if you wish to keep raw data and videos.
A native installation is highly recommended on a local device as it reduces overhead significantly. For a native installation, please download the setup.sh script from the latest release on the device on which you wish to install it, make the script executable and execute the script on a command line interface with the option --all. The steps are outlined below:
# get script from latest release
wget https://github.com/localdevices/nodeorc/releases/latest/download/setup.sh
# make the setup script executable
chmod +x setup.sh
# execute script
./setup.sh --all
The setup procedure will ask several inputs including the url and your username and password for the LiveOpenRiverCam server. Note that these credentials will not be stored on the device, but only used to receive a temporary access token and refresh token. If you use a local LiveOpenRiverCam instance, then this will report on its local IP-address and hostname. For instance if the IP-address is 192 .168.1.107, and hostname is mynodeorc then you can access the server while on the same network on http://192.168.1.107:8000 or (more easy as hostnames do not change) http://mynodeorc:8000 Please use this URL and ensure that the local LiveOpenRiverCam instance is running on your computer in the same network.
You can also perform installation steps one-by-one. If you wish to see the options of the setup script, then simply use:
./setup.shwithout any arguments.
Docker installation
We are still working on a docker image for NodeORC. Please stay tuned. Once the docker image is there you can install docker on your device or cloud instance and pull the image using a command such as (exact location of the image is still to be determined):
docker pull localdevices/nodeorcWe will ensure that you can also use the setup script for a docker installation, so that you can supply the required information for setup in a similar way as a native installation.
Usage
Cloud processing
We are still working on cloud-usage of NodeOpenRiverCam. Currently only edge processing is supported. Once this is supported, you can setup NodeOpenRiverCam on one or more cloud-nodes, connected to a LiveOpenRiverCam platform and have the nodes process individual videos that are uploaded to the LiveOpenRiverCam server. This will work through a queueu manager.
Edge processing
If you have followed the setup script for deploying NodeOpenRiverCam, then the device should have a name, defined by yourself, and it should be able to receive tasks and report to a LiveOpenRiverCam instance. If your device is able to communicate to the configured LiveOpenRiverCam instance, it will announce its existence automatically. As it is freshly configured it does not have any tasks to perform yet, and therefore it will regularly report in (every 5 minutes) to see if any new task is available. If so, it will download and validate the task, and if the task is valid, store it and start using it. Storing of tasks and configurations is done through a local database.
For preparing task forms (i.e. templates for performing tasks on any video coming in) we refer to the LiveORC documentation.
During the setup procedure, you will have identified a location to store any information related to NodeORC. This is the “home folder” of NodeORC. After you have set this up, everything, including the database of processed videos, callbacks, the raw videos, processed result files (NetCDF data files, JPG images), log files, and so on, will all be stored under that same folder. If you have selected USB-drive storage, then the USB drive is always mounted under /mnt/usb and this folder will automatically be configured as the “home folder” The subfolder structure under this home folder is as follows:
.
├── nodeorc_data.db     <- database holding records of nodeorc videos and callbacks.
├── log                 <- folder holding log files in subfolders. One subfolder is created per calendar day.
├── results             <- folder holding result files in subfolders. One subfolder is created per calendar day.
├── incoming            <- folder in which new video files are expected. You must configure your camera such that it
│                          writes videos in THIS folder, using a specified naming convention with a datetime string.
├── failed              <- if a video fails, then the raw video will be stored here in subfolders. One subfolder is
│                          created per calendar day.
├── success             <- if a video is successfully processed it will be stored here in subfolders after
│                          processing. One subfolder is created per calendar day.
├── tmp                 <- during processing, a temporary folder will be created here in which the raw video and
│                          output files will be stored. Once successful, the tmp content will be moved to
│                          results (output) and success (raw video)
├── water_level         <- text or csv files are expected under this folder, holding the water level. The text
│                          files can have specific naming conventions that include a datestring so that
│                          water levels may be stored in files per day. The format in the files can be
│                          defined in a configuration message.
We follow this structure to allow a better understanding of the working methods.
Getting videos into the right folder
If you have for instance identified the USB-drive as location for storage, then incoming videos must be reported in /mnt/usb/incoming. If you for instance have a raspberry pi setup, and you want to make a regular video upon booting the device, you may for instance run a script upon boot that looks as follows (make sure your raspi camera is switched on and that the necessary libraries are installed). The script can be run e.g. through a cronjob or by adding it to your profile.
#!/bin/bash
# NOTE! THIS CODE HAS NOT BEEN TESTED.
# make a datetime string, to identify the utc time of the video
export trg_path="/mnt/usb/incoming"
export dt=`date '+%Y%m%d_%H%M%S'`
filename=${trg_path}/${dt}.h264
# record the video
raspivid --height 1080 --bitrate 20000000 --timeout 5 --framerate 30 --output ${filename}
For other camera setups, the manner in which you get videos in the right folder may strongly depend on the brand and type. Most likely camera-specific settings are needed.
As soon as a file is appearing in the incoming folder, nodeorc will capture this and add that file in the queue. If currently nothing is being processed, nodeorc will immediately start processing it. If an earlier file is being processed the new file is queued up until the previous video is done.
Failed and success folder
These two folders will contain videos that are already processed. If a video resulted in a failure (e.g. because no water level was found, the video is corrupt, or the processing recipe for some reason failed), then the video will be removed to the failed folder. If the video was processed with success, then the video is moved to the success folder. In case the video was successfully processed but the callback to the LiveORC server failed (e.g. because there was no network, or data bundle is finished) then the video is moved to “success” and callbacks that failed will be stored in the database and sent at a later stage. Failed and success videos are stored in subfolders per day with a YYYYMMDD format for the folder names.
Results folder
The results folder will contain outputs (figures and netcdf files) for each video. These outputs are organized in folder per day with a YYYYMMDD format for the folder name.
Supplying water levels
At this moment, NodeORC cannot (yet) read water levels optically. This means that some form of water levels must be supplied in a text file. We support a simple text file that contains no header, and a space separated set of water levels. By default, NodeORC will look for a file called all_levels.txt in the water_level folder under your supplied home folder. For reconfiguration of this file, we refer to the reconfiguration section written below. Within this file, it is expected that water levels are written in a high enough frequency to be able to match them against dates and times of incoming videos. The closest date and time found will be used. The format of the content of this file is a space-separated .csv file without headers with 2 columns in it: the first column contains a date-time string (without spaces). The second column contains the water levels. See for example the series shown below.
20221222_000000 92.367
20221222_001500 92.367
20221222_004500 92.367
20221222_010000 92.367
20221222_011500 92.368
20221222_013000 92.37
20221222_014500 92.378
20221222_020000 92.384
20221222_021500 92.386
20221222_024500 92.384
20221222_030000 92.378
20221222_031500 92.374
20221222_033000 92.373
20221222_034500 92.373
20221222_040000 92.377
20221222_041500 92.383
20221222_044500 92.389
20221222_050000 92.391
20221222_051500 92.398
20221222_053000 92.419
20221222_054500 92.44
20221222_060000 92.444
20221222_061500 92.444
20221222_064500 92.463
20221222_070000 92.468
20221222_071500 92.473
20221222_073000 92.475
20221222_074500 92.476
20221222_080000 92.481
20221222_081500 92.489
For operational observations, it is important that you ensure that the above-mentioned file is produced and kept up to date constantly with newly observed water levels. You can reconfigure the file to a file template that uses a datetime string to identify this file. With this you can create one file per day, or per month, so that files do not become too large and in case a file becomes corrupt (unlikely but not impossible), processing will pick up in the next day. Ideally, ensure that the frequency of water level observations is at least as high as the frequency of video observations. Because the collection of water levels is specific for each sensor or application, there is no general method in NodeORC to do the collection of water levels. Please create your own scripts to do this. Below we provide two approaches how you could do this.
Harvest water levels from an API: if water levels are posted on a central platform such as a Delft-FEWS forecasting system or a general web-based API, you can write a script that runs as a cronjob in the NodeORC device. Below a pseudo-code example of a script that would harvest the last water level from some API. Note that this is not a real example. You have to adapt this to the specific API that you are using.
import os
import requests
from urllib import urljoin
from datetime import datetime
# first we determine in which file the water level will be written. We assume
# that we create one file per day. This is highly recommended so that, in case
# for some reason a file becomes corrupted, the next day you will be able to
# continue processing without problems.
water_level_path = "/mnt/usb/water_level"
today = datetime.utcnow().strftime("%Y%m%d")
filename = os.path.join(
    water_level_path,
    f"water_level_{today}.txt"
)
# let's assume that time series for water levels are stored under a site id and
# a certain variable
headers = {}  # you may need to fill up headers to allow access with e.g. a token
# here we leave this empty for now. Review your specific API docs for further info
site_id = 1
variable = "water_level"
api_url = "https://api.somewhere-on-the-web.com"
# we assume that there is a specific end point for the last time step. Review
# your API documentation to come up with the right url
end_point = f"site/{site_id}/time_series/{variable}/last_time_step"
# the full url to the water level data
url = urljoin(api_url, end_point)
# now make the request!
r = requests.get(url, headers=headers)
if r.status != 200:
    raise ValueError(f"successful response status (200) was not given, instead we got {r.status}")
# the json payload of the response contains the
data = r.json()
time = datetime.strptime(data["datetime"], "%Y%m%dT%H:%M:%S")
water_level = data["value"]
# now write the value to the right file
new_line = f"{time.strftime('%Y%m%d_%H%M%S')} {water_level}\n"  # don't forget a carriage return at the end!
with open(filename, "a") as f:
    f.write(new_line)
# DONE!
Get a water level posted in the file from a sensor on the site directly. This would require a sensor specific approach to read the sensor from your on-site compute device directly.
Cleaning up disk of home folder
To prevent that storage fills up until the device is entirely full, there are several configuration options to control how storage is managed. If storage reaches a certain low threshold, then files in the failed and success folder are cleaned up until there is sufficient drive space, starting with the oldest files first. If that is not sufficient, then results files will also be removed. If for some reason the space goes down further, then nodeorc will shut itself down to ensure that the compute device can still be accessed remotely. In the configuration section you will find that you can alter the thresholds, which default to 2GB and 1GB respectively.
Reconfiguring NodeORC
General instructions
If you wish to modify the configuration after you have installed NodeORC, you can currently only do this on the device itself. You must login to the device (e.g. headless via SSH or graphically via a VNC connection or Teamviewer connection) move to the folder of installation and then execute:
$ python nodeorc upload-config <NAME OF JSON-FILE>Here you should replace <NAME OF JSON-FILE> by a JSON file that contains the relevant details. You can find the JSON file with your settings from the setup procedure in the settings folder under the name config_device.json. From here you can modify the settings. In the subsections below you can find instructions for several settings. If a settings is not passing through validation, for instance because you use strings where numbers are expected (or vice versa) or the format of the JSON-file contains syntax errors, you will receive an error message. Please read this carefully before continuing. Below we describe the most important cases for changing the configuration.
We are working on allowing for changes in configurations within the LiveORC front end. Soon you will also be able to reconfigure remotely using the LiveORC web platform. Please stay posted.
Configuring the file locations
During the setup, you have identified a logical file path under which incoming videos, results, and water levels are stored. If you have opted for use of a USB-drive, then this location is always /mnt/usb.
Configuring the home folder
The home folder is the folder in which all incoming videos are stored, where results of video analyses are stored, where the database with callbacks is stored, and where videos that have been successful or not are stored. These different files are all located in different subfolders, as shown above with the example for the home folder being /mnt/usb. If you wish to alter the home folder location then you can do this by modifying the home_folder in the subsection disk_management. For instance, if you have an edge device with an SSD drive you could use your user-home folder and point it to /home/user/nodeorc_data. We here assume that user is the username of the current device.
This would look as follows in the JSON-configuration file.
{
   ...
    "disk_management": {
        "home_folder": "/home/user/nodeorc_data",
        ...
    }
}
Disk management
Other options in the disk management section are meant to control the amount of available disk space on the device. min_free_space gives the minimum amount of space (GB) on the drive that contains the home_folder that should be kept free. critical_space is the amount of space under which NodeORC will shutdown its own service. This is meant to ensure the device can still operate and can still be accessed remotely. This is not possible when disk space reaches zero. frequency is the amount of seconds interval after which disk space will be checked and possible cleanup actions initiated.
Configuring the file naming convention of videos
While you may store videos in the incoming folder, nodeorc has to be able to extract the exact datetime format from the file name. You will need to specify the file naming convention in the configuration of NodeORC. This can be configured during the installation process, but you can also alter the video naming convention in the LiveOpenRiverCam platform by making a new configuration message for the device.
A typical file (taken from our raspberry pi camera example) may for instance be:
20240229_100003.h264Where year (2024), month (02), day (29), hour (10), minute (00) and second (03) are supplied as datetime string. You can instruct NodeORC to parse the date and time following a datetime template. In this example, the template would be:
{%Y%m%d_%H%M%S}.h264Here %Y means the 4-digit year, %m is the 2-digit month, %d is the 2-digit day in the month, %H the 2-digit hour, %M the 2-digit minute and %S the 2-digit second. NodeORC will try to parse a date using the string template between the curly braces (i.e. { and }). The assumed time is always UTC!!! This is crucial in order to ensure that there is never a timezone issue between the platform on which videos are read and treated (NodeORC) and the platform where results are stored, displayed and redistributed (LiveORC).
This file naming convention can be configured by altering the field video_file_fmt under the settings section in the JSON file.
{
   ...
    "settings": {
        ...,
        "video_file_fmt": "{%Y%m%d_%H%M%S}.h264",
        ...
    }
}
The above example would configure the file naming convention as shown in the example.
Don’t forget to place commas between each field inside a JSON section, and no comma after the last field of a section. Also don’t forget to open a section with a curly brace { and close it with a curly brace }.
Change the callback url details
During setup, you will have configured the LiveORC on which the device will report and checks in for reconfiguration. You may alter this by changing the following settings:
url: the main url to the LiveORC server
token_refresh_end_point: normally you should never change this, unless in a later moment in time the name of this end point changes in the LiveORC code.
token_refresh: the refresh token, used to refresh your access token when it has expired.
token_access: the access token for LiveORC. Note that this token is replaced automatically after 6 hours by a new token using the token_refresh. When the refresh token is used, it also automatically expires and gets replaced by a new refresh token.
Your resulting configuration section should look like this (tokens shown are not valid and should of course be replaced by your own token set).
{
    "callback_url": {
        "url": "http://openrivercam.com",
        "token_refresh_end_point": "/api/token/refresh/",
        "token_refresh": "eyJhbGciOiJIUzI1NiIsInR5cCI6IkpXVCJ9.eyJ0b2tlbl90eXBlIjoicmVmcmVzaCIsImV4cCI6MjAyMjE2NTU5NywiaWF0IjoxNzA2ODA1NTk3LCJqdGkiOiI2YWJiODgxNGExNDA0NTFlYmE1YzQyMTMyNDM2YmUxZCIsInVzZXJfaWQiOjF9.ps1P8zA7EBRrRb2A4iA1X53D2TzSkCx1AzncIVpcdUE",
        "token_access": "eyJhbGciOiJIUzI1NiIsInR5cCI6IkpXVCJ9.eyJ0b2tlbl90eXBlIjoiYWNjZXNzIiwiZXhwIjoxNzA2ODI3MTk3LCJpYXQiOjE3MDY4MDU1OTcsImp0aSI6IjU2MGE4NTM4MTViYzQ5ZDVhMzEwNWNhODU4NmQ2MzVmIiwidXNlcl9pZCI6MX0._ORAHl8z2bpkmP31jXfPkB_hLgEX2Rx6R5IFzcVmcyw"
    }
Water level file naming format and datetime format
"settings": {
    ...,
    "water_level_fmt": "wlevel_{%Y%m%d}.txt",
    "water_level_datetimefmt": "%Y%m%d_%H%M%S",
    "allowed_dt": 3600
    ...
},
Reboot and shutdown options
There are two options that control reboots and shutdowns. shutdown_after_task ensures that the device shuts down once there are no further videos to process in the queue. This option should ONLY be used when the device is controlled by a power cycling scheme, which ensures that after a certain amount of time the device will switch back on. Power cycling arrangements are device-specific and therefore not supported in NodeORC. You need to make your own hardware controller or scripts to do this.
reboot_after can be used to reboot a device after a certain time interval. If you set the value to an amount of seconds above 0, the device will reboot after the set amount in seconds. A minimum of 3600 seconds is used. If the device is still processing a video when the time interval is reached, the video will first finish processing before rebooting. The default value is 86400 (i.e. one day).
"settings": {
    "shutdown_after_task": false,
    "reboot_after": 86400

},

Download files
Download the file for your platform. If you're not sure which to choose, learn more about installing packages.


