NeighGen - A BGP neighbour config generator written in Python, using PeeringDB's API to discover ASN BGP addresses

Project description
NeighGen - BGP Neighbour Config Generator + PeeringDB Query Tool

+===================================================+
|                 © 2021 Privex Inc.                |
|               https://www.privex.io               |
+===================================================+
|                                                   |
|        NeighGen                                   |
|        License: X11/MIT                           |
|                                                   |
|        Core Developer(s):                         |
|                                                   |
|          (+)  Chris (@someguy123) [Privex]        |
|          (+)  Kale (@kryogenic) [Privex]          |
|                                                   |
+===================================================+

NeighGen - A BGP neighbour config generator written in Python,
using PeeringDB's API to discover ASN BGP addresses.
Copyright (c) 2021    Privex Inc. ( https://www.privex.io )
Docker Quickstart
docker pull privex/neighgen

docker run --rm -it privex/neighgen -h

docker run --rm -it privex/neighgen asinfo -x -F 210083
docker run --rm -it privex/neighgen asinfo -x 210083
docker run --rm -it privex/neighgen asinfo-raw 210083
docker run --rm -it privex/neighgen neigh 210083
docker run --rm -it privex/neighgen neigh -o ios 210083
If you'd like to be able to query PeeringDB locally via a database, you can use the Docker Compose environment which comes prepared in the Git project.
Clone the repo:
git clone https://github.com/Privex/neighgen.git
Copy dk-config.yaml for docker-compose to use:
cp example.dk-config.yaml dk-config.yaml
Then simply run docker-compose up -d , which will build both the neighgen and postgres containers,
then start them up in the background.
docker-compose up -d
You can monitor neighgen's import process via docker's logging:
docker-compose logs -f ngen
Once it's finished syncing, you should be able to enter the postgres container, and make whatever queries you want:
docker-compose exec postgres psql -U peeringdb peeringdb
Please be aware that the PeeringDB database generation, is not part of this repo.
The PeeringDB local DB sync functionality is provided by the peeringdb package: https://github.com/peeringdb/peeringdb-py
Installing
From PyPi
We recommend installing the package on the newest version of Python that your OS has available.
Most modern LTS releases at the time, such as Ubuntu 20.04 and Debian 10 - have at LEAST Python 3.8 available, while Ubuntu 20.04 has 3.9 available.
For example, if the newest version of Python on your system is 3.8, then you'd install it on Python 3.8 like so:
python3.8 -m pip install -U privex-neighgen
If for some reason, your Python distribution doesn't support the python3.x -m pip method of
calling Pip, then you can use the classic pip3 command instead:
pip3 install -U privex-neighgen
From Github
git clone https://github.com/Privex/neighgen.git
cd neighgen
# Option 1. - Install NeighGen onto your system from the repo
pip3 install -U .

# Option 2. - Create a Pipenv virtualenv, and use the software
# straight from the project folder:
pip3 install -U pipenv
pipenv install
pipenv install --dev
pipenv shell

python3 -m neighgen -h
python3 -m neighgen asinfo 210083
Configuration
The software is primarily configured through a YML config file.
You can generate a base example config at ~/.ngen.yml using the following command:
neighgen gen_config -o ~/.ngen.yml yml
The application will search the following locations for the config, in order, until it finds one that exists. It will only load the first config it finds:
from os import getcwd
from pathlib import Path
PWD = Path(getcwd()).expanduser().resolve()
_CONFIG_FILES = [
    'config.yaml', 'config.yml', 'ngen.yaml', 'ngen.yml',
    PWD / 'config.yaml', PWD / 'config.yml', PWD / 'ngen.yaml', PWD / 'ngen.yml',
    '~/.neighgen/config.yaml', '~/.neighgen/config.yml'
    '~/.ngen/config.yaml', '~/.ngen/config.yml'
    '~/.ngen.yaml', '~/.ngen.yml'
    '~/.peeringdb/config.yaml', '~/.peeringdb/config.yml'
]
The first files in that list, are scanned within the base folder of the project, i.e. it will look
for config.yaml / config.yml / ngen.yaml / ngen.yml in the root of the project,
where LICENSE.txt , Dockerfile , README.md and other files are located.
The second line of files, search within your current working directory, which can be helpful
if you've installed the application via pip, so that it will use config.yml / ngen.yaml
in whatever directory you're currently cd'd into.
You can also generate an example ENV file, however, you should only use an ENV file / environment args if you have a specific reason that the YML file isn't suitable on it's own, e.g. for configuring the app from within some form of management system that uses ENV files (e.g. systemd).
# This will just output to your terminal. You can use either '-o', or you can
# pipe the contents to where-ever you want the ENV file to be.
neighgen gen_config env
The last type of config which neighgen can generate - is a slightly modified version of the standard
YML config, but pre-configured for use with Docker (esp. with the docker-compose setup).
To generate the Docker-focused YML config:
neighgen gen_config -o dk-config.yaml docker
Examples
asinfo
Display PeeringDB information for AS210083 (Privex) as pretty printed tables:
python3 -m neighgen asinfo 210083
Display PeeringDB information for AS210083 (Privex) as pretty printed tables, and include internet exchange information:
python3 -m neighgen asinfo -x 210083
Display PeeringDB information for AS210083 (Privex) as pretty printed tables, and include both internet exchange information, and facility information:
python3 -m neighgen asinfo -x -F as210083
asinfo-raw
Display PeeringDB info for AS210083 in programmatic form - which by default is JSON:
python3 -m neighgen asinfo-raw 210083
Display PeeringDB info for AS210083 in programmatic form, including both IXP and facility info:
python3 -m neighgen asinfo-raw -x -F 210083
Display ONLY IXP information from PeeringDB for AS210083 in programmatic form:
python3 -m neighgen asinfo-raw -OX 210083
Display ONLY Facility information from PeeringDB for AS210083 in programmatic form:
python3 -m neighgen asinfo-raw -OF 210083
Display ONLY IXP information from PeeringDB for AS210083 in programmatic form - but as YAML instead of JSON:
python3 -m neighgen asinfo-raw -OX 210083 yml
Display PeeringDB info for AS210083 in programmatic form, including both IXP and facility info, but as XML instead of JSON:
python3 -m neighgen asinfo-raw -x -F 210083 xml
neigh
Display neighbour configuration for peering with AS210083 at all of their IXPs, using the default OS config format 'nxos' (Cisco NX-OS):
python3 -m neighgen neigh 210083
Display neighbour configuration for peering with AS210083 at only exchanges with 'ams-ix' in their name, using the default OS config format 'nxos' (Cisco NX-OS):
python3 -m neighgen neigh 210083 ams-ix
Display neighbour configuration for peering with AS210083 at only exchanges with 'ams-ix' in their name, this time we manually specify that we want the config to be formatted for use with 'ios' (Cisco IOS).
python3 -m neighgen neigh -o ios 210083 ams-ix
Same as previous, but we set the peer-policy for v4 and v6 to blank, which disables it from adding peer-policy neighbour commands:
python3 -m neighgen neigh -p4 '' -p6 '' -o ios 210083 ams-ix
The network AS13335 peers at several different AMS-IX regions, so to limit the neighbours to use only the IXP called "AMS-IX", and not "AMS-IX Hong Kong" or "AMS-IX Caribbean", we use "-X" to enable exact IXP matching (the matching isn't case sensitive though). This ensure it only uses IXP peers on the exchange named "AMS-IX" and not their other regions.
python3 -m neighgen neigh -X 13335 ams-ix
License
This Python module was created by Privex Inc. of Belize City, and licensed under the X11/MIT License. See the file LICENSE for the license text.
TL;DR; license:
We offer no warranty. You can copy it, modify it, use it in projects with a different license, and even in commercial (paid for) software.
The most important rule is - you MUST keep the original license text visible (see LICENSE) in any copies.
Screenshots
The full IMGUR album of screenshots can be found here: https://imgur.com/a/5Z15DSv
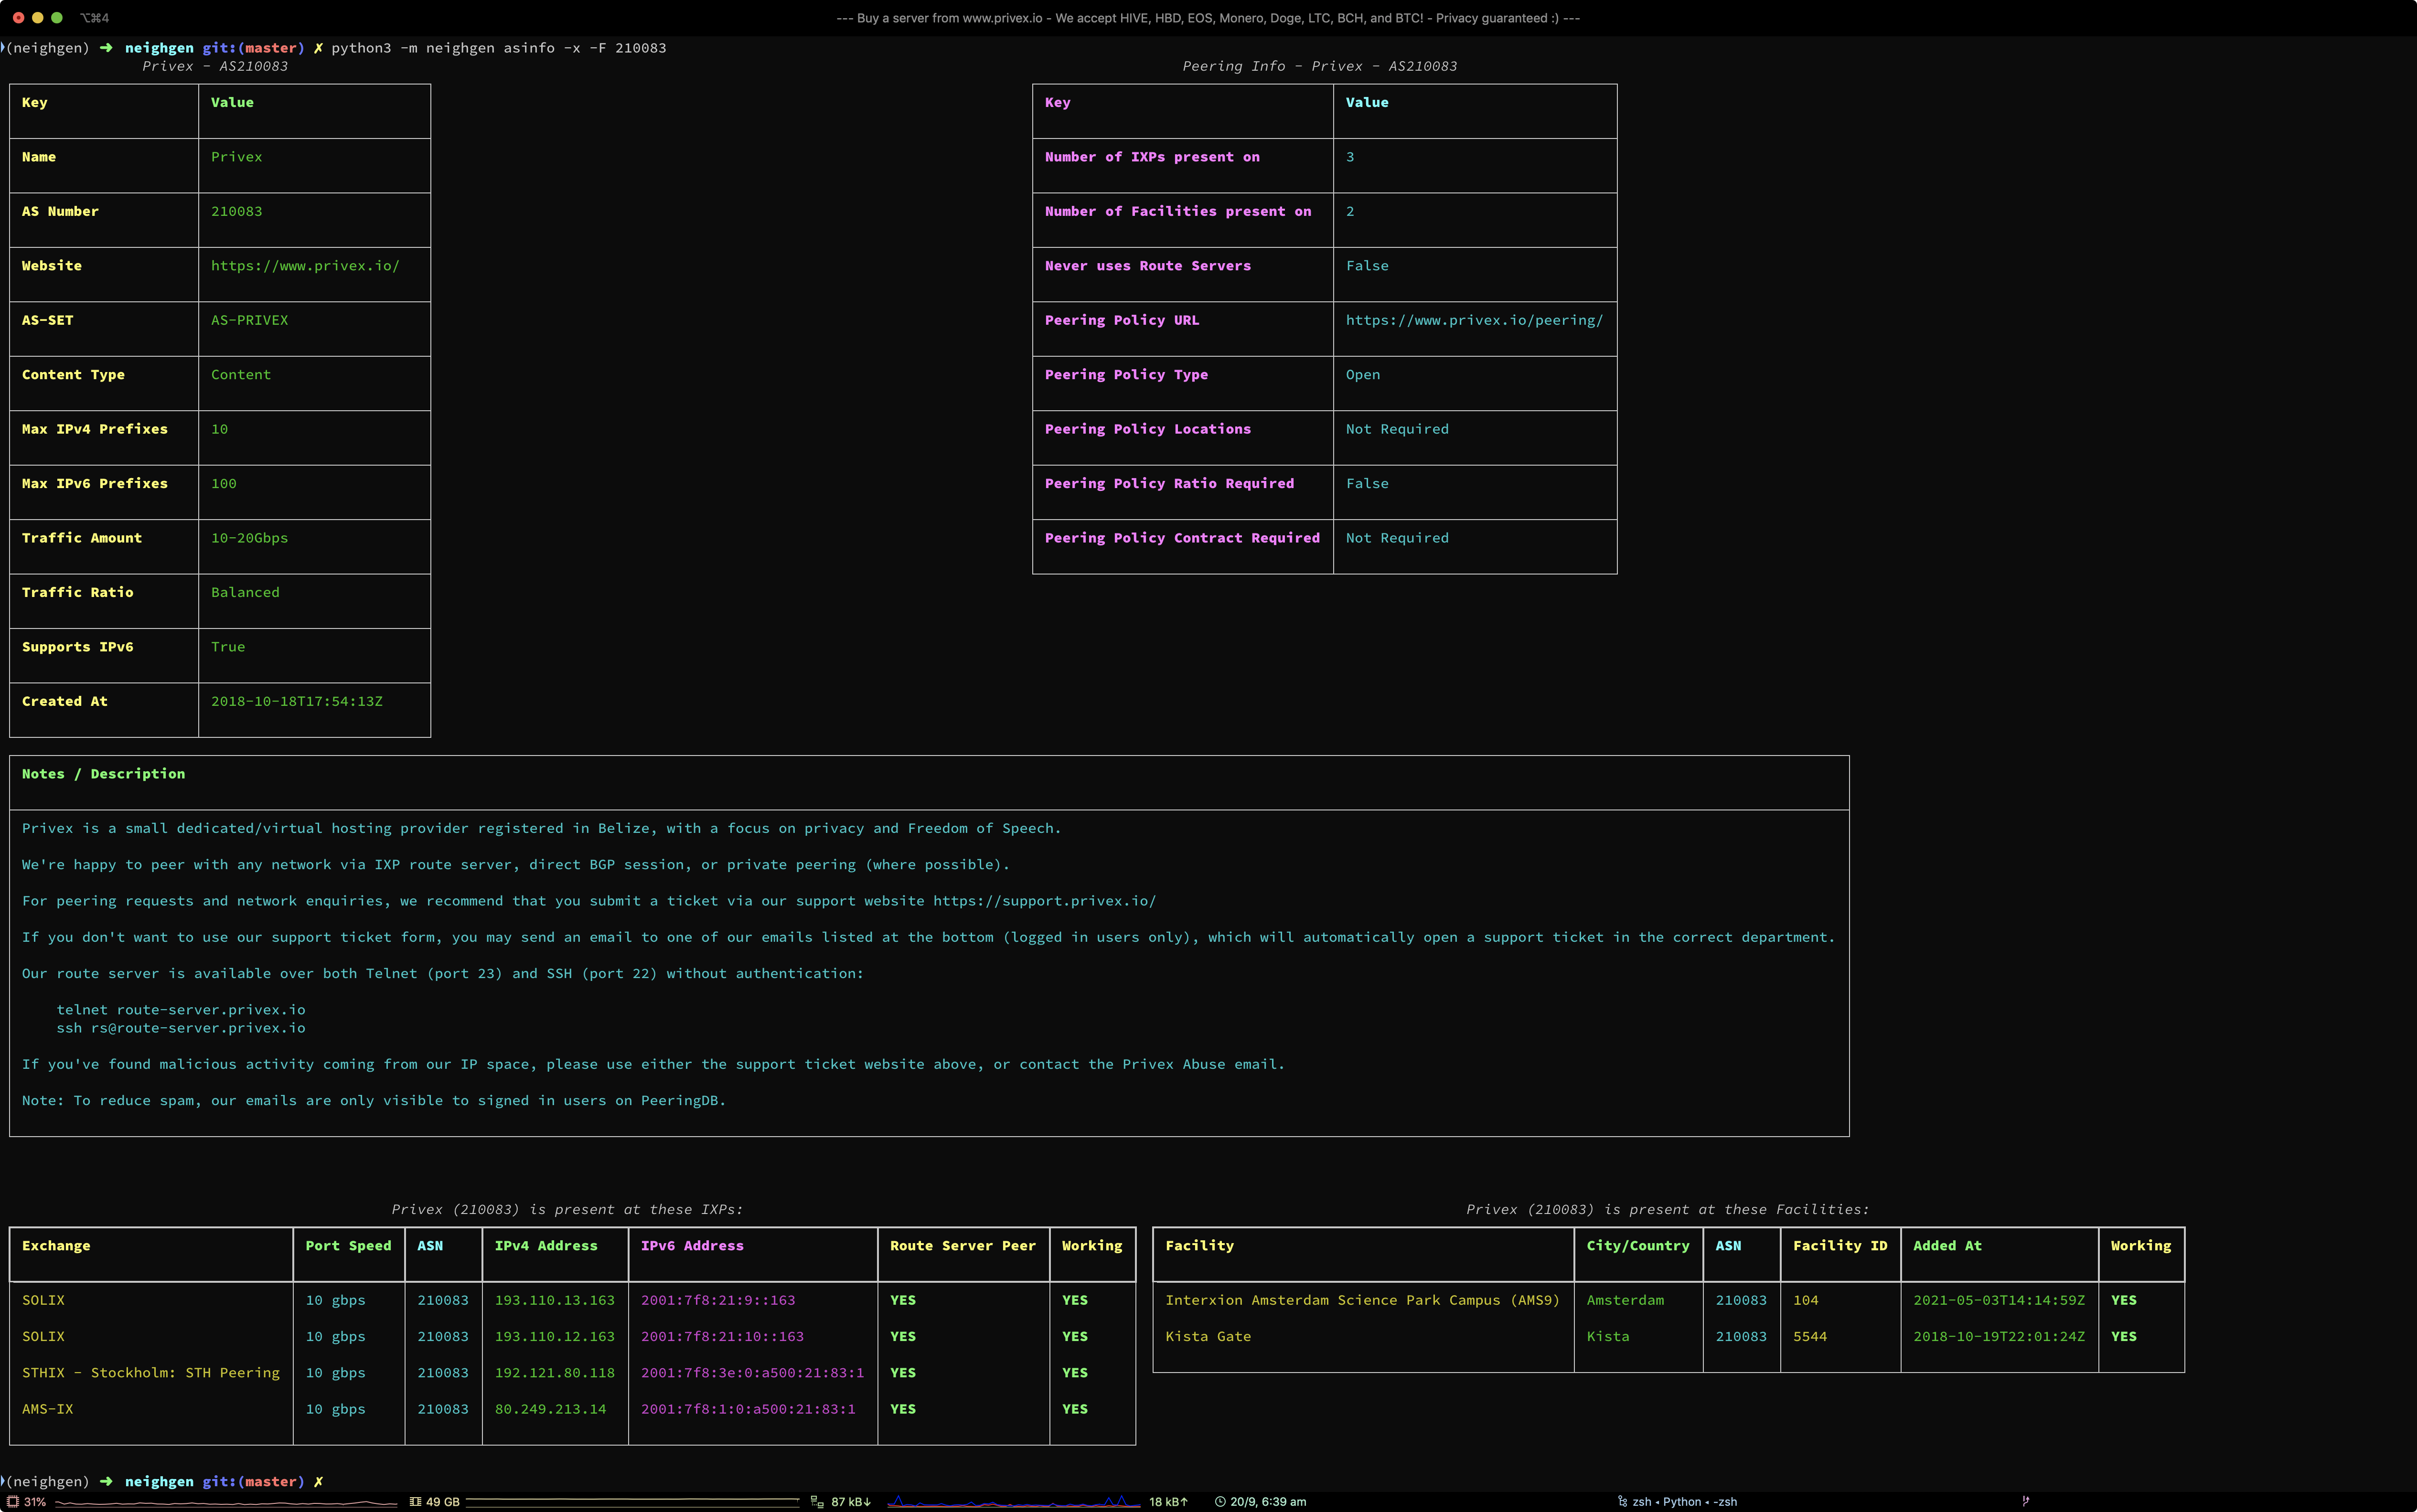
Screenshot of ASINFO command showing the generated unicode/ascii tables with colour coding.
Command used:
python3 -m neighgen asinfo -x -F 210083
# Alternative if you have neighgen installed from pip:
neighgen asinfo -x -F 210083
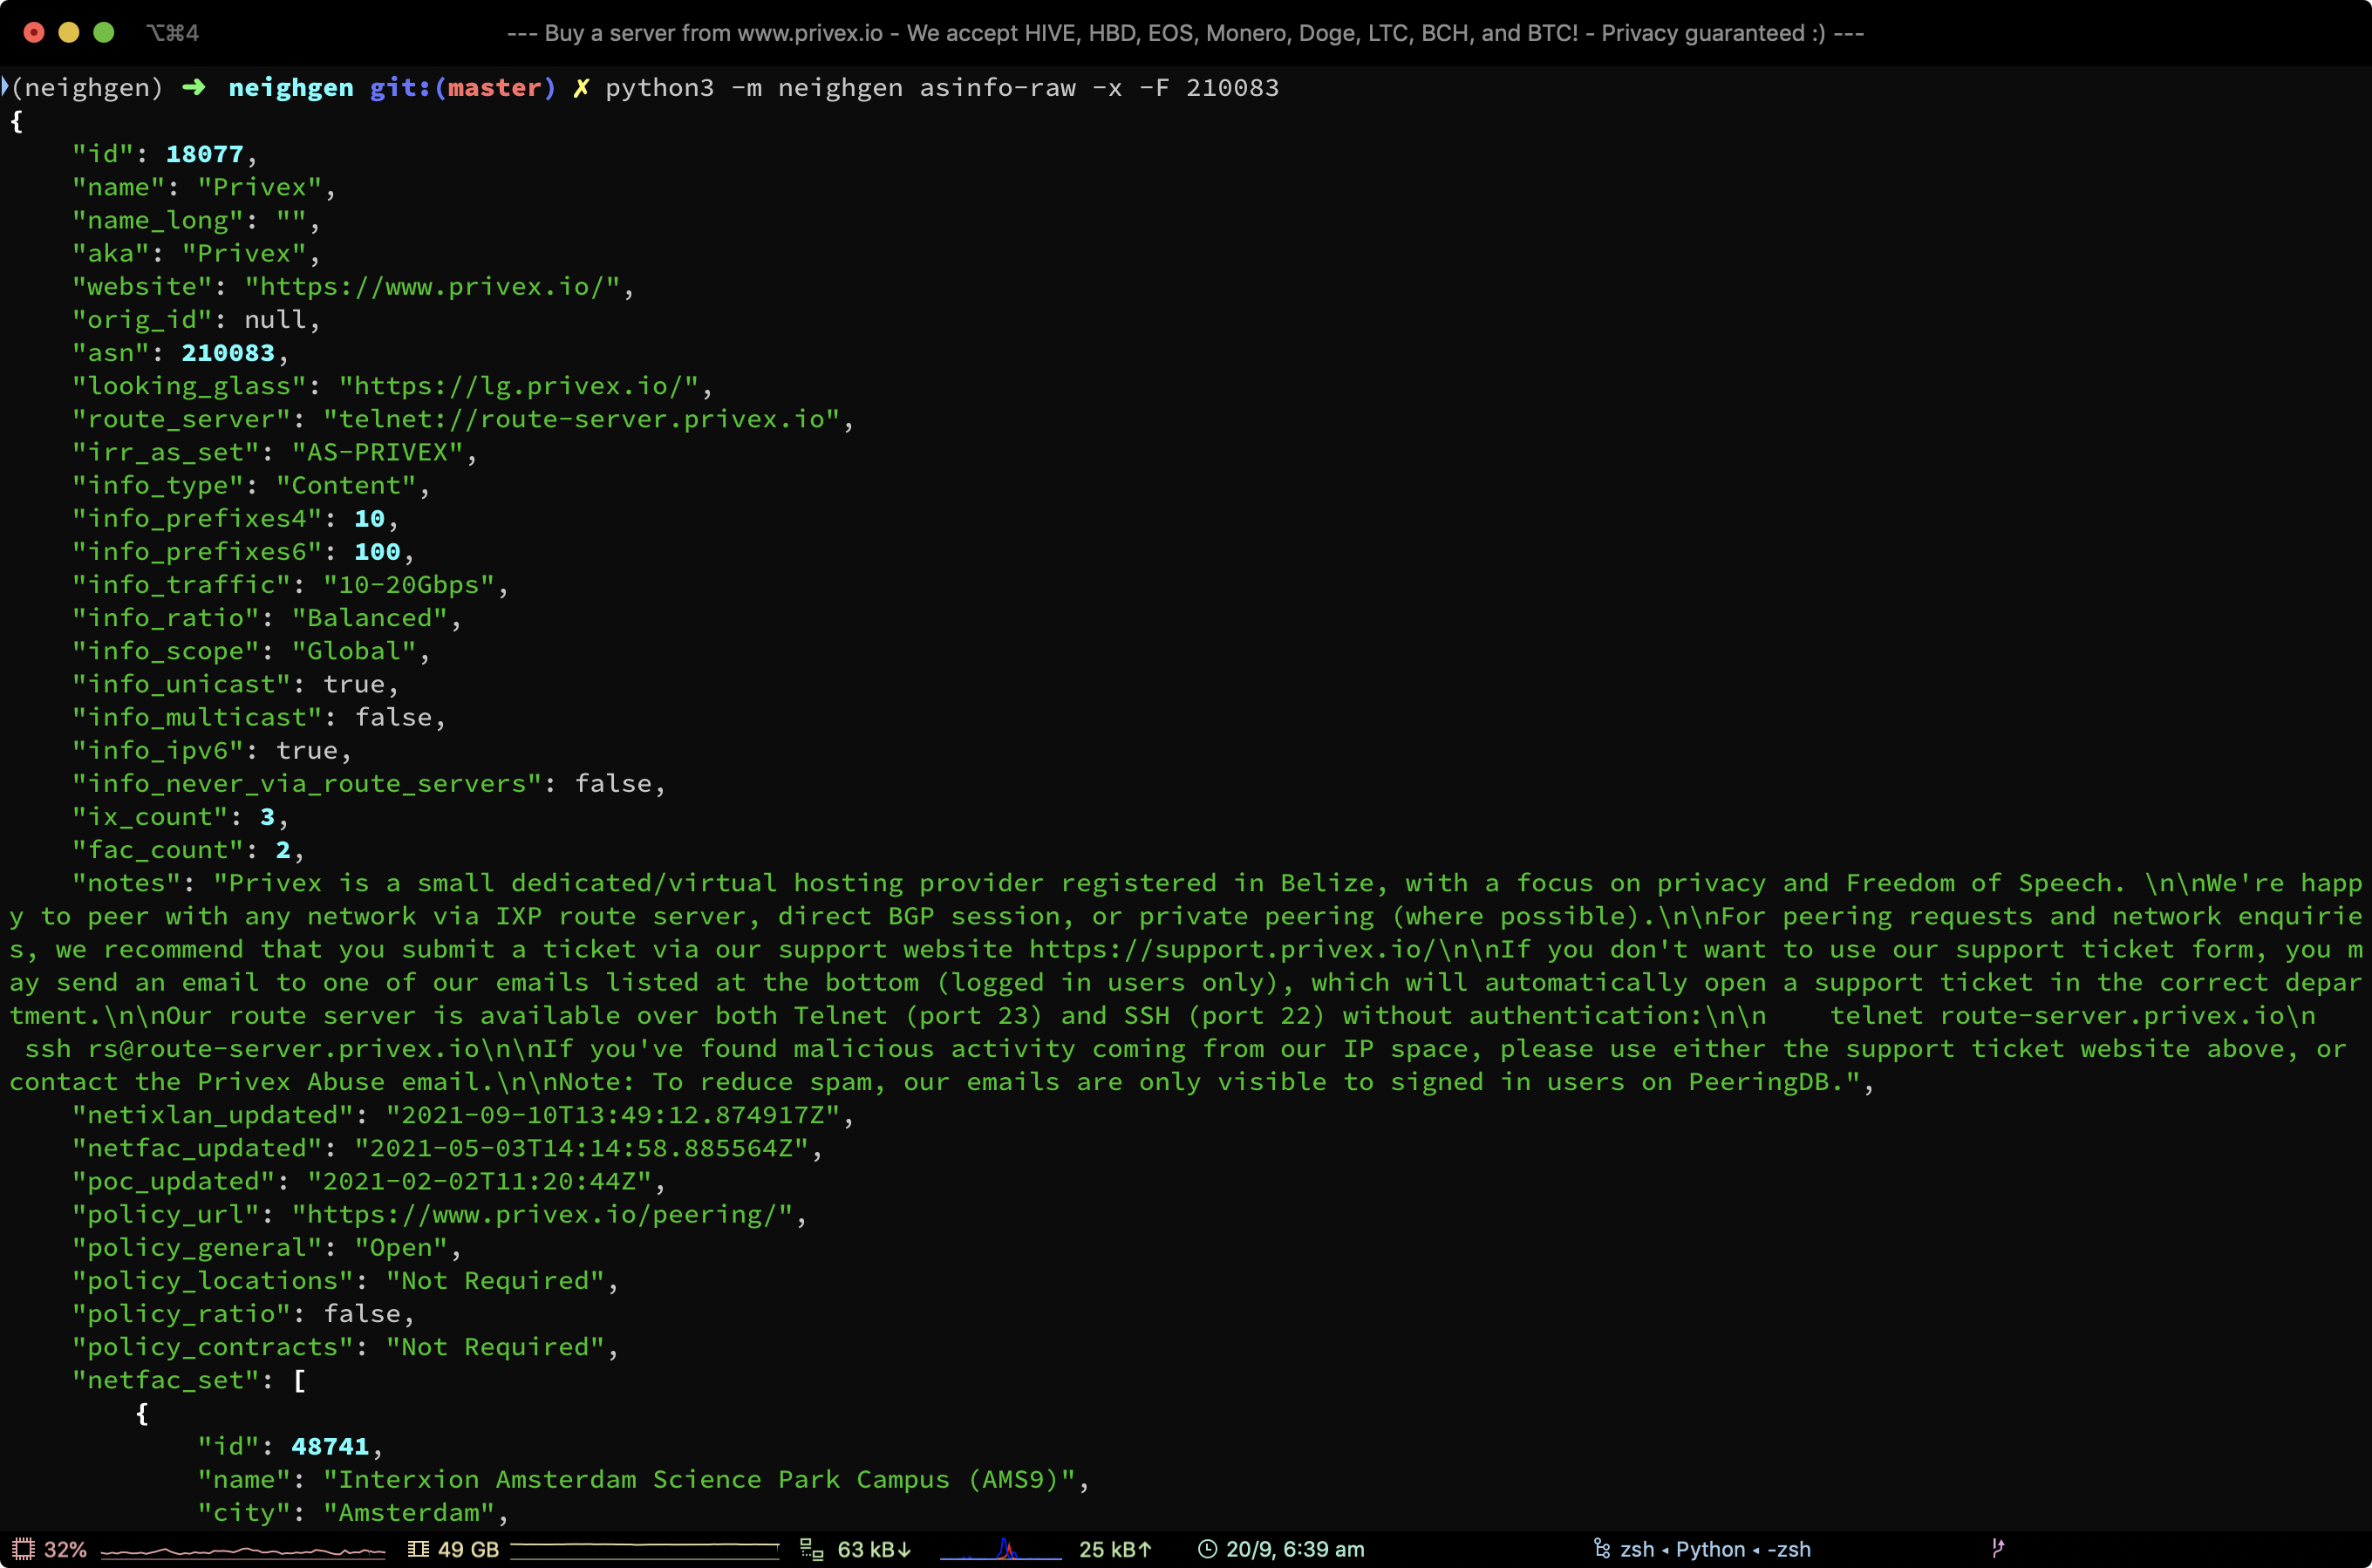
Screenshot of ASINFO-RAW command showing outputted JSON which represents the ASN's metadata, including
their IXP's and facilities.
Command used:
python3 -m neighgen asinfo-raw -x -F 210083
# Alternative if you have neighgen installed from pip:
neighgen asinfo-raw -x -F 210083
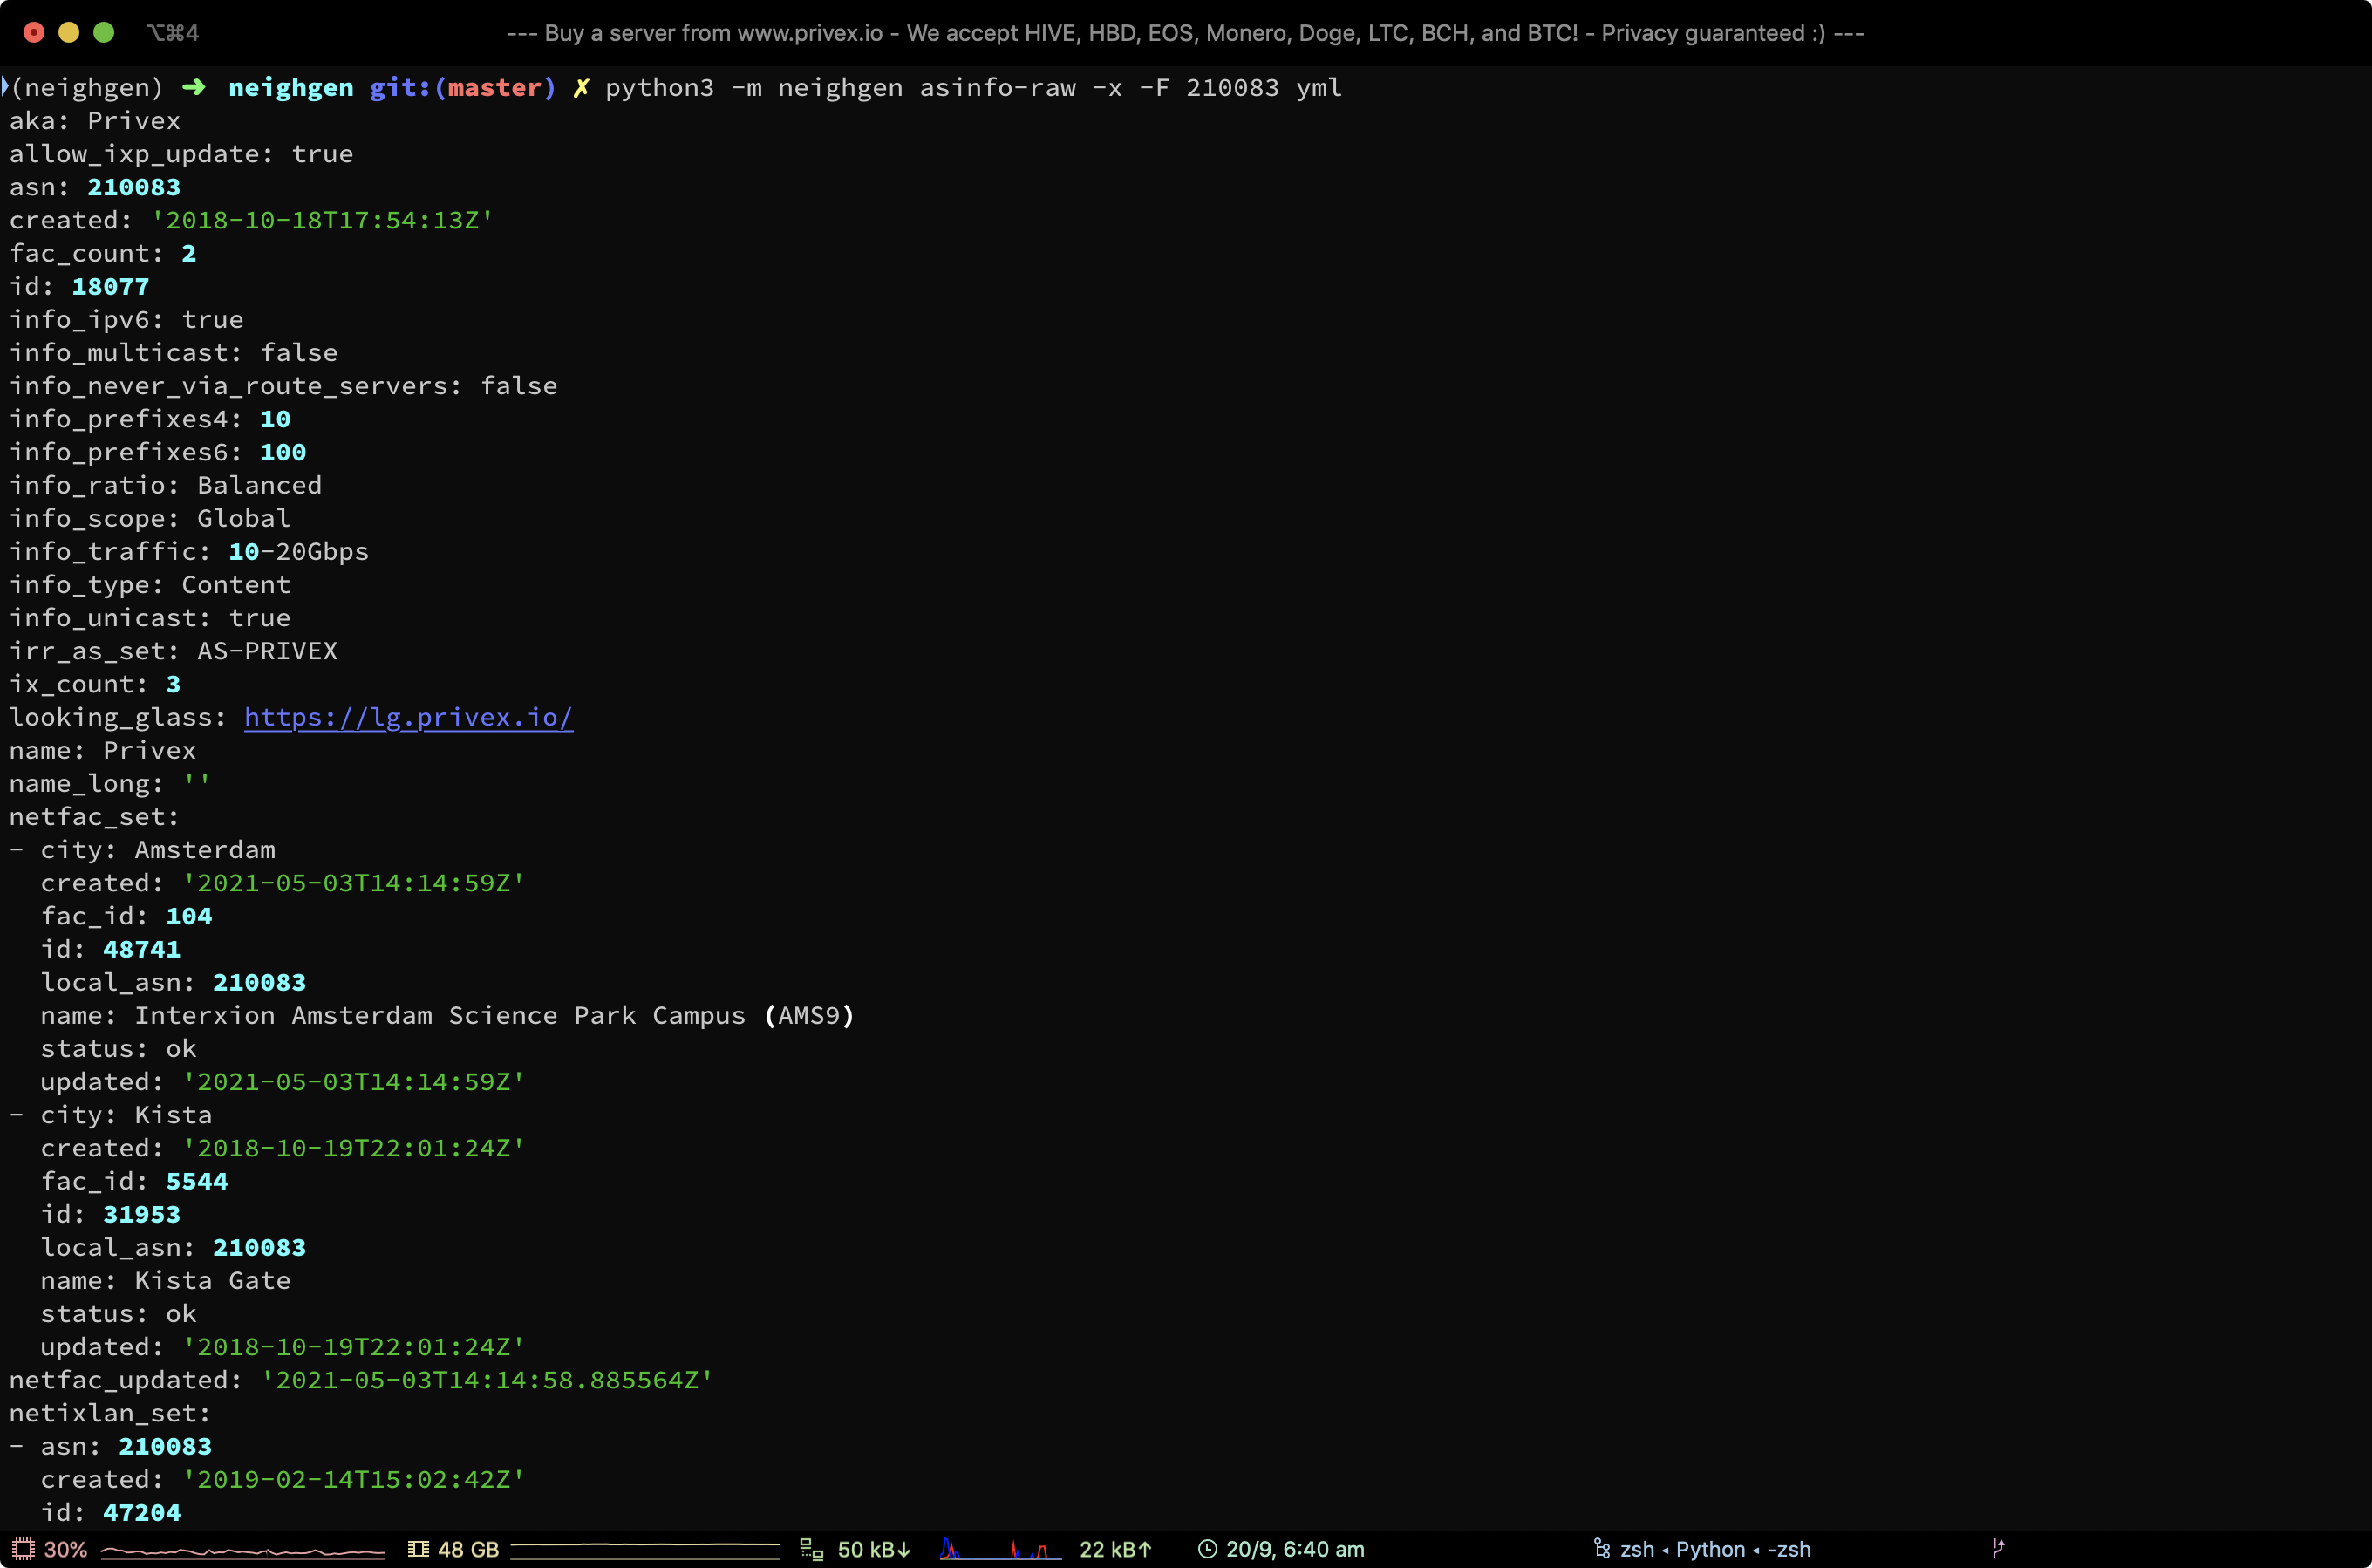
Screenshot of ASINFO-RAW command - same as previous example, but with YML output mode instead of JSON.
Command used:
python3 -m neighgen asinfo-raw -x -F 210083 yml
# Alternative if you have neighgen installed from pip:
neighgen asinfo-raw -x -F 210083 yml
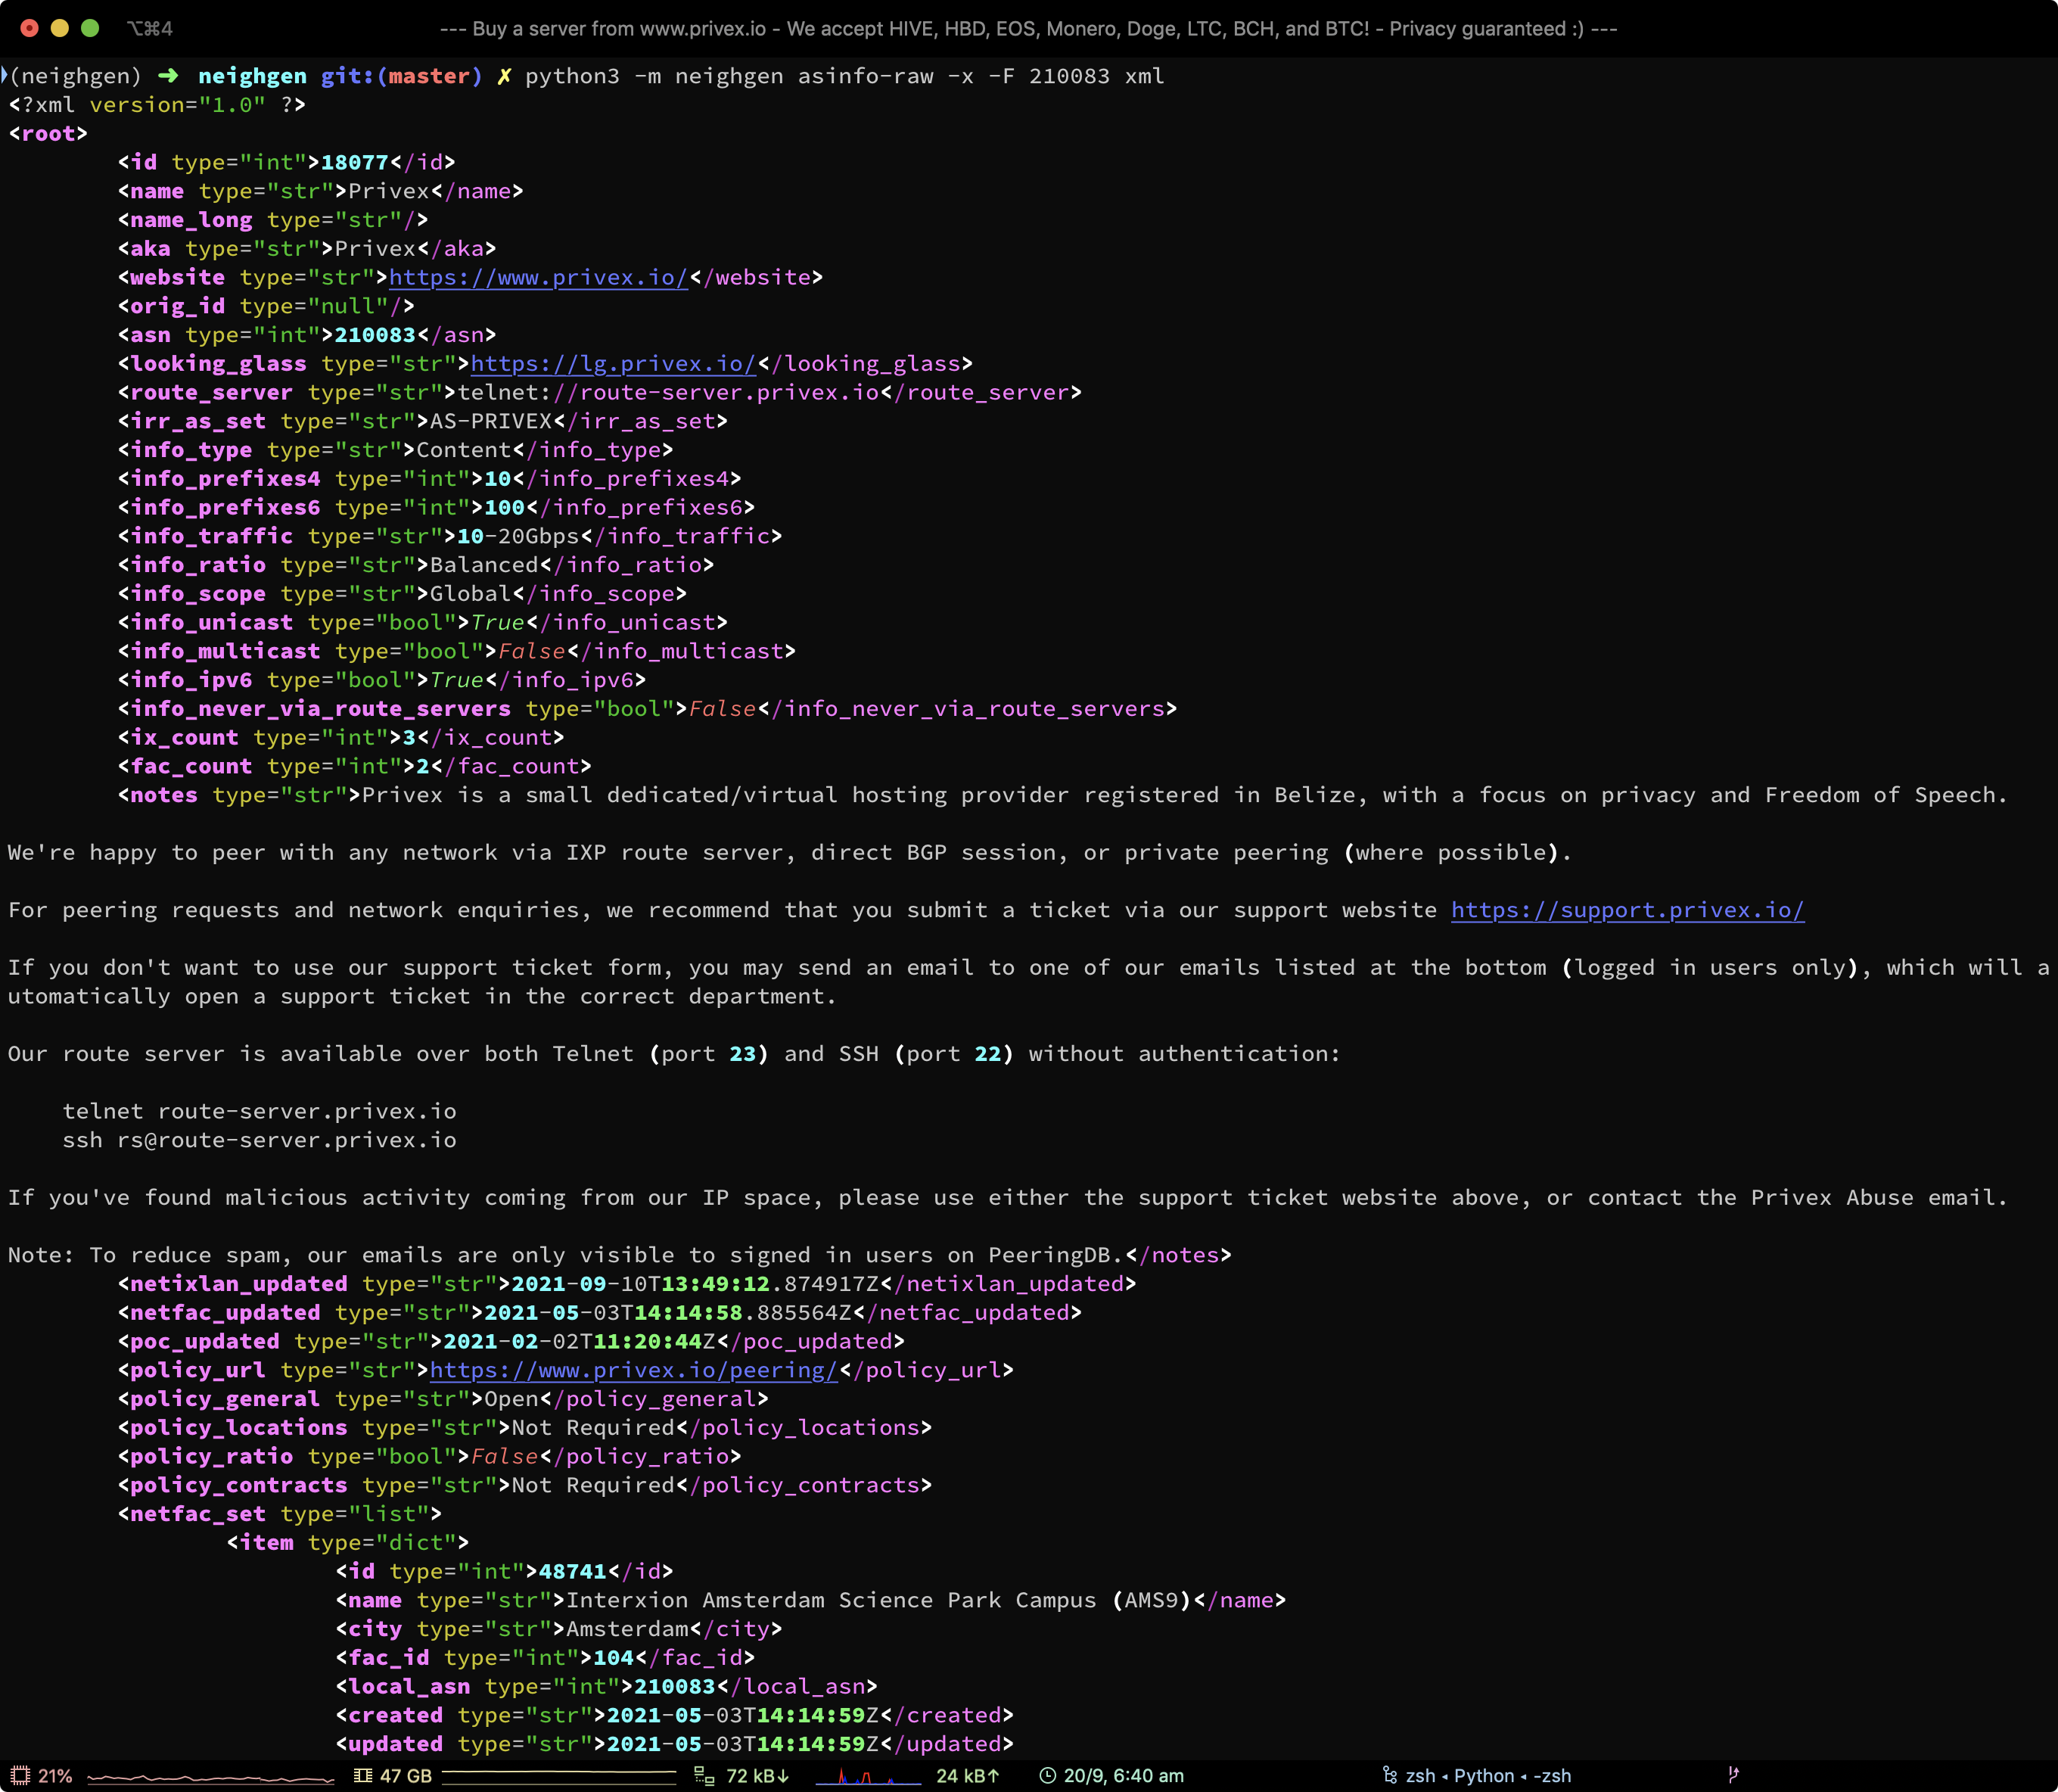
Screenshot of ASINFO-RAW command - same as previous example, but with XML output mode instead of JSON.
Command used:
python3 -m neighgen asinfo-raw -x -F 210083 xml
# Alternative if you have neighgen installed from pip:
neighgen asinfo-raw -x -F 210083 xml
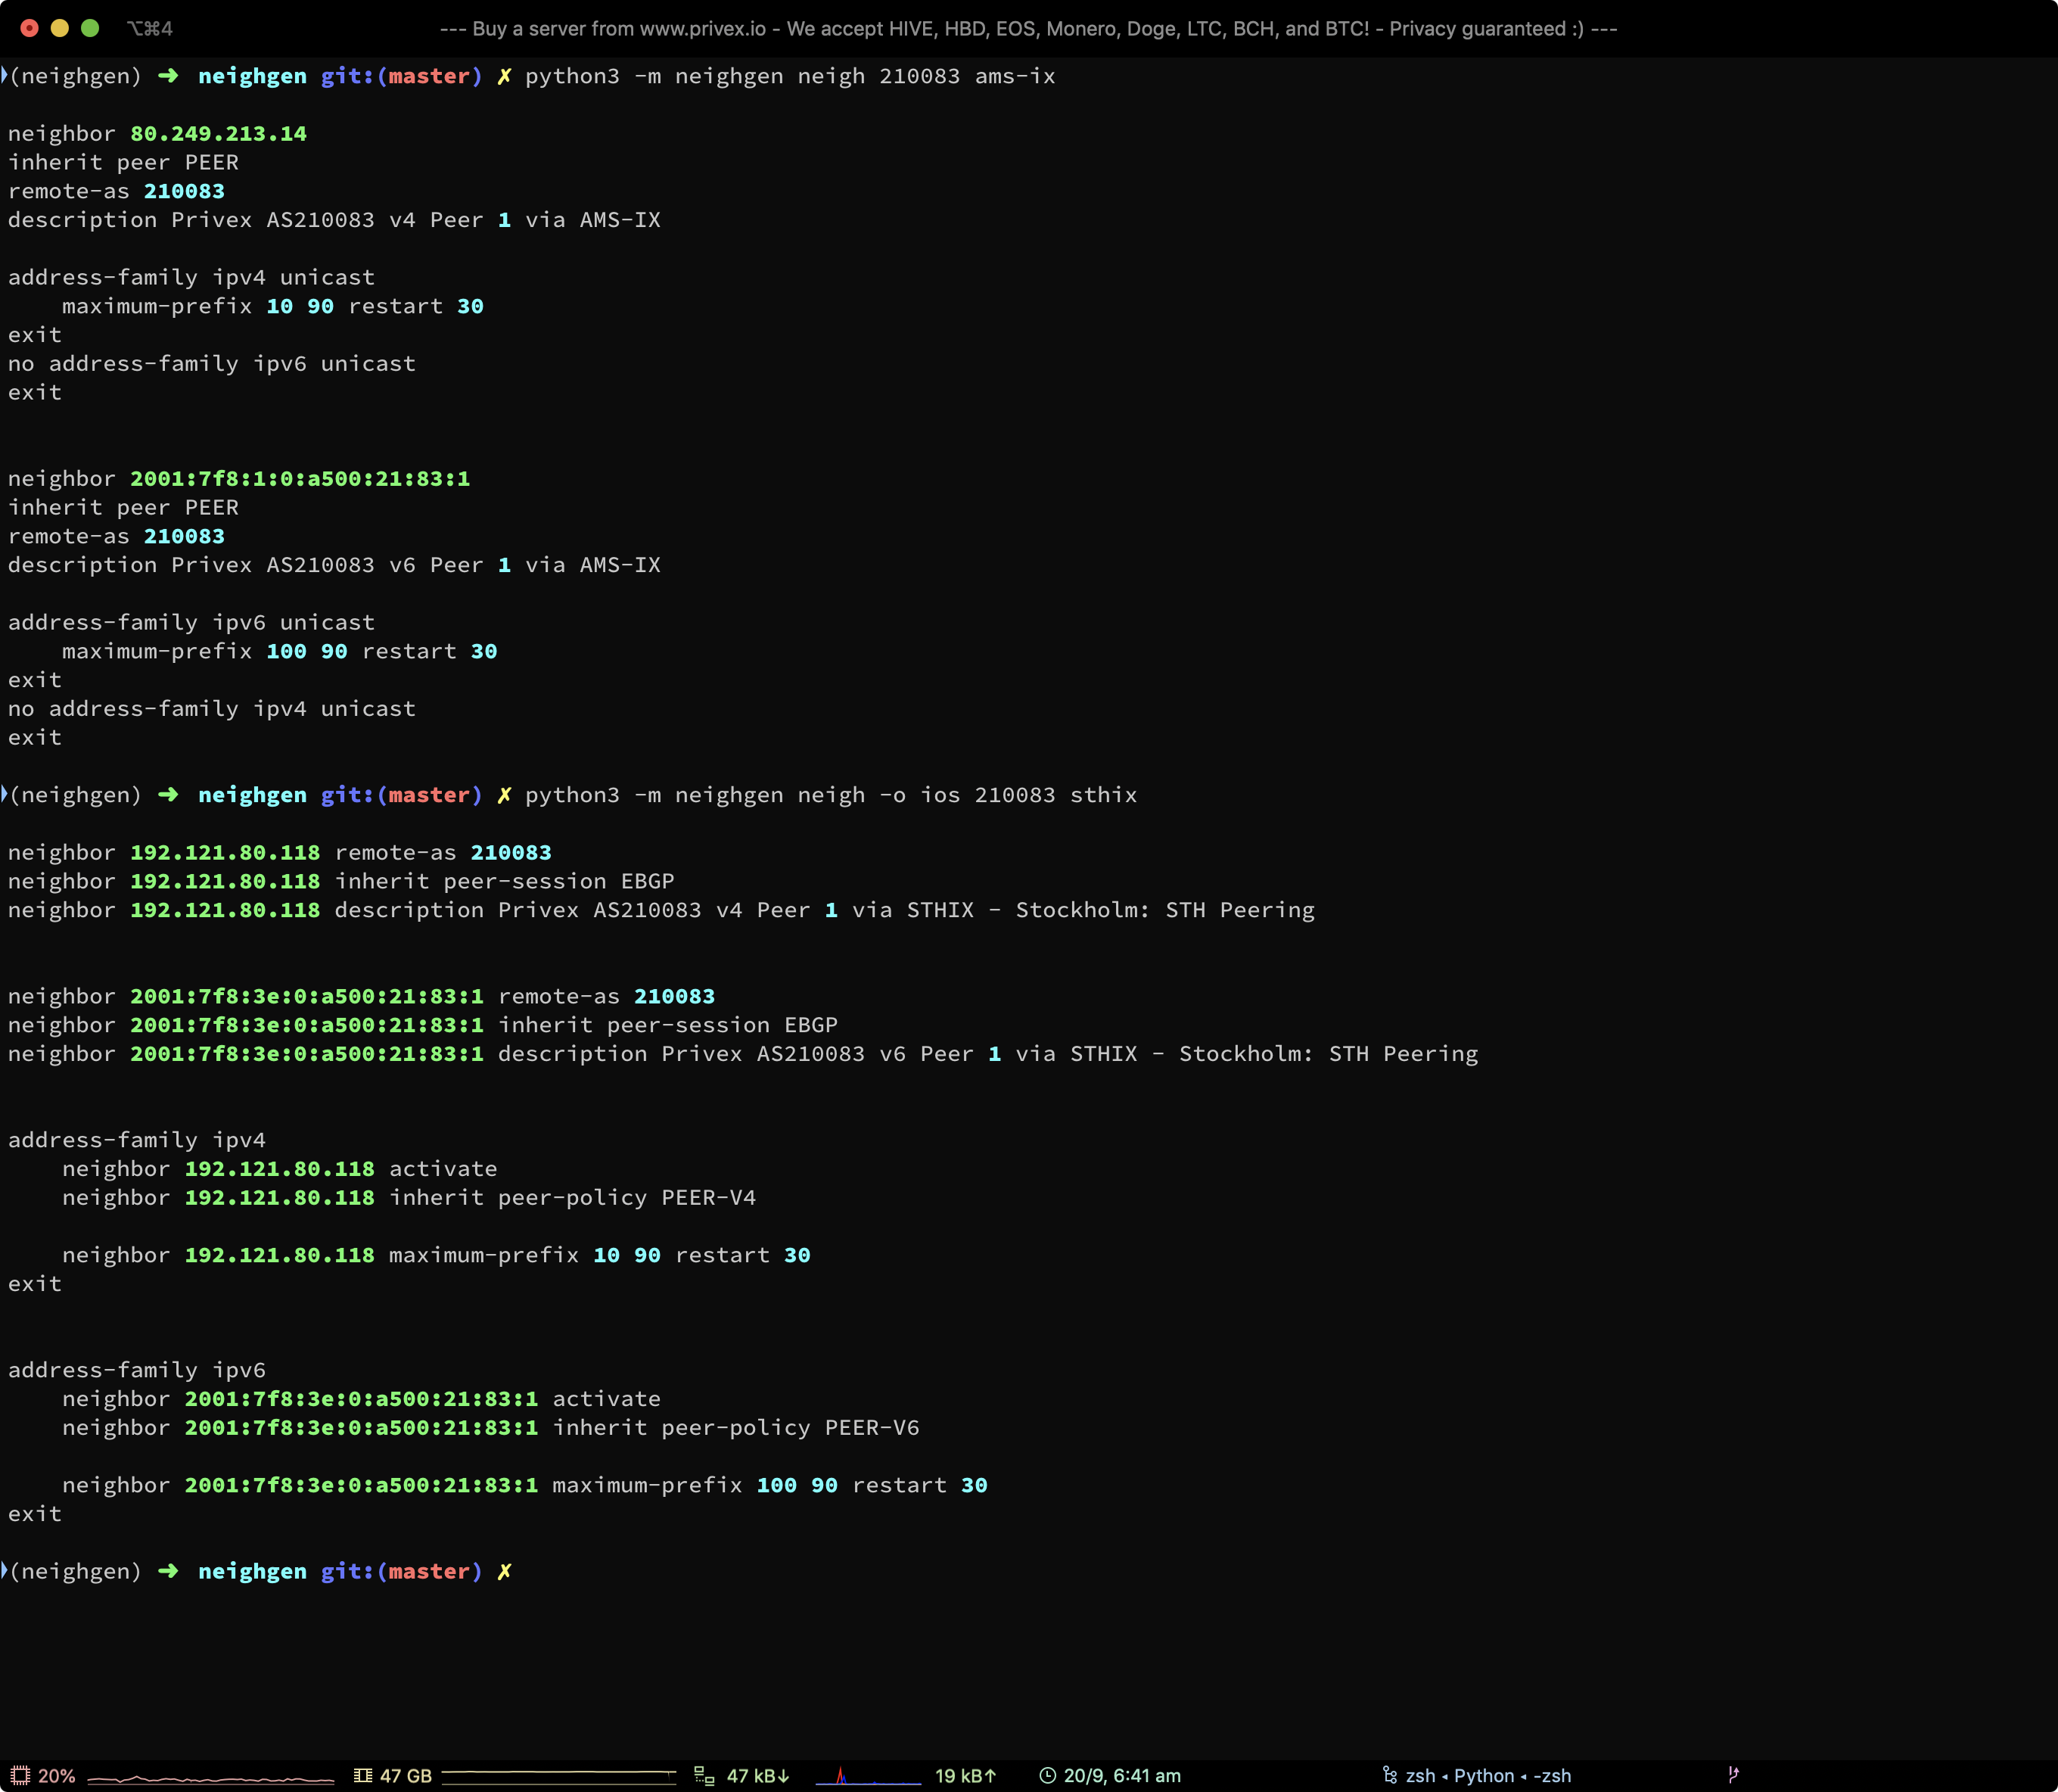
Screenshot of NEIGH command, showing both NX-OS and IOS generated config.
The generated config can be pasted into the CLI of a Cisco device running NX-OS or IOS.
There are various CLI arguments and YML config options available to customise the generated config, such as enabling/disabling peer template/policy/session, or changing the names they refer to.
Command used:
python3 -m neighgen neigh 210083 ams-ix
python3 -m neighgen neigh -o ios 210083 sthix
# Alternative if you have neighgen installed from pip:
neighgen neigh 210083 ams-ix
neighgen neigh -o ios 210083 sthix
Thanks for reading!
If this project has helped you, consider grabbing a VPS or Dedicated Server from Privex.
Prices start at as little as US$0.99/mo (we take cryptocurrency!)
Release history Release notifications | RSS feed

Download files
Download the file for your platform. If you're not sure which to choose, learn more about installing packages.
Source Distribution
Built Distribution
Hashes for privex_neighgen-0.8.0-py3-none-any.whl
| Algorithm | Hash digest | |
|---|---|---|
| SHA256 | 750f89c37ac4f6b826a077a17d1ab54cecb7a84cf71ba371bb448339bc02a2ea |
|
| MD5 | 5c8e4a10a2224cb57972e2e8da75f1bd |
|
| BLAKE2b-256 | 65c30eed93439eab246591999a1ef269d20238637b6002165914b54290f28706 |


