Automated air liquid interface cell culture analysis using deep optical flow.

Project description
Rainbow


Software for automated Air-Liquid Interface cell culture image analysis using deep optical flow. See below for more details.
Table of contents
- Installation
- Usage
- Additional Information
- Examples
- Community Guidelines
- License
- Software Paper
- Our Team
- Acknowledgements
Installation
Rainbow can be installed on Linux, Windows & macOS and supports Python 3.8 and above. We recommend installing and running Rainbow within a virtual environment. Although it is not a requirement, we also recommend installing and running Rainbow on a GPU-enabled system to minimize processing times.
-
Download and install Python (Rainbow was tested using Python version 3.8.10).
-
Launch the terminal (Linux and macOS users) or command prompt (Windows users). The proceeding commands will be entered into the opened window1.
-
(Optional but recommended) Create and activate a virtual environment called 'rainbow-env' in your desired directory:
python -m venv rainbow-env. rainbow-env/bin/activate(Linux and macOS users) orrainbow-env\Scripts\activate.bat(Windows users)python -m pip install -U pip -
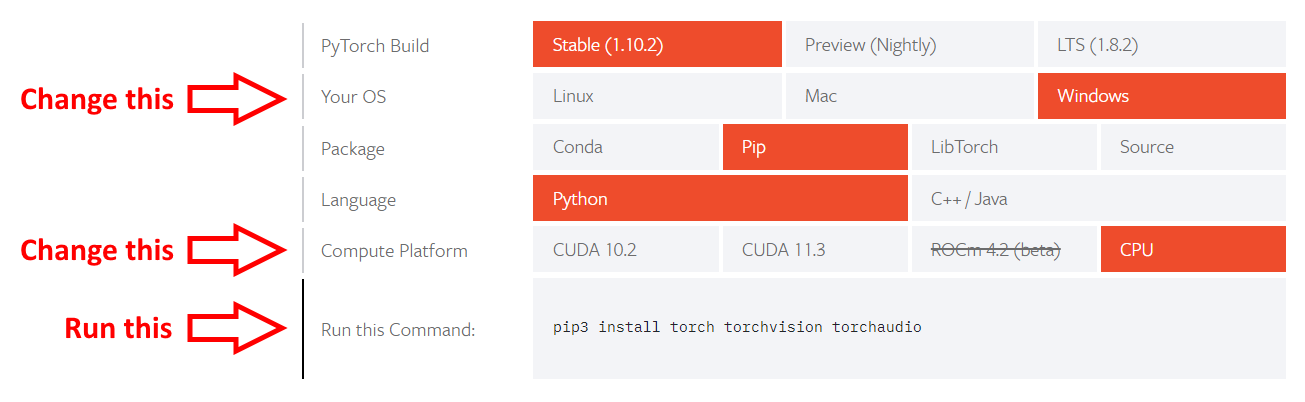
Install PyTorch by specifying your system configuration using the official PyTorch get started tool and running the generated command:
For example, Windows users without a GPU (i.e. CPU only) will run:pip install torch torchvision torchaudio
Next, proceed wth either option A or B.
Option A - Install from PyPI
This is the simplest and fastest way to install Rainbow, recommended for normal users.
-
Install Rainbow:
pip install rainbow-optical-flow
Option B - Install from Source
Developers may wish to install Rainbow from source. Please ensure Git and Git LFS are installed before proceeding.
-
Clone this repository into your desired directory:
git clone https://github.com/AlphonsG/Rainbow-Optical-Flow-For-ALI.git -
Navigate into the cloned directory:
cd Rainbow-Optical-Flow-For-ALI -
Install Rainbow:
pip install -e . -
Finalize the installation by running the following commands:
git submodule sync

git submodule update --init --recursive
Notes:
-
1Confirm the correct python version for Rainbow has been installed using the
python -Vcommand in the terminal. If this command does not report the correct python version, try using thepython3 -vcommand instead. If the second command produces the expected result, replace allpythonandpipcommands in this guide withpython3andpip3, respectively. -
The virtual environment can be deactivated using:
deactivate -
If Rainbow fails to install on Linux, it may be because
wxpythoncould not be built (look for clues in the error messages printed on the terminal e.g. "Running setup.py install for wxpython ... error"). Instead, try installingwxpythonfirst by following these instructions (specifically "Yes, we have Linux Wheels. Sort of.") and then attempt to install Rainbow again viapip install rainbow-optical-flow(option A) orpip install -e .(option B).
Usage
Command Line Interface (CLI)
Once installed, Rainbow can be used through a CLI. Run rainbow --help or rainbow -h (within the rainbow-env environment if applicable) for a list of available command arguments and descriptions.
To test Rainbow using an example Air-Liquid Interface cell culture image series, follow the instructions under option B of the installation procedure (except for step 7) and run the following commands in the terminal:
cd rainbow
rainbow ../examples/example_image_series ../misc/configs/default_config.yaml
After processing is finished, a folder containing similar outputs (e.g. a HTML report, videos, images, CSV files) to those in this example output folder should be generated in this folder.
Graphical User Interface (GUI)
Once installed, Rainbow can be be used through a GUI, which can be launched by running the command rainbow (within the rainbow-env environment if applicable).
To test Rainbow using an example Air-Liquid Interface cell culture image series, follow the instructions under option B of the installation procedure (except for step 7) and run the following commands in the terminal::
cd rainbow
rainbow
Then, in the GUI that opens, select this folder as the input image series and this file as the configuration file in the GUI under 'Required Arguments' and click the 'Start' button. After processing is finished, a folder containing similar outputs (e.g. a HTML report, videos, images, CSV files) to those in this example output folder should be generated in this folder.
Additional Information
Optical Flow
Rainbow uses a deep learning model called GMA to compute the optical flow in an image series. This model can be replaced with any other method for computing optical flow by writing a custom class that implements the base_model interface (gma.py is an example of that).
Analysis
Rainbow can automatically generate an analysis report after computing the optical flow in an image series. A base report file that can be modified is provided here as a Jupyter notebook. The path of a Jupyter notebook needs to specified in the config for automatic report generation (default provided).
Scripts
The scripts folder contains python scripts to enable additional functionality such as the ability to combine reports from multiple experiments into one file for simpler viewing and comparisons. Run python <script-name>.py --help in the terminal to view the usage instructions for a script.
Automated Testing
To perform and check the status of the automated tests locally, run the command pytest in the terminal, with Rainbow installed, from the root directory of this repository after cloning.
Examples
Examples of some of the data generated by Rainbow can be seen below.
Raw Image Series (left) and Rainbow Optical Flow Visualisation (Right)

Magnitude Heatmaps (Left) and Quiver Plots (Right) Across Image Series

Experimental Methods
Primary tracheobronchial epithelial cells were isolated through trans‐laryngeal, non‐bronchoscopic cytologic brushings via an endotracheal tube from two children (3.3 and 4.1 years), as previously described (Looi et al., 2018; Martinovich et al., 2017). The use of tracheobronchial epithelial cells for these studies were approved by the Human Research Ethics Committees of St John of God Hospital and The University of Western Australia. Cells were imaged (20x objective) on day 2 post air-lift for 2.5 hrs every 8 mins with a Nikon C2+ inverted microscope incubated at 37° C with humidified 95% air/5% CO2 using an Okolab live cell imaging chamber to generate time lapse images of maximally migrating cells as previously described (Park et al., 2015; Mitchel et al., 2020). The example image series provided in this repository contains 20 image frames at 1280 x 1024 px resolution.
References
Looi,K. et al. (2018) Effects of human rhinovirus on epithelial barrier integrity and function in children with asthma. Clinical & Experimental Allergy, 48, 513–524.
Martinovich,K.M. et al. (2017) Conditionally reprogrammed primary airway epithelial cells maintain morphology, lineage and disease specific functional characteristics. Scientific Reports, 7, 17971.
Mitchel,J.A. et al. (2020) In primary airway epithelial cells, the unjamming transition is distinct from the epithelial-to-mesenchymal transition. Nature Communications, 11, 5053. Park,J.-A. et al. (2015) Unjamming and cell shape in the asthmatic airway epithelium. Nature Materials, 14, 1040–1048.
Community guidelines
Guidelines for third-parties wishing to:
- Contribute to the software
- Report issues or problems with the software
- Seek support
can be found here.
License
Software Paper
Title
Rainbow: Automated Air-Liquid Interface Cell Culture Analysis Using Deep Optical Flow
Access
https://joss.theoj.org/papers/10.21105/joss.04080
Our Team
Acknowledgements
Release history Release notifications | RSS feed

Download files
Download the file for your platform. If you're not sure which to choose, learn more about installing packages.
Source Distribution
Built Distribution
Hashes for rainbow-optical-flow-2022.4.6.tar.gz
| Algorithm | Hash digest | |
|---|---|---|
| SHA256 | 18f5456160a9961a7d6d07f6caf281683d8664417f7d5d3fae6d438e6320dced |
|
| MD5 | a699b80935ae68a590855a4bab84a1bc |
|
| BLAKE2b-256 | e13f38286861b96a3a2dd22e5a7ad9aaeed952d639481dcf03a03f3f948f1790 |
Hashes for rainbow_optical_flow-2022.4.6-py3-none-any.whl
| Algorithm | Hash digest | |
|---|---|---|
| SHA256 | 8fce38a6a7d77f3b2a81b2f042267621d6c30dc4b4d499932e85d14750af4492 |
|
| MD5 | 9f2154c6a3305bead0899ba70244bc65 |
|
| BLAKE2b-256 | 659d333eec55e9d0d3e7972bc5ec41318565fb27cb9738000e6168823818ff57 |


