The kwcoco module and cli for image datasets


Project description


Read the docs |
|
Gitlab (main) |
|
Github (mirror) |
|
Pypi |
|
Slides |
https://docs.google.com/presentation/d/1OqljzzaZdjzmMg9876J4wFOmdFlJsH2Lc8_7tcqAPUE/edit |
Blog |
The main webpage for this project is: https://gitlab.kitware.com/computer-vision/kwcoco
The kwcoco package is a Python module and command line utility for reading, writing, modifying, and interacting with computer vision datasets — i.e. images or videos with raster or vector annotations. A dataset is defined using a json file or SQL database that points to assets that exist on disk or on the cloud. The Python API provides a way to efficiently load image data and associated metadata (e.g. for writing torch datasets). The command line application provides a way to quickly summarize, visualize, and perform common modifications (e.g. subset, union) on the data.
The Kitware COCO module defines a variant of the Microsoft COCO format, originally developed for the “collected images in context” object detection challenge. We are backwards compatible with the original module, but we also have improved implementations in several places, including segmentations, keypoints, annotation tracks, multi-spectral images, and videos (which represents a generic sequence of images).
A KWCOCO file is a “manifest” that serves as a single reference that points to all images, categories, and annotations in a computer vision dataset. Thus, when applying an algorithm to a dataset, it is sufficient to have the algorithm take one dataset parameter: the path to the KWCOCO file. Generally a KWCOCO file will live in a “bundle” directory along with the data that it references, and paths in the KWCOCO file will be relative to the location of the KWCOCO file itself.
The main data structure in this model is largely based on the implementation in https://github.com/cocodataset/cocoapi It uses the same efficient core indexing data structures, but in our implementation the indexing can be optionally turned off, functions are silent by default (with the exception of long running processes, which optionally show progress by default). We support helper functions that add and remove images, categories, and annotations.
We have reimplemented the object detection scoring code in the kwcoco.metrics submodule.
The original pycocoutils API is exposed via the kwcoco.compat_dataset.COCO class for drop-in replacement with existing tools that use pycocoutils.
There is some support for kw18 files in the kwcoco.kw18 module.
Installation
The kwcoco. package can be installed via pip:
# From pypi
pip install kwcoco
Feature Overview
At its core kwcoco’s goal is to make it easy to organize, query, manipulate, and distribute image and video datasets. To accomplish this goal it offers several features.
An fast in-memory dictionary-based backend data structure with random access and indexed lookups.
An sqlalchemy backend that supports sqlite3 or postgresql (currently read-only).
Efficient random sampling of image subregions using delayed_image.
A Command Line Interface (CLI) for manipulating / inspecting coco files using scriptconfig.
Transparent coco file compression (e.g. i.e. read from / write to zipfiles)
Support for videos as lists of image frames
Support for multispectral imagery via image assets
Metrics for classification and bounding box object detection (segmentation and polygon object detection coming soon).
Toydata generation for easy CI testing and demos.
Backwards compatibility with the original cocoapi.
The KWCOCO CLI
After installing KWCOCO, you will also have the kwcoco command line tool. This uses a scriptconfig / argparse CLI interface. Running kwcoco --help should provide a good starting point.
usage: kwcoco [-h] [--version] {stats,union,split,show,toydata,eval,conform,modify_categories,reroot,move,validate,subset,grab,info,visual_stats,find_unregistered_images} ...

The Kitware COCO CLI

options:
  -h, --help            show this help message and exit
  --version             show version number and exit (default: False)

commands:
  {stats,union,split,show,toydata,eval,conform,modify_categories,reroot,move,validate,subset,grab,info,visual_stats,find_unregistered_images}
                        specify a command to run
    stats               Compute summary statistics about a COCO dataset
    union               Combine multiple COCO datasets into a single merged dataset.
    split               Split a single COCO dataset into two sub-datasets.
    show                Visualize a COCO image using matplotlib or opencv, optionally writing
    toydata (demodata)  Create COCO toydata for demo and testing purposes.
    eval (eval_detections)
                        Evaluate and score predicted versus truth detections / classifications in a
    conform             Infer properties to make the COCO file conform to different specs.
    modify_categories   Rename or remove categories
    reroot              Reroot image paths onto a new image root.
    move (mv)           Move a kwcoco file to a new location while maintaining relative paths.
    validate            Validates that a coco file satisfies expected properties.
    subset              Take a subset of this dataset and write it to a new file
    grab                Grab standard datasets.
    info (tables)       Print the first few rows from specified tables. Tries to avoid reading the
    visual_stats (plot_stats)
                        Inspect properties of dataset and write raw data tables and visual plots.
    find_unregistered_images
                        Find images in a kwcoco bundle that are not registered in a kwcoco file.
This should help you inspect (via stats and show), combine (via union), and make training splits (via split) using the command line. Also ships with toydata, which generates a COCO file you can use for testing. The kwcoco CLI has tab-complete features, but requires enabling argcomplete.
Toy Data
Don’t have a dataset with you, but you still want to test out your algorithms? Try the KWCOCO shapes demo dataset, and generate an arbitrarily large dataset.
The toydata submodule renders simple objects on a noisy background — optionally with auxiliary channels — and provides bounding boxes, segmentations, and keypoint annotations. The following example illustrates a generated toy image with and without overlaid annotations.
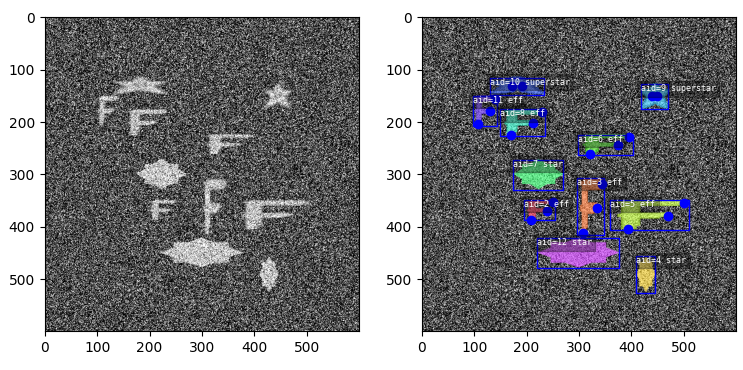
Video data, multispectral, and multi-sensor demo data is supported.
The CocoDataset object
The kwcoco.CocoDataset class is capable of dynamic addition and removal of categories, images, and annotations. Has better support for keypoints and segmentation formats than the original COCO format. Despite being written in Python, this data structure is reasonably efficient.
>>> import kwcoco
>>> import json
>>> # Create demo data
>>> demo = kwcoco.CocoDataset.demo()
>>> # Modify it such that all paths are absolute wrt to your machine
>>> demo.reroot(absolute=True)
>>> # could also use demo.dump / demo.dumps, but this is more explicit
>>> text = json.dumps(demo.dataset)
>>> with open('demo.json', 'w') as file:
>>>    file.write(text)

>>> # Read from disk
>>> self = kwcoco.CocoDataset('demo.json')

>>> # Add data
>>> cid = self.add_category('Cat')
>>> gid = self.add_image('new-img.jpg')
>>> aid = self.add_annotation(image_id=gid, category_id=cid, bbox=[0, 0, 100, 100])

>>> # Remove data
>>> self.remove_annotations([aid])
>>> self.remove_images([gid])
>>> self.remove_categories([cid])

>>> # Look at data
>>> print(ub.urepr(self.basic_stats(), nl=1))
>>> print(ub.urepr(self.extended_stats(), nl=2))
>>> print(ub.urepr(self.boxsize_stats(), nl=3))
>>> print(ub.urepr(self.category_annotation_frequency()))


>>> # Inspect data
>>> import kwplot
>>> kwplot.autompl()
>>> self.show_image(gid=1)

>>> # Access single-item data via imgs, cats, anns
>>> cid = 1
>>> self.cats[cid]
{'id': 1, 'name': 'astronaut', 'supercategory': 'human'}

>>> gid = 1
>>> self.imgs[gid]
{'id': 1, 'file_name': 'astro.png', 'url': 'https://i.imgur.com/KXhKM72.png'}

>>> aid = 3
>>> self.anns[aid]
{'id': 3, 'image_id': 1, 'category_id': 3, 'line': [326, 369, 500, 500]}

# Access multi-item data via the annots and images helper objects
>>> aids = self.index.gid_to_aids[2]
>>> annots = self.annots(aids)

>>> print('annots = {}'.format(ub.urepr(annots, nl=1, sv=1)))
annots = <Annots(num=2)>

>>> annots.lookup('category_id')
[6, 4]

>>> annots.lookup('bbox')
[[37, 6, 230, 240], [124, 96, 45, 18]]

>>> # built in conversions to efficient kwimage array DataStructures
>>> print(ub.urepr(annots.detections.data))
{
    'boxes': <Boxes(xywh,
                 array([[ 37.,   6., 230., 240.],
                        [124.,  96.,  45.,  18.]], dtype=float32))>,
    'class_idxs': np.array([5, 3], dtype=np.int64),
    'keypoints': <PointsList(n=2) at 0x7f07eda33220>,
    'segmentations': <PolygonList(n=2) at 0x7f086365aa60>,
}

>>> gids = list(self.imgs.keys())
>>> images = self.images(gids)
>>> print('images = {}'.format(ub.urepr(images, nl=1, sv=1)))
images = <Images(num=3)>

>>> images.lookup('file_name')
['astro.png', 'carl.png', 'stars.png']

>>> print('images.annots = {}'.format(images.annots))
images.annots = <AnnotGroups(n=3, m=3.7, s=3.9)>

>>> print('images.annots.cids = {!r}'.format(images.annots.cids))
images.annots.cids = [[1, 2, 3, 4, 5, 5, 5, 5, 5], [6, 4], []]
The JSON Spec
A COCO file is a json file that follows a particular spec. It is used for storing computer vision datasets: namely images, categories, and annotations. Images have an id and a file name, which holds a relative or absolute path to the image data. Images can also have auxiliary files (e.g. for depth masks, infrared, or motion). A category has an id, a name, and an optional supercategory. Annotations always have an id, an image-id, and a bounding box. Usually they also contain a category-id. Sometimes they contain keypoints, segmentations. The dataset can also store videos, in which case images should have video_id field, and annotations should have a track_id field.
An implementation and extension of the original MS-COCO API [1].
Dataset Spec:
An informal description of the spec given in: kwcoco/coco_schema_informal.rst.
For a formal description of the spec see the kwcoco/coco_schema.json.
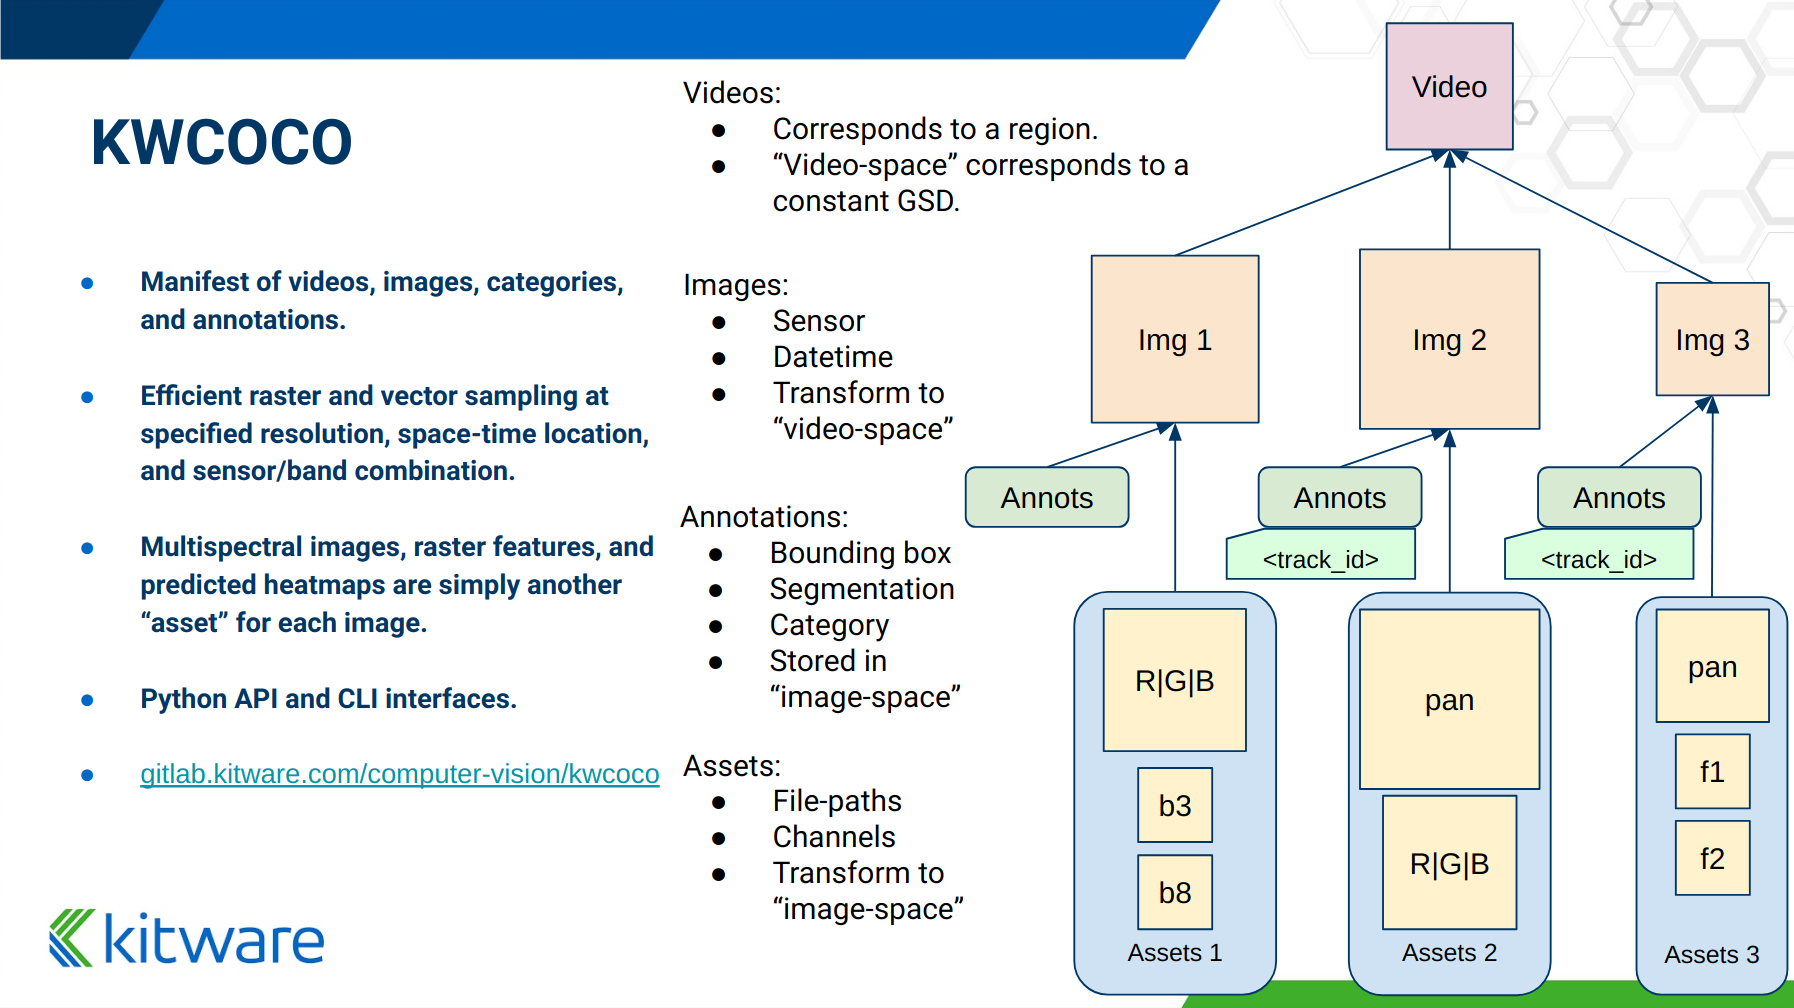
For more information on the “warp” transforms see warping_and_spaces.
A high level overview of the structure - entities and their relationships - is shown in the following overview slide:
The CocoDatset API Grouped by Functionality
The following are grouped attribute/method names of a kwcoco.CocoDataset. See the in-code documentation for further details.
{
    'classmethod': [
        'coerce',
        'demo',
        'from_coco_paths',
        'from_data',
        'from_image_paths',
        'random',
    ],
    'slots': [
        'index',
        'hashid',
        'hashid_parts',
        'tag',
        'dataset',
        'bundle_dpath',
        'assets_dpath',
        'cache_dpath',
    ],
    'property': [
        'anns',
        'cats',
        'cid_to_aids',
        'data_fpath',
        'data_root',
        'fpath',
        'gid_to_aids',
        'img_root',
        'imgs',
        'n_annots',
        'n_cats',
        'n_images',
        'n_videos',
        'name_to_cat',
    ],
    'method(via MixinCocoAddRemove)': [
        'add_annotation',
        'add_annotations',
        'add_category',
        'add_image',
        'add_images',
        'add_video',
        'clear_annotations',
        'clear_images',
        'ensure_category',
        'ensure_image',
        'remove_annotation',
        'remove_annotation_keypoints',
        'remove_annotations',
        'remove_categories',
        'remove_images',
        'remove_keypoint_categories',
        'remove_videos',
        'set_annotation_category',
    ],
    'method(via MixinCocoObjects)': [
        'annots',
        'categories',
        'images',
        'videos',
    ],
    'method(via MixinCocoStats)': [
        'basic_stats',
        'boxsize_stats',
        'category_annotation_frequency',
        'category_annotation_type_frequency',
        'conform',
        'extended_stats',
        'find_representative_images',
        'keypoint_annotation_frequency',
        'stats',
        'validate',
    ],
    'method(via MixinCocoAccessors)': [
        'category_graph',
        'delayed_load',
        'get_auxiliary_fpath',
        'get_image_fpath',
        'keypoint_categories',
        'load_annot_sample',
        'load_image',
        'object_categories',
    ],
    'method(via CocoDataset)': [
        'copy',
        'dump',
        'dumps',
        'subset',
        'union',
        'view_sql',
    ],
    'method(via MixinCocoExtras)': [
        'corrupted_images',
        'missing_images',
        'rename_categories',
        'reroot',
    ],
    'method(via MixinCocoDraw)': [
        'draw_image',
        'imread',
        'show_image',
    ],
}
Converting your RGB data to KWCOCO
Assuming you have programmatic access to your dataset you can easily convert to a coco file using process similar to the following code:
# ASSUME INPUTS
# my_classes: a list of category names
# my_annots: a list of annotation objects with bounding boxes, images, and categories
# my_images: a list of image files.

my_images = [
    'image1.png',
    'image2.png',
    'image3.png',
]

my_classes = [
    'spam', 'eggs', 'ham', 'jam'
]

my_annots = [
    {'image': 'image1.png', 'box': {'tl_x':  2, 'tl_y':  3, 'br_x':  5, 'br_y':  7}, 'category': 'spam'},
    {'image': 'image1.png', 'box': {'tl_x': 11, 'tl_y': 13, 'br_x': 17, 'br_y': 19}, 'category': 'spam'},
    {'image': 'image3.png', 'box': {'tl_x': 23, 'tl_y': 29, 'br_x': 31, 'br_y': 37}, 'category': 'eggs'},
    {'image': 'image3.png', 'box': {'tl_x': 41, 'tl_y': 43, 'br_x': 47, 'br_y': 53}, 'category': 'spam'},
    {'image': 'image3.png', 'box': {'tl_x': 59, 'tl_y': 61, 'br_x': 67, 'br_y': 71}, 'category': 'jam'},
    {'image': 'image3.png', 'box': {'tl_x': 73, 'tl_y': 79, 'br_x': 83, 'br_y': 89}, 'category': 'spam'},
]

# The above is just an example input, it is left as an exercise for the
# reader to translate that to your own dataset.

import kwcoco
import kwimage

# A kwcoco.CocoDataset is simply an object that manages an underlying
# `dataset` json object. It contains methods to dynamically, add, remove,
# and modify these data structures, efficient lookup tables, and many more
# conveniences when working and playing with vision datasets.
my_dset = kwcoco.CocoDataset()

for catname in my_classes:
    my_dset.add_category(name=catname)

for image_path in my_images:
    my_dset.add_image(file_name=image_path)

for annot in my_annots:
    # The index property provides fast lookups into the json data structure
    cat = my_dset.index.name_to_cat[annot['category']]
    img = my_dset.index.file_name_to_img[annot['image']]
    # One quirk of the coco format is you need to be aware that
    # boxes are in <top-left-x, top-left-y, width-w, height-h> format.
    box = annot['box']
    # Use kwimage.Box to perform quick, reliable, and readable
    # conversions between common bounding box formats.
    ltrb = [box['tl_x'], box['tl_y'], box['br_x'], box['br_y']]
    xywh = kwimage.Box.coerce(ltrb, format='ltrb').to_coco()
    my_dset.add_annotation(bbox=xywh, image_id=img['id'], category_id=cat['id'])

# Dump the underlying json `dataset` object to a file
my_dset.fpath = 'my-converted-dataset.mscoco.json'
my_dset.dump(my_dset.fpath, newlines=True)

# Dump the underlying json `dataset` object to a string
print(my_dset.dumps(newlines=True))
KWCOCO Spaces
There are 3 spaces that a user of kwcoco may need to be concerned with depending on their dataset: (1) video space, (2) image space, and (3) asset/auxiliary space.
Videos can contain multiple images, images can contain multiple asset/auxiliary items, and kwcoco needs to know about any transformation that relates between different levels in this hierarchy.
Video space - In a sequence of images, each individual image might be at a different resolution, or misaligned with other images in the sequence. This space is only important when working with images in “video” sequences.
Image space - If an image contains multiple auxiliary / asset items, this is the space that they are all re sampled to at the “image level”. Note all annotations on images should always be given in image space by convention.
Auxiliary / Asset Space - This is the native space/resolution of the raster image data that lives on disk that KWCOCO points to. When an image consists of only a single asset. This space is only important when an image contains multiple files at different resolutions.
When an item is registered in a space. (i.e. you register a video, image, or auxiliary/asset item), kwcoco will benefit from knowing (1) the width/height of the object in it’s own space, and any transformation from that object to it’s parent space — i.e. an auxiliary/asset item needs to know how to be transformed into image space, and an image needs to know how to be transformed into video space (if applicable). This warping can be as simple as a scale factor or as complex as a full homography matrix (and we may generalize beyond this), and is specified via the TransformSpec. When this transform is unspecified it is assumed to be the identity transform, so for pre-aligned datasets, the user does not need to worry about the differentiation between spaces and simply work in “image space”.
Converting your Multispectral Multiresolution Data to KWCOCO
KWCOCO has the ability to work with multispectral images. More generally, a KWCOCO image can contain any number of “raster assets”. The motivating use case is multispectral imagery, but this also incorporates more general use cases where rasters can represent metadata from a depth sensor, or stereo images, etc.
Put plainly, a KWCOCO image can consist of multiple image files, and each of those image file can have any number of channels. Furthermore, these image files do not need to have the same resolution. However, the channels within a single image currently must be unique.
Because images can be in different resolutions, we need to bring up the topic of “KWCOCO spaces”. For full info on this, see the discussion on “KWCOCO spaces”, but briefly, there are 3 spaces that a user of kwcoco needs to be concerned with: (1) video space, (2) image space, and (3) asset/auxiliary space, and KWCOCO will want to know how.
As a simple example, lets assume you have a dataset containing sequences of RGB images, corresponding infrared images, depth estimations, and optical flow estimations. The infrared images are stored in half-resolution of the RGB images, but the depth and flow data is at the same resolution as the RGB data. The RGB images have 3 channels the flow images have 2 channels, and depth and ir have 1 channel.
If our images on disk look like:
- video1/vid1_frame1_rgb.tif
- video1/vid1_frame1_ir.tif
- video1/vid1_frame1_depth.tif
- video1/vid1_frame1_flow.tif
- video1/vid1_frame2_rgb.tif
- video1/vid1_frame2_ir.tif
- video1/vid1_frame2_depth.tif
- video1/vid1_frame2_flow.tif
- video1/vid1_frame3_rgb.tif
- video1/vid1_frame3_ir.tif
- video1/vid1_frame3_depth.tif
- video1/vid1_frame3_flow.tif
We can add them to a custom kwcoco file using the following code.
First, lets’s actually make dummy data for those images on disk.
import numpy as np
import kwimage
import ubelt as ub
num_frames = 3
num_videos = 1
width, height = 64, 64

bundle_dpath = ub.Path('demo_bundle').ensuredir()
for vidid in range(1, num_videos + 1):
    vid_dpath = (bundle_dpath / f'video{vidid}').ensuredir()
    for frame_num in range(1, num_frames + 1):
        kwimage.imwrite(vid_dpath / f'vid{vidid}_frame{frame_num}_rgb.tif', np.random.rand(height, width, 3))
        kwimage.imwrite(vid_dpath / f'vid{vidid}_frame{frame_num}_ir.tif', np.random.rand(height // 2, width // 2))
        kwimage.imwrite(vid_dpath / f'vid{vidid}_frame{frame_num}_depth.tif', np.random.rand(height, width, 1))
        kwimage.imwrite(vid_dpath / f'vid{vidid}_frame{frame_num}_flow.tif', np.random.rand(height, width, 2))
Now lets create a kwcoco dataset to register them. We use the channel spec to denote what the channels are.
import ubelt as ub
import os
bundle_dpath = ub.Path('demo_bundle')

import kwcoco
import kwimage
dset = kwcoco.CocoDataset()
dset.fpath = bundle_dpath / 'data.kwcoco.json'

# We will define a map from our suffix codes in the filename to
# kwcoco channel specs that indicate the number of channels
channel_spec_mapping = {
   'rgb': 'red|green|blue',  # rgb is 3 channels
   'flow': 'fx|fy',  # flow is 2 channels
   'ir': 'ir',
   'depth': 'depth',
}

for video_dpath in bundle_dpath.glob('video*'):
   # Add a video and give it a name.
   vidid = dset.add_video(name=video_dpath.name)

   # Parse out information that we need from the filenames.
   # Lots of different ways to do this depending on the use case.
   assets = []
   for fpath in video_dpath.glob('*.tif'):
       _, frame_part, chan_part = fpath.stem.split('_')
       frame_index = int(frame_part[5:])
       assets.append({
           'frame_num': frame_index,
           'channels': channel_spec_mapping[chan_part],
           'fpath': fpath,
       })

   # Group all data from the same frame together.
   frame_to_group = ub.group_items(assets, lambda x: x['frame_num'])
   for frame_index, group in frame_to_group.items():
       # Let us lookup data by channels
       chan_to_item = {item['channels']: item for item in group}
       # Grab the RGB data as it will be our "primary" asset
       rgbdata = chan_to_item['red|green|blue']

       # Use the prefix for the image name
       name = rgbdata['fpath'].stem.split('_rgb')[0]

       height, width = kwimage.load_image_shape(rgbdata['fpath'])[0:2]

       # First add the base image. We will add this image as
       # without a file_name because all of its data will be stored
       # in its auxiliary list. We will assume all images in the
       # video are aligned, so we set `warp_img_to_vid` to be the
       # identity matrix.
       gid = dset.add_image(
           name=name, width=width, height=height,
           warp_img_to_vid=kwimage.Affine.eye().concise())

       # We could have constructed the auxiliary item dictionaries
       # explicitly and added them in the previous step, but we
       # will use the CocoImage api to do this instead.
       coco_img = dset.coco_image(gid)

       for item in group:
           fpath = item['fpath']
           height, width = kwimage.load_image_shape(fpath)[0:2]
           file_name = os.fspath(fpath.relative_to(bundle_dpath))
           coco_img.add_auxiliary_item(
               file_name=file_name, channels=item['channels'], width=width,
               height=height)

# We can always double check we did not make errors using kwcoco validate
dset.validate()
Now we have a multispectral multi-resolution dataset. You can load specific subsets of channels (in specific subregions is your data is stored in the COG or a RAW format) using the delayed load interface.
# Get a coco image.
gid = 1
coco_img = dset.coco_image(gid)

# Tell delayed load what channels we want. We can
# also specify which "space" we want to load it in.
# Note: that when specifying channels from multiple asset items
# it is not possible to sample in the the auxiliary / asset space
# so only image and video are allowed there.
delayed_img = coco_img.imdelay('fx|depth|red', space='image')

# We finalize the data to load it
imdata = delayed_img.finalize()

# We can show it if we want, but it's just random data.
import kwplot
kwplot.autompl()
kwplot.imshow(imdata)
Somewhat more interesting is to use the KWCOCO demodata. We can see here that videos can contain multiple images at different resolutions and each image can contain different number of channels.
import kwcoco
import kwarray
import kwimage
dset = kwcoco.CocoDataset.demo('vidshapes8-msi-multisensor')

gid = 1
coco_img = dset.coco_image(gid)

# Randomly select 3 channels to use
avail_channels = coco_img.channels.fuse().as_list()
channels = '|'.join(kwarray.shuffle(avail_channels)[0:3])
print('channels = {!r}'.format(channels))

delayed_img = coco_img.imdelay(channels, space='video')

imdata = delayed_img.finalize()

# Depending on the sensor intensity might be out of standard ranges,
# we can use kwimage to robustly normalize for this. This lets
# us visualize data with false color.
canvas = kwimage.normalize_intensity(imdata, axis=2)
canvas = np.ascontiguousarray(canvas)

# We can draw the annotations on the image, but be cognizant of the spaces.
# Annotations are always in "image" space, so if we loaded in "video" space
# then we need to warp to that.
imgspace_dets = dset.annots(gid=gid).detections
vidspace_dets = imgspace_dets.warp(coco_img.warp_vid_from_img)

canvas = vidspace_dets.draw_on(canvas)

import kwplot
kwplot.autompl()
kwplot.imshow(canvas)
The result of the above code is (note the data is random, so it may differ on your machine):

Key notes to takeaway:
KWCOCO can register many assets at different resolutions, register groups depicting the same scene at a particular time into an “image”, and then groups of images can be grouped into “videos”.
Annotations are always specified in image space
Channel code within a single image should never be duplicated.
The KWCOCO Channel Specification
To summarize kwcoco.ChannelSpec and kwcoco.FusedChannelSpec represent a set of channels or bands in an image. A FusedChannelSpec could be as simple as red|green|blue, or more complex like: red|green|blue|nir|swir16|swir22 and a ChannelSpec can be a collection of one or more FusedChannelSpecs separated by a comma.
The home of the channel specification has moved to delayed_image. See the delayed image channel spec docs for more details.


