A library to control dynamixel AX-12+ servos with python

Project description

PyAX-12
Copyright (c) 2010,2015 Jeremie DECOCK (http://www.jdhp.org)
Online documentation: http://pyax-12.readthedocs.org
Source code: https://github.com/jeremiedecock/pyax12
Issue tracker: https://github.com/jeremiedecock/pyax12/issues
PyAX-12 on PyPI: https://pypi.python.org/pypi/pyax12
In collaboration with http://www.vorobotics.com
Description
PyAX-12 is an open source lightweight Python library to control Dynamixel AX-12+ actuators.
Note:
This project is still in beta stage, so the API is not finalized yet.
Dependencies
Python >= 3.0
PyAX-12 is tested to work with Python 3.4 under Gnu/Linux (Debian 8), MacOSX (Mavericks 10.9) and Windows (7). Any Python 3.X version under recent Gnu/Linux, MaxOSX and Windows systems should suit too.
PyAX-12 can also be run on Raspberry Pi through the GPIO connector.
Python-serial is the only dependency required to install PyAX-12.
Note:
If you use pip to install PyAX-12, Python-serial will be automatically downloaded and installed (see the following install section).
Installation
Gnu/Linux
You can install, upgrade, uninstall PyAX-12 with these commands (in a terminal):
pip install --pre pyax12
pip install --upgrade pyax12
pip uninstall pyax12
Or, if you have downloaded the PyAX-12 source code:
python3 setup.py install
Windows
You can install, upgrade, uninstall PyAX-12 with these commands (in a command prompt):
py -m pip install --pre pyax12
py -m pip install --upgrade pyax12
py -m pip uninstall pyax12
Or, if you have downloaded the PyAX-12 source code:
py setup.py install
MacOSX
You can install, upgrade, uninstall PyAX-12 with these commands (in a terminal):
pip install --pre pyax12
pip install --upgrade pyax12
pip uninstall pyax12
Or, if you have downloaded the PyAX-12 source code:
python3 setup.py install
Hardware setup
Official AX-12 documentation (archive).
Connecting AX-12 actuators to a computer (including Raspberry Pi computers) through USB port
The USB2Dynamixel can be used to connect AX-12 actuators to your computer. Actually, any FTDI serial/USB converter device should do the job.
For more information on USB2Dynamixel setup, check the official documentation.
Connecting AX-12 actuators to a Raspberry Pi through GPIO port
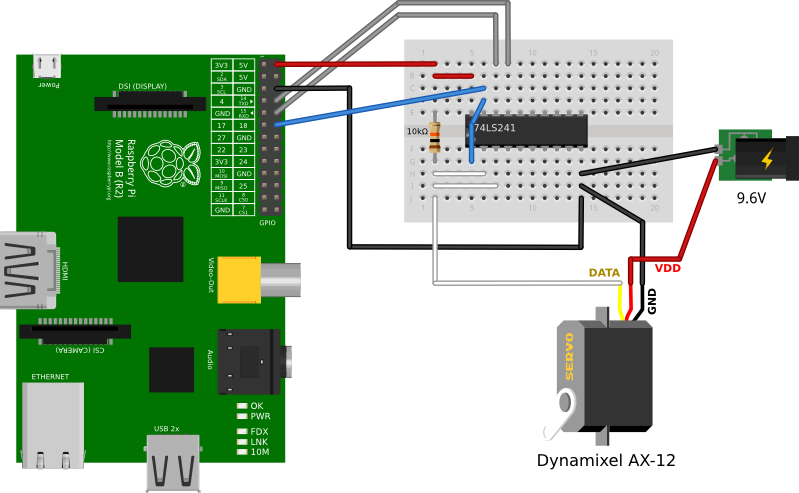
A small electronic circuit is needed to convert Raspberry Pi UART signals (on RX and TX pins) to the half-duplex ones required by Dynamixels (see this archive).
The chips that converts full-duplex into half-duplex are either 74HC126/74HC04 or 74LS241.
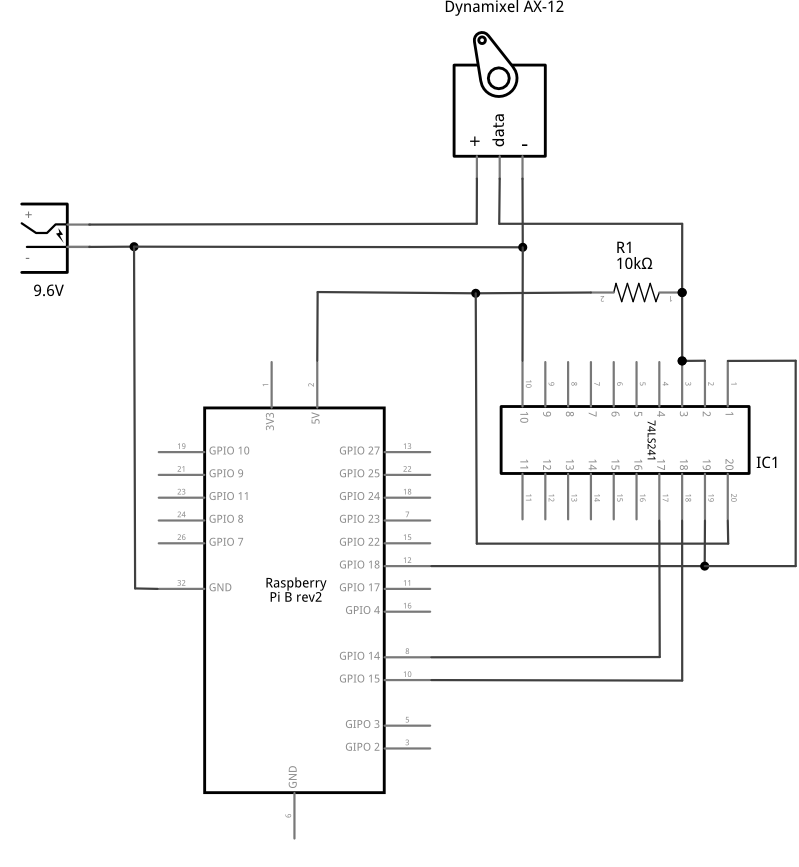
Control Dynamixel AX-12 with the 74LS241
Here are the schematics of the electronic circuit required to control Dynamixel AX-12 with the 74LS241.
Additional explanation can be found on the following pages:
http://www.oppedijk.com/robotics/control-dynamixel-with-raspberrypi
http://memememememememe.me/post/the-dynamixel-ax-12a-servos/
http://robottini.altervista.org/dynamixel-ax-12a-and-arduino-how-to-use-the-serial-port
http://savageelectronics.blogspot.fr/2011/01/arduino-y-dynamixel-ax-12.html
A PCB by Thiago Hersan is freely available here:
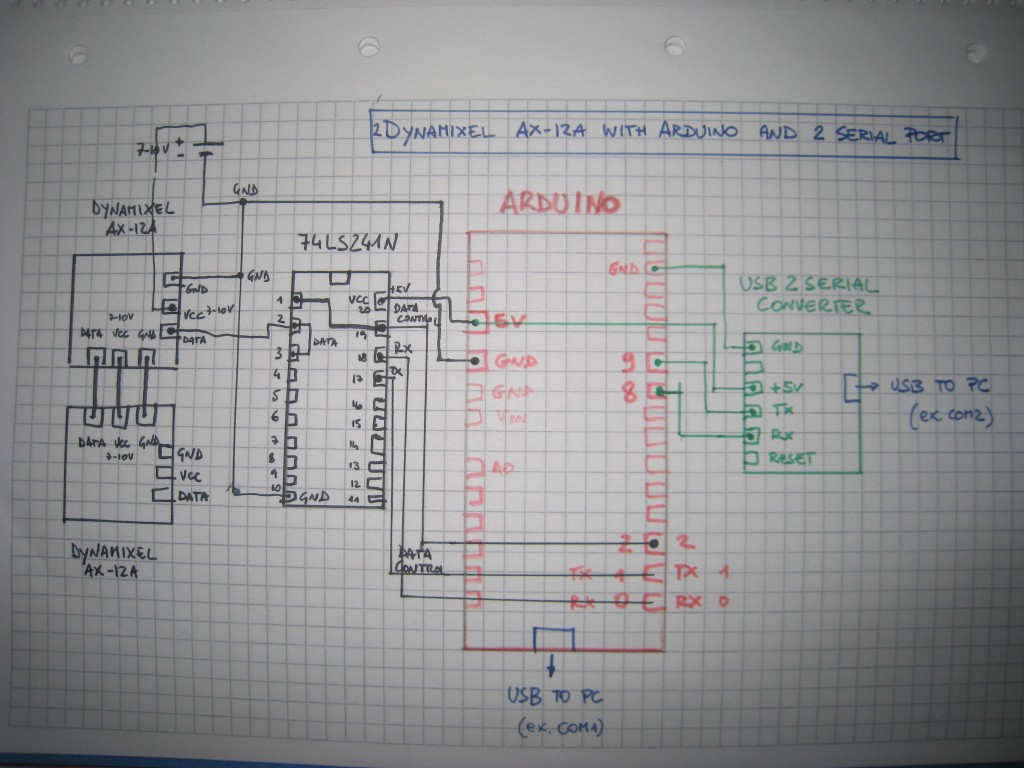
For other schematics, check the following pages:
http://memememememememe.me/assets/posts/the-dynamixel-ax-12a-servos/uart_half-duplex_74LS241.jpg
https://circuits.io/circuits/267189-ax-12-driver-for-raspberry-pi/#schematic
http://robottini.altervista.org/wp-content/uploads/2011/12/Dynamixel-Arduino-electric-schema-1024x768.jpg (this one doesn’t link pins 3 and 20 by a resistor)
Control Dynamixel AX-12 with the 774HC126/74HC04
For the 74HC126/74HC04, check the following page:
Robotis support (archive)
UART configuration
Increasing the bandwidth up to 1Mbps may require a special setup (not tested yet):
Otherwise keeping the bandwidth to 57600bps should work out of the box (make sure you use the right Dynamixel ID and the Dynamixel bandwidth is properly setup to 56700bps).
Additional information
See also: https://github.com/jeremiedecock/raspberry-pi-python-snippets/tree/master/dynamixel_ax12
Documentation
Online Documentation: http://pyax-12.readthedocs.org
API Documentation: http://pyax-12.readthedocs.org/en/latest/api.html
Example usage
In the following examples, the dynamixel_id, port and baudrate values should be adapted depending on your configuration:
for Linux users:
the port value should be something like
“/dev/ttyS0”, “/dev/ttyS1”, … if you use an actual serial port
“/dev/ttyUSB0”, “/dev/ttyUSB1”, … if you use an USB to serial adapter (like the USB2Dynamixel adapter)
the baudrate value should be the same than the one configured in Dynamixel units
for Windows users:
the port value should be something like “COM2”, “COM3”, … (see the COM port configuration in the Windows device manager)
the baudrate value should be the same than the one configured in the Dynamixel units and the Windows device manager (i.e. check the COM port configuration in the Windows device manager)
for MacOSX users:
the port value should be something like “/dev/tty.usbserial-XXX” if you use an USB to serial adapter like the USB2Dynamixel adapter
the baudrate value should be the same than the one configured in Dynamixel units
for Raspberry Pi users:
if you want to control AX-12 actuators through GPIO connector, don’t forget to set rpi_gpio to True in the Connection constructor (check the first following example)
the port value should be “/dev/ttyAMA0”
If you use the USB2Dynamixel device, make sure its switch is set on “TTL”.
Some other examples are available in the examples directory.
Ping a Dynamixel
This snippet prints True if the specified Dynamixel unit is connected and available at the given baudrate; otherwise it prints False.
from pyax12.connection import Connection

# Connect to the serial port
serial_connection = Connection(port="/dev/ttyUSB0", baudrate=57600)

dynamixel_id = 3

# Ping the third dynamixel unit
is_available = serial_connection.ping(dynamixel_id)

print(is_available)

# Close the serial connection
serial_connection.close()
Raspberry Pi users who connected AX-12 actuators to the GPIO connector should use the following code instead:
from pyax12.connection import Connection

# Connect to the serial port
serial_connection = Connection(port="/dev/ttyAMA0", rpi_gpio=True)

dynamixel_id = 3

# Ping the third dynamixel unit
is_available = serial_connection.ping(dynamixel_id)

print(is_available)

# Close the serial connection
serial_connection.close()
Scan (search available Dynamixel units)
This snippet prints the ID list of connected and available Dynamixel units (at the given baudrate).
from pyax12.connection import Connection

# Connect to the serial port
serial_connection = Connection(port="/dev/ttyUSB0", baudrate=57600)

# Ping the dynamixel unit(s)
ids_available = serial_connection.scan()

for dynamixel_id in ids_available:
    print(dynamixel_id)

# Close the serial connection
serial_connection.close()
Print the control table of the first Dynamixel unit
This snippet prints the control table of the specified Dynamixel unit (i.e. the internal state information of the Dynamixel unit).
from pyax12.connection import Connection

# Connect to the serial port
serial_connection = Connection(port="/dev/ttyUSB0", baudrate=57600)

dynamixel_id = 1

# Print the control table of the specified Dynamixel unit
serial_connection.pretty_print_control_table(dynamixel_id)

# Close the serial connection
serial_connection.close()
This snippet should print something like that:
model_number................. AX-12+
firmware_version............. 24
id........................... 1
baud_rate.................... 57142.9 bps
return_delay_time............ 500 µs
cw_angle_limit............... -150.0° (0)
ccw_angle_limit.............. 150.0° (1023)
max_temperature.............. 70°C
min_voltage.................. 6.0V
max_voltage.................. 14.0V
max_torque................... 1023
status_return_level.......... 2 (respond to all instructions)
input_voltage_alarm_led...... off
angle_limit_alarm_led........ off
overheating_alarm_led........ on
range_alarm_led.............. off
checksum_alarm_led........... off
overload_alarm_led........... on
instruction_alarm_led........ off
input_voltage_alarm_shutdown. off
angle_limit_alarm_shutdown... off
overheating_alarm_shutdown... on
range_alarm_shutdown......... off
checksum_alarm_shutdown...... off
overload_alarm_shutdown...... on
instruction_alarm_shutdown... off
down_calibration............. 46
up_calibration............... 972
torque_enabled............... yes
led.......................... off
cw_compliance_margin......... 0.3° (1)
ccw_compliance_margin........ 0.3° (1)
cw_compliance_slope.......... 9.4° (32)
ccw_compliance_slope......... 9.4° (32)
goal_position................ -0.1° (511)
moving_speed................. 512
torque_limit................. 1023
present_position............. -0.1° (511)
present_speed................ 0
present_load................. 0
present_voltage.............. 12.1V
present_temperature.......... 43°C
registred_instruction........ no
moving....................... no
locked....................... no
punch........................ 32
Move the first Dynamixel unit to various position angles
This snippet moves the first Dynamixel unit to 0°, then -45°, -90°, -135°, -150° (the maximum CW angle), +150° (the maximum CCW angle), +135°, +90°, +45° and finally goes back to 0°.
from pyax12.connection import Connection
import time

# Connect to the serial port
serial_connection = Connection(port="/dev/ttyUSB0", baudrate=57600)

dynamixel_id = 1

# Go to 0°
serial_connection.goto(dynamixel_id, 0, speed=512, degrees=True)
time.sleep(1)    # Wait 1 second

# Go to -45° (45° CW)
serial_connection.goto(dynamixel_id, -45, speed=512, degrees=True)
time.sleep(1)    # Wait 1 second

# Go to -90° (90° CW)
serial_connection.goto(dynamixel_id, -90, speed=512, degrees=True)
time.sleep(1)    # Wait 1 second

# Go to -135° (135° CW)
serial_connection.goto(dynamixel_id, -135, speed=512, degrees=True)
time.sleep(1)    # Wait 1 second

# Go to -150° (150° CW)
serial_connection.goto(dynamixel_id, -150, speed=512, degrees=True)
time.sleep(1)    # Wait 1 second

# Go to +150° (150° CCW)
serial_connection.goto(dynamixel_id, 150, speed=512, degrees=True)
time.sleep(2)    # Wait 2 seconds

# Go to +135° (135° CCW)
serial_connection.goto(dynamixel_id, 135, speed=512, degrees=True)
time.sleep(1)    # Wait 1 second

# Go to +90° (90° CCW)
serial_connection.goto(dynamixel_id, 90, speed=512, degrees=True)
time.sleep(1)    # Wait 1 second

# Go to +45° (45° CCW)
serial_connection.goto(dynamixel_id, 45, speed=512, degrees=True)
time.sleep(1)    # Wait 1 second

# Go back to 0°
serial_connection.goto(dynamixel_id, 0, speed=512, degrees=True)

# Close the serial connection
serial_connection.close()
Bug reports
To search for bugs or report them, please use the PyAX-12 Bug Tracker at:
License
The PyAX-12 library is provided under the terms and conditions of the MIT License.


