A tool for automated EIS analysis by proposing statistically plausible ECMs.


Project description

AutoEIS
What is AutoEIS?
AutoEIS is a Python package that automatically proposes statistically plausible equivalent circuit models (ECMs) for electrochemical impedance spectroscopy (EIS) analysis. The package is designed for researchers and practitioners in the fields of electrochemical analysis, including but not limited to explorations of electrocatalysis, battery design, and investigations of material degradation.
Please be aware that the current version is still under development and has not been formally released. If you find any bugs or have any suggestions, please file an issue or directly submit a pull request. We would greatly appreciate any contributions from the community.
Installation
Follow the instructions below to install AutoEIS and its dependencies:
Install Julia
The official way to install Julia is via juliaup. Juliaup provides a command line interface to automatically install Julia (optionally multiple versions side by side). Working with juliaup is straightforward; Please follow the instructions on its GitHub page.
Julia manual setup (not recommended)
We strongly recommend that you install Julia using juliaup (see Install Julia). If you've already done so, skip this step and go the next. However, if for any reason, you insist on using your own Julia installation, you need to ensure that julia command can be found in your PATH environment variable. You can test this by running the command julia in a terminal (or command prompt on Windows). If an error message appears stating julia is not recognized as an internal or external command, you need to add the path to the Julia executable to your PATH environment variable. You can find instructions on how to do this here.
Install AutoEIS using pip
Open a terminal (or command prompt on Windows) and run the following command:
pip install -U autoeis
Install JAX (skip now, come back only if you encounter errors on Windows)
If you're on Windows, you might need to manually install jaxlib (We recommend that you skip this step for now, and come back only if you encounter any errors while using AutoEIS). For CPU version, run the following command in a command prompt:
pip install "jax[cpu]===0.4.11" -f https://whls.blob.core.windows.net/unstable/index.html --use-deprecated legacy-resolver
For GPU support, use the following command instead:
pip install jax[cuda111] -f https://whls.blob.core.windows.net/unstable/index.html --use-deprecated legacy-resolver
If you encounter any problem running above commands, visit jax-windows-builder repository to find and install a compatible version. You can find more detailed instructions there.
Install Julia dependencies
The circuit generation is done using the Julia package EquivalentCircuits.jl. AutoEIS provides a helper function to automatically install the required Julia dependencies. Open a terminal (or command prompt on Windows) and run the following command:
python -m autoeis install
Note: AutoEIS doesn't pollute your global Julia environment. Instead, it creates a new shared environment called autoeis-VERSION_NUMBER (VERSION_NUMBER is the AutoEIS version) and installs the required packages there. This way, you can safely use AutoEIS without worrying about breaking your existing Julia environment. Shared environments are stored in the ~/.julia/environments directory on Unix-based systems and %USERPROFILE%\.julia\environments on Windows.
Verify the installation
If all steps were completed successfully, you should now be able to use AutoEIS. To confirm that AutoEIS is installed correctly, running the following command in a terminal (or command prompt on Windows) should print the version number:
python -c "import autoeis; print(autoeis.__version__)"
Workflow
The schematic workflow of AutoEIS is shown below:
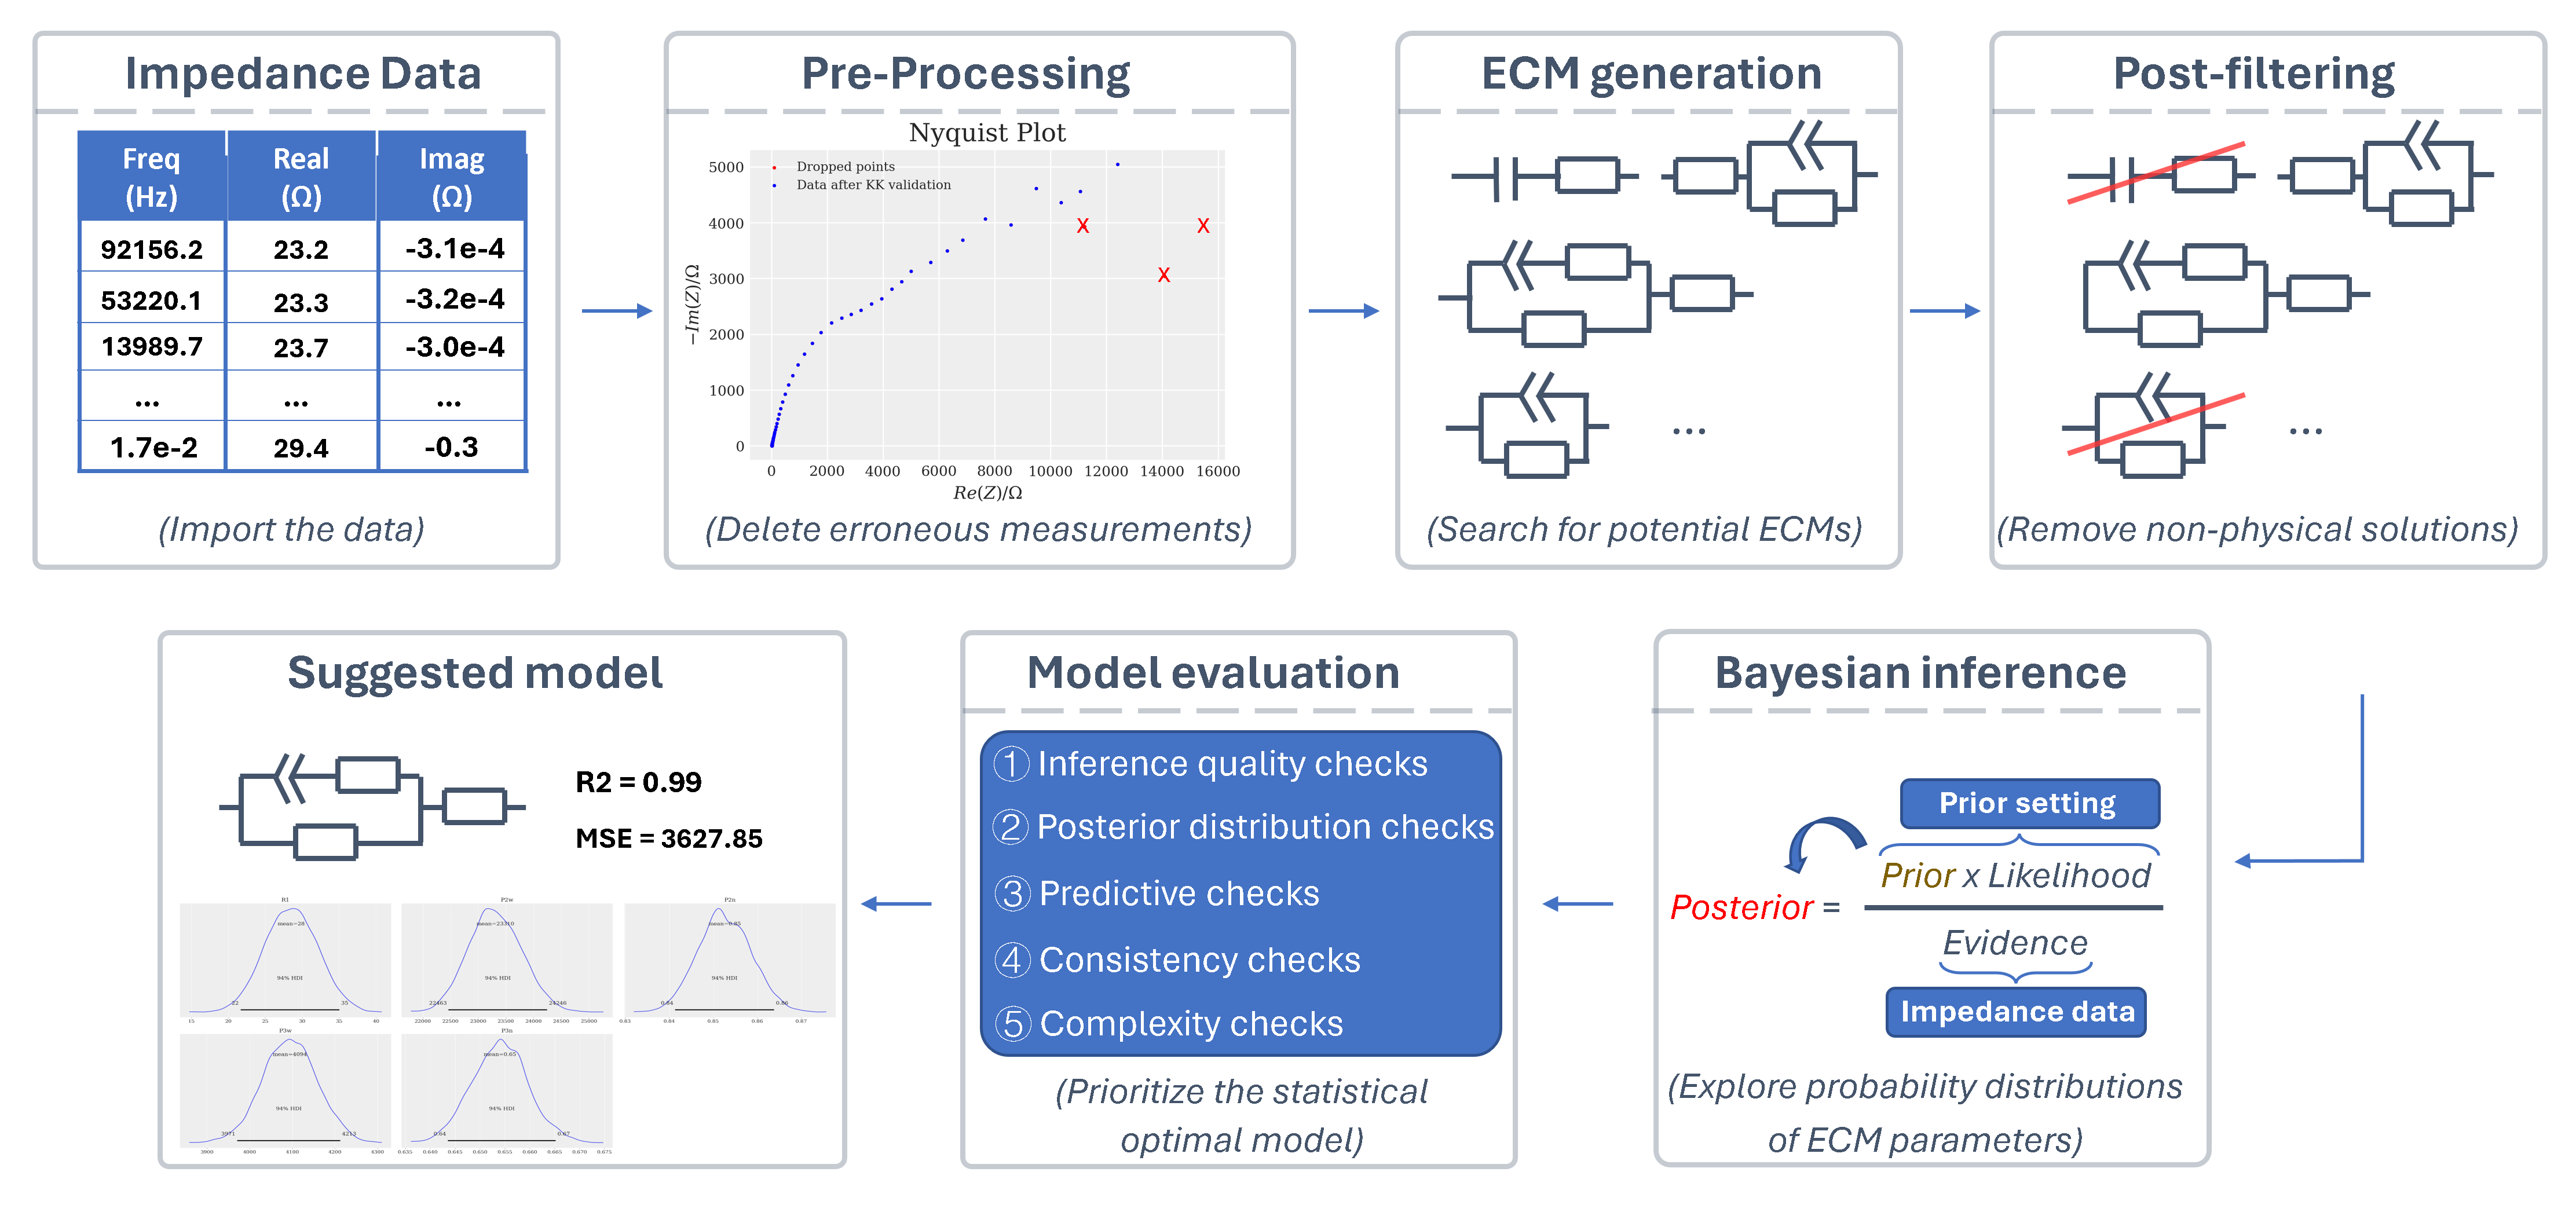
It includes: data pre-processing, ECM generation, circuit post-filtering, Bayesian inference, and the model evaluation process. Through this workflow, AutoEis can prioritize the statistically optimal ECM and also retain suboptimal models with lower priority for subsequent expert inspection. A detailed workflow can be found in the paper.
Usage
To use AutoEIS, you can either perform the circuit generation and Bayesian inference step by step or use the perform_full_analysis function to perform the whole process automatically. The following is an example of how to use the perform_full_analysis function:
import numpy as np
import autoeis as ae

# Load test dataset shipped with AutoEIS
Z, freq = ae.io.load_test_dataset()

# Perform automated EIS analysis
circuits = ae.perform_full_analysis(Z, freq, iters=100, parallel=True)
print(circuits)
Z: Electrochemical impedance measurements (complex array)freq: Frequencies corresponding to the impedance measurementsiters: Numbers of equivalent circuit generation to be performedparallel: Whether to use parallel processing to speed up the analysis
An example notebook that demonstrates how to use AutoEIS can be found here.
Work in progress/known issues
- Refactor the code as it is still in the developmental stage and not yet production-ready.
- Speed up the code; Currently, it takes ~ 4 hours to generate 100 equivalent circuits (your mileage may vary).
- Add proper unit/integration tests.
- Add proper documentation (API, more examples, etc.).
- Add a graphical user interface for a more user-friendly interaction.
Acknowledgement
The authors extend their heartfelt gratitude to the following individuals for their invaluable guidance and support throughout the development of this work: Prof. Jason Hattrick-Simpers, Dr. Robert Black, Dr. Debashish Sur, Dr. Parisa Karimi, Dr. Brian DeCost, Dr. Kangming Li, and Prof. John R. Scully.
The authors also wish to express their sincere appreciation to the following experts for engaging in technical discussions and providing valuable feedback: Dr. Shijing Sun, Prof. Keryn Lian, Dr. Alvin Virya, Dr. Austin McDannald, Dr. Fuzhan Rahmanian, and Prof. Helge Stein.
Special thanks go to Prof. John R. Scully and Dr. Debashish Sur for graciously allowing us to utilize their corrosion data as an illustrative example to showcase the functionality of AutoEIS. Their contributions have been immensely helpful in shaping this research, and their unwavering support is deeply appreciated.
Release history Release notifications | RSS feed


Download files
Download the file for your platform. If you're not sure which to choose, learn more about installing packages.


