Collect data from Hichi Smartmeter and expose it via MQTT

Project description
pysmartmeter


Collect data from Hichi Smartmeter aka volkszaehler.org (USB Version) and expose it via MQTT.
Discussion: https://www.photovoltaikforum.com/thread/188160-pysmartmeter (de)
In the end it can looks like the following Home Assistant dashboard screenshot, using MQTT integration:
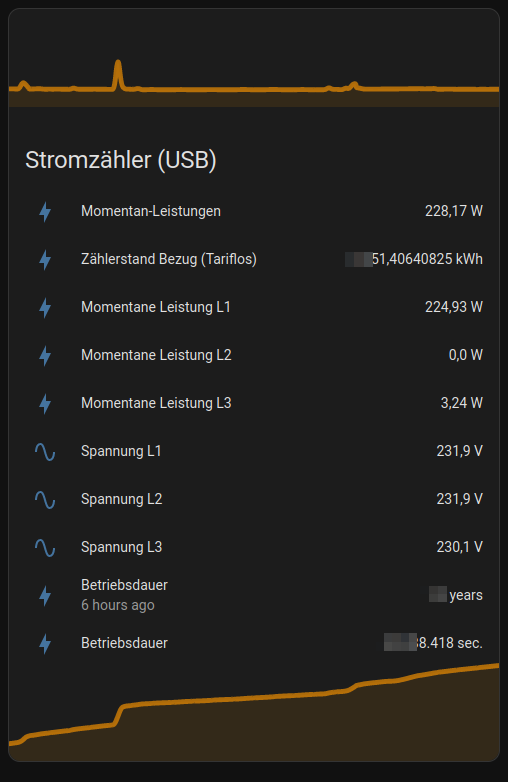
With my "eBZ DD3" energy meter by eBZ GmbH the values update live every second ;)
Currently only energy meters that send OBIS text protocol are supported! (Test this with ./cli.py dump)
TODO: #37 - Add support for SML (Smart Message Language) binary protocol
quickstart
Install minimum requirements, e.g.:
~$ sudo apt install python3-venv
Clone sources and install project:
~$ git clone https://github.com/jedie/pysmartmeter.git
~$ cd pysmartmeter
~/pysmartmeter$ ./cli.py --help
The output of ./cli.py --help looks like:
Usage: ./cli.py [OPTIONS] COMMAND [ARGS]...

╭─ Options ────────────────────────────────────────────────────────────────────────────────────────╮
│ --help      Show this message and exit.                                                          │
╰──────────────────────────────────────────────────────────────────────────────────────────────────╯
╭─ Commands ───────────────────────────────────────────────────────────────────────────────────────╮
│ debug-settings               Display (anonymized) MQTT server username and password              │
│ debug-systemd-service        Just print the systemd service file content                         │
│ detect-serial                Just print the detected serial port instance                        │
│ dump                         Just dump serial output                                             │
│ publish-loop                 Publish current data via MQTT (endless loop)                        │
│ setup-systemd-service        Setup PySmartMeter systemd services and starts it.                  │
│ store-settings               Store MQTT server settings.                                         │
│ systemd-restart              Restart PySmartMeter systemd services                               │
│ systemd-status               Call systemd status of PySmartMeter services                        │
│ systemd-stop                 Stop PySmartMeter systemd services                                  │
│ test-mqtt-connection         Test connection to MQTT Server                                      │
│ version                      Print version and exit                                              │
╰──────────────────────────────────────────────────────────────────────────────────────────────────╯
Test if you Hichi Smartmeter with CP2102 USB to UART Bridge Controller will be found, e.g.:
~/pysmartmeter$ ./cli.py detect-serial
Maybe you didn't have permissions to access the port, e.g.:
~/pysmartmeter$ ./cli.py dump
...
try: /dev/ttyUSB0 CP2102 USB to UART Bridge Controller - CP2102 USB to UART Bridge Controller USB VID:PID=10C4:EA60
/dev/ttyUSB0 file mode: 0o20660
/dev/ttyUSB0 user ID: 0
/dev/ttyUSB0 user group ID: 20
/dev/ttyUSB0 user group: 'dialout'
ERROR: [Errno 13] could not open port /dev/ttyUSB0: [Errno 13] Permission denied: '/dev/ttyUSB0'
...
Fix fiy by add the user to the group, e.g.:
sudo usermod -a -G dialout $USER
publish smartmeter data via MQTT
You have to store your MQTT settings (host, port, username, password) one time, e.g.:
~/pysmartmeter$ ./cli.py store-settings
This will create a JSON file here: ~/.pysmartmeter
You can test reading this settings file with:
~/pysmartmeter$ ./cli.py debug-settings
Test your MQTT settings with:
~/pysmartmeter$ ./cli.py test-mqtt-connection
Setup systemd service:
~/pysmartmeter$ sudo ./cli.py setup-systemd-service
This will create a systemd service that automaticly starts on every boot.
Note: Before you start the systemd service, check if everything works correctly with ./cli.py dump and ./cli.py publish-loop
Otherwise you may start a services that will just deal wie gabage (e.g.: your energy meters speaks no OBIS text protocol) and restarts on and on again ;)
Check if service is running:
~/pysmartmeter$ sudo ./cli.py systemd-status
If everything is fine: Go to your Home Assistant and check the MQTT integration The device discovery will be made automaticly.
Start hacking
~$ git clone https://github.com/jedie/pysmartmeter.git
~$ cd pysmartmeter
~/pysmartmeter$ ./dev-cli.py --help
Usage: ./dev-cli.py [OPTIONS] COMMAND [ARGS]...

╭─ Options ────────────────────────────────────────────────────────────────────────────────────────╮
│ --help      Show this message and exit.                                                          │
╰──────────────────────────────────────────────────────────────────────────────────────────────────╯
╭─ Commands ───────────────────────────────────────────────────────────────────────────────────────╮
│ check-code-style            Check code style by calling darker + flake8                          │
│ coverage                    Run tests and show coverage report.                                  │
│ fix-code-style              Fix code style of all pysmartmeter source code files via darker      │
│ install                     Run pip-sync and install 'pysmartmeter' via pip as editable.         │
│ mypy                        Run Mypy (configured in pyproject.toml)                              │
│ publish                     Build and upload this project to PyPi                                │
│ safety                      Run safety check against current requirements files                  │
│ test                        Run unittests                                                        │
│ tox                         Run tox                                                              │
│ update                      Update "requirements*.txt" dependencies files                        │
│ update-test-snapshot-files  Update all test snapshot files (by remove and recreate all snapshot  │
│                             files)                                                               │
│ version                     Print version and exit                                               │
╰──────────────────────────────────────────────────────────────────────────────────────────────────╯
Backwards-incompatible changes
v0.4.x -> v0.5.x
We split the CLI files into:
./cli.py- Commands for end users./dev-cli.py- Commands for developers
v0.2.x -> v0.3.x
Packages changes:
- We switched from
poetrytopip-tools Makefilewas removed- "Renamed"
cli.shtocli.py
The Makefile is no longer needed, because "Bootstrapping" will be made, just by call cli.py
To migrate, just remove the existing .venv and create a fresh one, e.g.:
~$ cd pysmartmeter
~/pysmartmeter$ git pull origin main
~/pysmartmeter$ rm -Rf .venv
~/pysmartmeter$ ./cli.py --help
various links
- Discussion: https://www.photovoltaikforum.com/thread/188160-pysmartmeter (de)
- https://github.com/pyserial/pyserial
- https://github.com/eclipse/paho.mqtt.python
- https://github.com/eclipse/mosquitto
- https://dewiki.de/Lexikon/OBIS-Kennzahlen (de) | https://www.promotic.eu/en/pmdoc/Subsystems/Comm/PmDrivers/IEC62056_OBIS.htm (en)
- https://www.photovoltaikforum.com/thread/145886-habe-lesk%C3%B6pfe-mit-usb-%C3%BCber/ (de)
- https://www.heise.de/tests/Ausprobiert-Guenstiger-IR-Lesekopf-fuer-Smart-Meter-mit-Tastmota-Firmware-7065559.html (de)
- https://www.home-assistant.io
Release history Release notifications | RSS feed


Download files
Download the file for your platform. If you're not sure which to choose, learn more about installing packages.
Source Distribution
Built Distribution
Hashes for pysmartmeter-0.5.0-py3-none-any.whl
| Algorithm | Hash digest | |
|---|---|---|
| SHA256 | dd925f0a5d92a667ce5d932d96a70a53c47b3572015971106b9e9eae03c15d37 |
|
| MD5 | 8a2ec04bf9fc5a2dc07ea0b6e1ae770d |
|
| BLAKE2b-256 | 9736112a3b29b1efb75aa23617bf745c47cabb03b74e7fef9271465bc9255c9c |


